Little Pink Monsters

  • tutorials
  • Recipes
  • Contact
  • About Me
  • facebook
  • twitter
  • pinterest
  • instagram
  • rss

Doily Print Valentine’s Dress Tutorial (Easy!)

by Natasha on February 4, 2013 in tutorials

IMG_0273

Valentine’s is my favorite holiday and you guys, I’m not gonna lie. It’s not because of the romance, affection or declarations of love. It’s because everything is PINK & RED & it’s just so stinkin’ cute I can’t take it!!

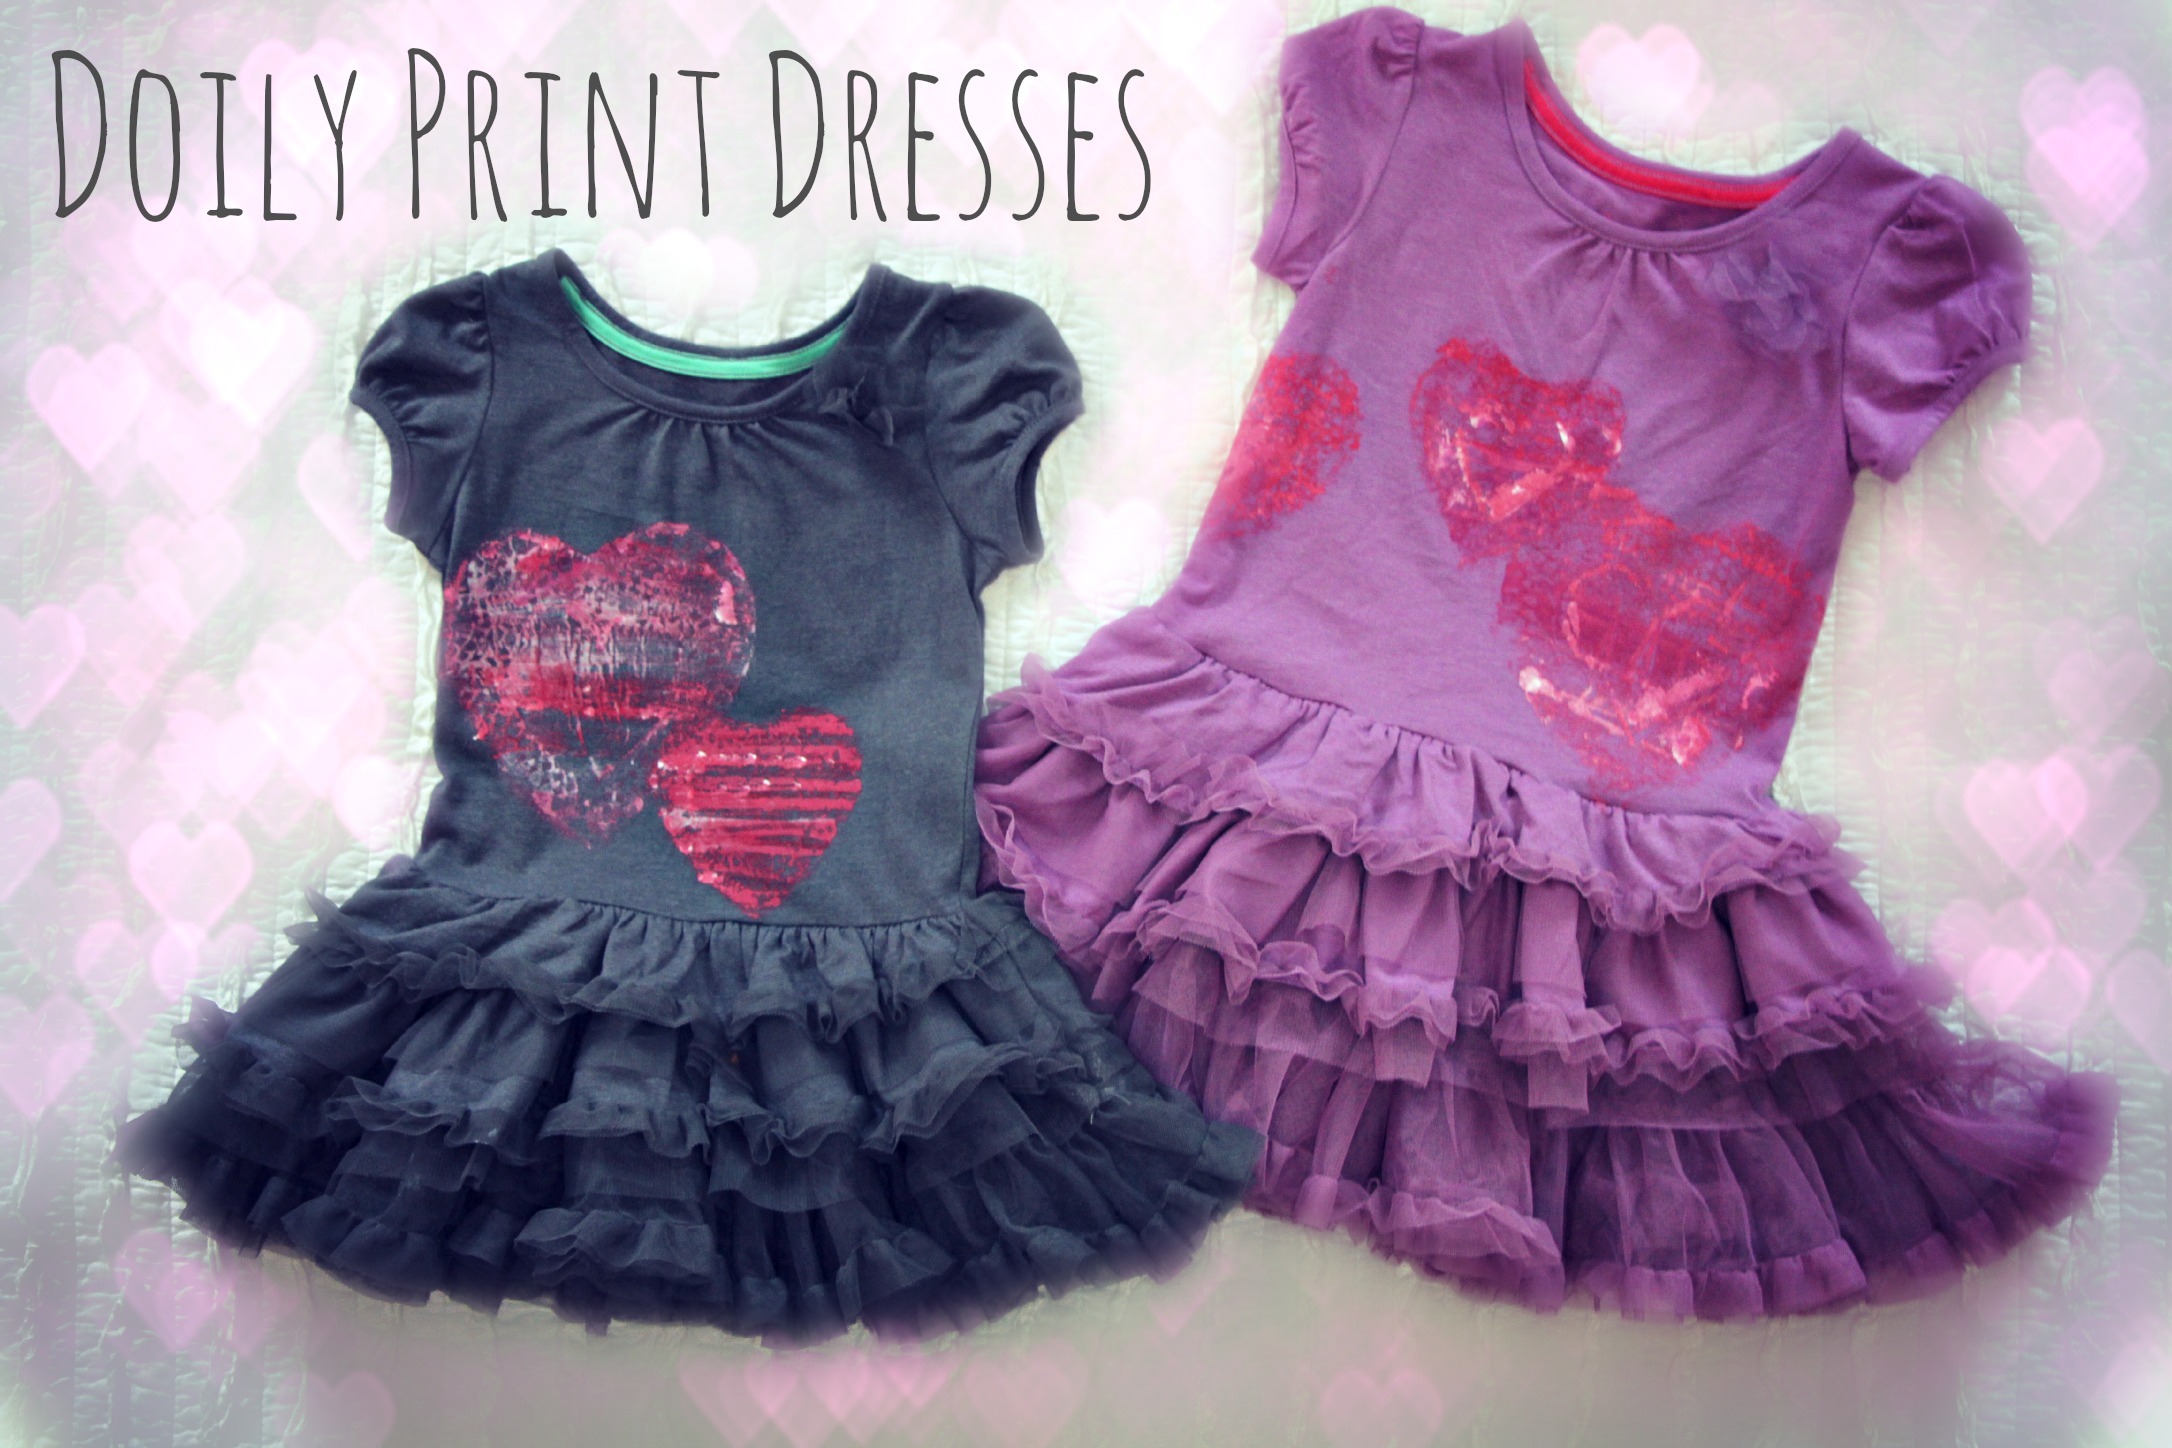
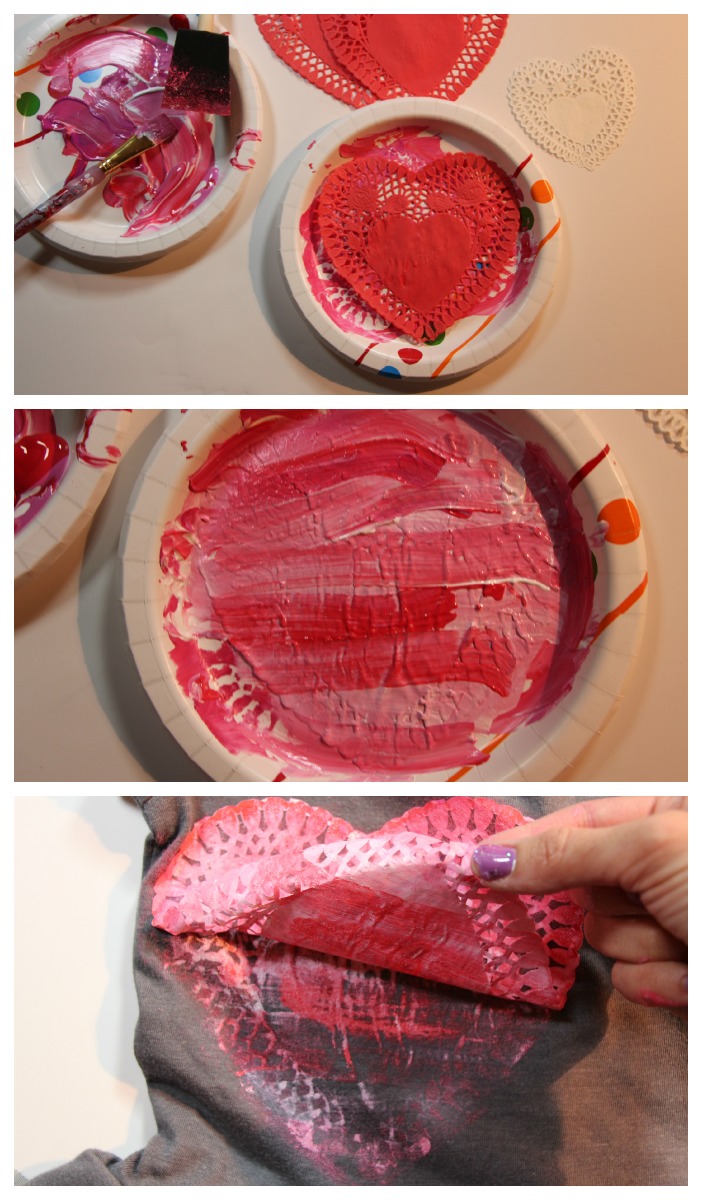
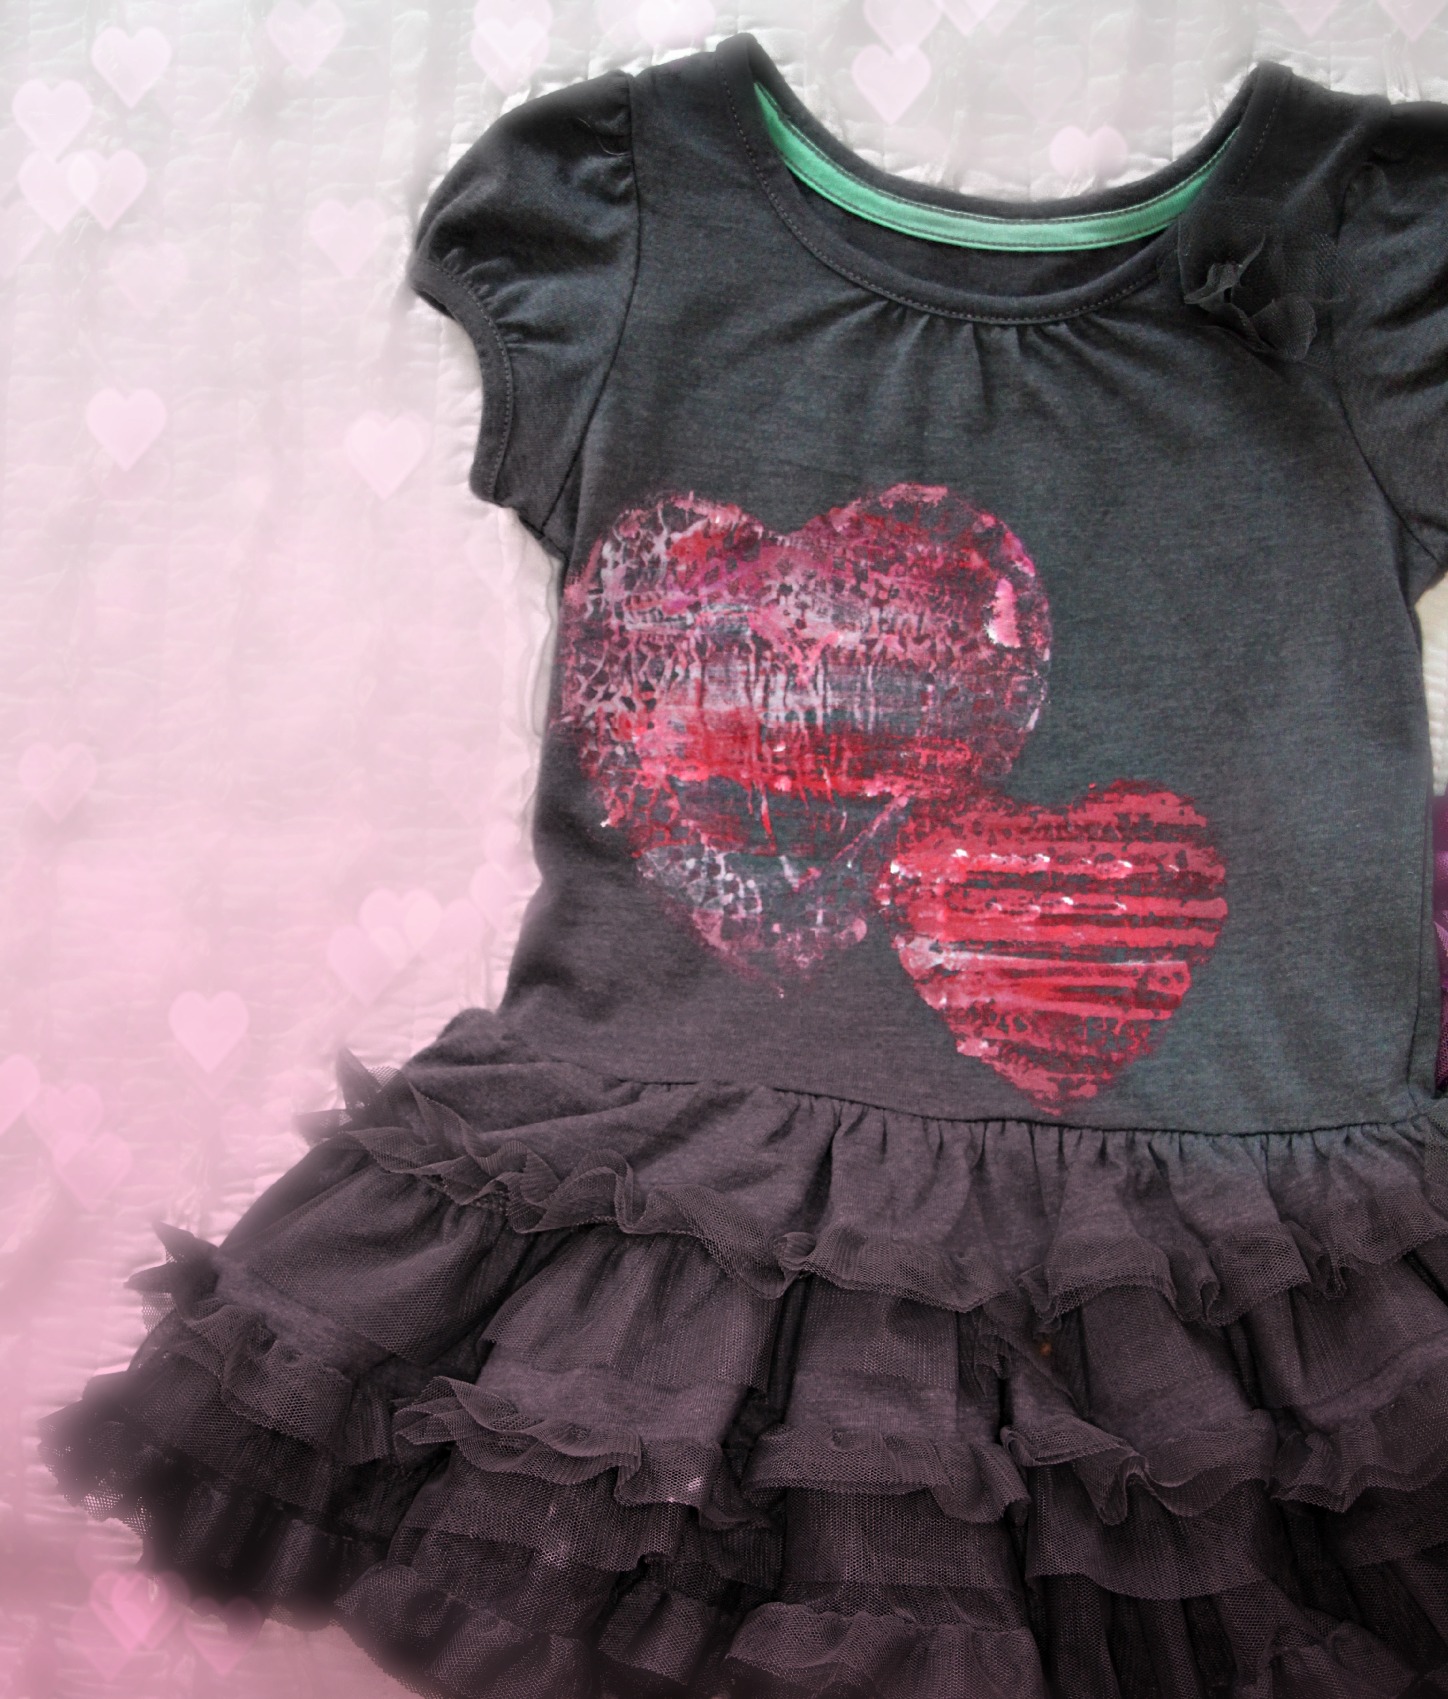
For this year’s first Vday craft I just had to bring back the the doily stamping I did when my babes were in onesies, especially because now Samster’s old enough to paint her own! You can watch Sam & I make her dress in the video below or if you’re in a mad rush just skip down to the photos & I have a feeling you’ll get the gist.

valcollage

IMG_0274

This week I’m jonesin’ to share a few things with you…flowers made from Airheads candy that’s gonna win me some mad money, avocado butter that’s gonna win me some mad cellulite but taste darn good going in & finally a vday shirt you & I can be proud to wear. Between Soph’s fractured toe & Sam’s ear infection last week was a ZOO, raise a coffee mug high & let’s toast to this week being super low key, easy going & somehow also shockingly productive. Totally realistic, right?

Inspired? Share the Love...
Share on Facebook
Facebook
Tweet about this on Twitter
Twitter
Pin on Pinterest
Pinterest
Google+
Google+

{ }

Cheater’s Crock Pot Chicken & Dumplings

by Natasha on February 1, 2013 in dinner 101

IMG_0162

IMG_0158

IMG_0157

I used How Sweet It Is’ recipe for the crock pot base but as much I desperately wanted to make biscuits from scratch it just wasn’t.gonna.happen. And you know what, I’m sure there’s something to be said for making them yourself but the can-o-biscuit-dough was pretty darn good if I say so & yes, I DO say so.

This was so yummy, so comforting, so utterly all American cold rainy day. Peter said it was one of his all time favs. Which just makes me wonder why the heck do I spend an hour slaving over complicated recipes when I could just throw this in a crock pot & have him think I’m homemaker of the year? Nonetheless, if you like moist, fall apart chicken & enjoy having doughy bread to dunk in your light, sweet, broth then this is for you. Follow the link above for most of the recipe but for my cheater’s route whip out a roll of refrigerated biscuit dough (you know, the ones that come in a roll where you have to pop the can open on the line & it always scares you, like, every.single.time. It’s getting quite ridiculous. You should seriously get a grip.) and around 30 minutes before dinner place biscuit dough rolled into small balls all around the top of the crockpot. Replace the lid and let the steam cook the biscuits for around 25 minutes or until cooked through. (Your crockpot should still be on low) They’ll always be dense & doughy but you just don’t want them to be raw. Mmm, it’s darn cold out, I might just have to make this over the weekend…

Oh! And just a reminder, if you have a Superbowl party to hit up this weekend or just want to make some tasty tidbits for your own viewing then check out my Superbowl Fare Pinterest board for a roundup of ideas. Have a great weekend, Go Ravens!!

Inspired? Share the Love...
Share on Facebook
Facebook
Tweet about this on Twitter
Twitter
Pin on Pinterest
Pinterest
Google+
Google+

{ }

peacock feather shoe clips

by Natasha on January 31, 2013 in tutorials

Peacock Feather Bow Shoe Clips

IMG_0216Peacock Feather Bow Shoe Clips

Peacock Feather Bow Shoe Clips Peacock Feather Bow Shoe ClipsIMG_0185 Peacock Feather Bow Shoe Clips

Peacock Feather Bow Shoe Clips

I’m seriously in crazy stupid love with these clips. They’re so irrestibly soft & fuzzy and the peacock feathers are just the most beautiful shades of turquoise, royal blue & jade green. The best part is, of course, that you can clip then on or off. Commitment free trends? Yes, please.

The construction of these little bows of plume goodness is actually pretty basic. They’re based off of my duct tape shoe bow from the DIY princess glitter shoes video. These are slightly different however because there’s no knot. Basically, I fold the tape in on itself so I have a 1″ wide 6″ long double sided piece of tape. (there should no longer be a sticky side) Next, I folded the sides in towards the center & adhered them with a dab of hot glue. I trimmed this shape a bit (see pic) so it was more ‘bow’ like. The ‘clip’ is actually a plain ol’ clip on earring from Kmart. A stud style works best but if you can only find dangly ones you can always pry off the extra pieces with some pliers. I found that the metal earring wouldn’t adhere very well directly to the duct tape bow, (using hot glue) but if I glued the earring to a small circle of felt first & then the felt to the bow…solid. That sucker isn’t going anywhere.

A word on the feathers…these are made from peacock plume, they’re small 1″-2″ full fluffy feathers. I ordered mine through this link (be prepared to waste away at least 4 hours of your life on that supply site by the way, I went BUH-NANAS) but I’ve also seen some pretty nice bags of feathers at JoAnns. For the individual feather attachment I purposely worked my way from the back around to the front so I could best show off the beautiful burst of colors that are on the bottom half of each feather. Also, by layering them in this manner the feathers help to define the bow shape with the smaller brown down in the middle & the larger, wispier turquoise feathers sprouting out. All feathers are attached with hot glue but take care to use small, decisive dots of glue, larger clumps can really be a nightmare. Oh, one other tip, I took that last photo so you could see how the feathers actually help to make the loops of the bow stand up, don’t worry if they’re a bit droopy pre-feathers.

That’s it! Do you love them?? Will you make some? And seriously, how amazing would they look with white feathers on bridal shoes? They’d certainly be a heck of lot cheaper than these $340 ones that inspired me!

Inspired? Share the Love...
Share on Facebook
Facebook
Tweet about this on Twitter
Twitter
Pin on Pinterest
Pinterest
Google+
Google+

{ }

Little Social Monster

by Natasha on January 28, 2013 in mommy blog

Did I mention to you that I was going to my annual blogging conference this past week? It’s called Alt, it’s kind of amazing. This is my second year attending as well as second year rooming with Susan from Crafterhours. (I’m still kind of amazed she took me back for a second time, I’m such a chatty moody roommate) So last year after Alt I remember feeling excited to come back & be an amazing blogger, all that goodness, but more than anything I felt overwhelmingly overwhelmed. It was exhausting meeting so many people & hearing so many incredible A list bloggers share all of their master tips, tricks & guidance for the newbie & well established blogger. It was great but almost too much for me.

So here’s my little confession, just between you & I…I don’t like talking to people.

I think I probably come across somewhat social on here but in reality it doesn’t come that naturally to me. I used to be, very much so, and then I wasn’t. I don’t like that. Last year I spent a lot of time between sessions hiding in my room, drawing the blinds, turning on the TV & trying to find some peace in my own little mental space. This year I went into it with the resolution to actually meet people. Like REALLY meet people. Get to know them. I mean, when else am I going to be in a giant room filled to the brim with other creative bloggers? What a waste to let my discomfort of socializing keep me from getting to know some of these fabulous women. I’m quite proud to say I did it. I met people. I sat at tables where I didn’t know anyone & got to know them. And guess what, I made new friends! Yay me! And not only that, I met the most incredible mentors. I actually got to sit down for an hour with just a handful of other girls & the founder of Tea Collection. TEA COLLECTION PEOPLE! She told me her amazing story of how she started her own beautiful, meaningful, clothing line. ‘Inspired’ doesn’t even come close to covering what I took from that hour. I walked away from that conversation & my head exploded & I peed my pants all at the same time.

I could go on & on about the wonderful people I met & the lessons I learned & you could politely nod & half smile because you want to be nice but I know this conversation is going to get boring at some point because you weren’t there. I get that. But there is one ‘a-ha’ I really want to share with you….

Realzing that I needed to ‘Unpause‘ myself was freeing & anxiety provoking all at the same time. It was wonderful to decide to start living my life & stop waiting around for a better time but then it was like, oh, crap, now I have to do something! Where to start? I have multiple goals for myself & LPM but how do I do it? Not to mention how do I not forsake my responsibility to the family that I’m matriarch of while I’m pursuing these dreams? Ack! But here’s a tip I learned from some amazing blogger who spoke that I sadly have no idea what her name is…

Try to break down your life & goals into different arms. Heh?

Like this…

IMG_0240

That’s what I scribbled down that somehow totally made my shoulders come down, my eyebrows relax & that little girl inside my head go, ‘oh, ok. we can totally do this.” (Those are my real, personal notes too so remember this is a no judgement zone, ok?)

I curtailed my goals into four arms I need to manage. Family, Little Pink Monster, LPM product line & Self love & care. Then within each arm I wrote out what I needed to do to make that arm work. For each to succeed on it’s own. Then everyday I’m going to write in my planner what I need to do for each arm. It’s breaking things down from an ultimate want of who I want to be, to individual goals, to daily responsibilities.

Does that make any sense? I hope so, it made so much sense to me & was a great relief.

So here’s the other amazing reason I love to go to Alt that I wanted to share…

I get to wear cute clothes.

This is the one time of year where I actually get to plan my attire based on what I think is fabulous & not what can I wear while chasing a toddler. Here are some pics of my wardrobe indulgences….  outfitcollage1outfitCollage2outfit3Collage

Oxblood dress with leather peter pan collar & graphic print legging {H&M, recent}
Blue button down shirt with bronze sequin collar & lace print gold jeans {Both from Nordstrom, pants Seven Jeans}
Peacock Outfit (The party was Clue themed & we were supposed to dress as one of the character’s colors…Mrs White, Scarlett, Professor Plum…you get the picture) Print Skirt {on clearance now at Madewell} Cardigan {Jcrew} Faux Fur Circle Scarf {Nordstrom Junior’s} Shoes {old school Nordstrom}

Do you see the fluffiness on my shoes?? They’re peacock feather bow shoe clips I made! Yay! I’ll give you the tutorial & much better pics next post, I think white ones would be great for a wedding if you know any brides to be on a budget!

Snakeskin dress & neon belt {on clearance now at Madewell} Jean Jacket {old school JCrew} Brogues {BP}
Black & white dress {last season Madewell} And those poofy & ridiculous shoes? One of my favorite splurges ever, I picked them up in Vegas last year. {Love Moschino.}

Oh yeah, I also had a passionate yet paper cut inducing trist with George Clooney.IMG_5280

So that’s about it. I think everything that happened in my life over the last 6 months has been a journey supplying with me lessons to be a wife, mother & woman who leads a happier, more fulfilled life & this trip to Alt was just a wonderful affirmation & addition.

I’m happy to be home though, I missed my little nuggets desperately.

Have a good one guys, next time we chat I’ll tell you all about those shoe clips, promise!

Inspired? Share the Love...
Share on Facebook
Facebook
Tweet about this on Twitter
Twitter
Pin on Pinterest
Pinterest
Google+
Google+

{ }

My Stash

by Natasha on January 22, 2013 in Uncategorized

Is it just me or do you love being at a girlfriend’s house and watching as she puts on her makeup? I guess it’s something we usually do when we’re alone & it’s kind of interesting to see how someone else has figured it out. Love when I can pick up a new tip or must have prodcut.

Here’s what is in my make-up box & the necessary items for pulling off a quickie 5-minute full face of makeup. Which is what I wear 99.9% of the time… (At the end of the post is a fast-motion video of me throughout the process. Hurry & watch it before I take down evidence of what I look like sans makeup)

My absolute must-haves…

Foundation: Skin 79 BB Cream (detailed post here)

Concealer: Bobbi Brown Corrector in Natural

Powder: Jane ID Pressed Powder

Blush: Benefit Coralista

Highlighter: Bobbie Brown Shimmer Brick, bronze (worth EVERY SINGLE PENNY, last forever & I get so many compliments on it!)

Eyeshadow: Color Tattoo in Audacious Asphalt, Bobbi Brown Shimmer Brick

Eyeliner: Chanel Le Crayon Khol in Black Jade

Mascara: Chanel Inimitable in Black

Lip Stain: Stila Lip Stain in Pomegranate, Revlon Just Bitten in Gothic & Tarte Lipsurgence in Hope (smells like mint!)

*LOVE lip stains, glosses come off after 2 minutes so I put this on 1st and then reapply gloss during the day

Makeup Case: Two Five Train Case

Now you’re turn to share the goodies, what’s your favorite makeup product that I just have to try?!

Inspired? Share the Love...
Share on Facebook
Facebook
Tweet about this on Twitter
Twitter
Pin on Pinterest
Pinterest
Google+
Google+

{ }

What the heck is BB Cream anyway?

by Natasha on January 21, 2013 in Uncategorized

Have you been hearing about something called “BB Cream” everywhere?

After seeing the girl on one of the beauty blogs I read swear by it I decided to do a little homework on what this new magic makeup was that people seem to be going bananas over…

BB cream, also known as Blemish Balm, Blemish Base or Beblesh Balm (due to an apparent copyright on the word “Blemish”), is a cosmetic item that has recently taken off in Asian markets.

Originally formulated in Germany in the 1950s, the cream was used to protect skin after laser procedures and surgery, while also providing light coverage. In 1980s BB cream took off in Japan, China & Korea & after being named “the secret of Korean actresses”.

So random, right?

So what IS this stuff…

It’s basically an all-in-one cream- moisturizer, primer, foundation, and sunblock all in one. It comes in only a couple of different hues but somehow seems to blend seamlessly on multiple skintones. For example the girl on my beauty blog is Asian with fair skin while I’m hispanic with olive skin. Somehow the exact cream she uses look great on me too! I’m thinking voodoo.Many western cosmetic companies are now starting to jump on the BB Cream bandwagon but I’m not sure how authentic their formulas are. I can tell you this, I’m on my 2nd bottle of SKIN79 Super BB Cream VIP Gold & I really love it. One bottle is only $10 plus $5 for shipping, that’s not too shabby compared to other foundations out there. (Tip- store it right side up, if you have it on it’s side the plunger seems to get clogged)

It’s all I wear for foundation, it’s incredibly light-weight, has a SPF of 25 & provides decent coverage. It gives my skin that dewy look, which I love because most days I’m feeling anything but ‘dewy’. I also use under-eye concealer & sometimes loose transparent powder to finish off my basic make-up. (aside from blush, eyes & lips of course)

My mom uses Dr Jart BB Gold Label & while I was in Tampa I snagged it & was pretty happy with the results. It felt a little heavier & more sunscreen-ish (if that makes any sense) than my brand but nice nonetheless.

In conclusion, (I always feel like I’m finishing a school paper when I say that) I am definitely hooked on BB Cream. I’ve really been trying to use more ‘all-natural’ products & this definitely has plenty of ingredients that I cannot pronounce or remotely recognize, it could very well give me face cancer in 10 years but for now I’m willing to sell myself for pretty skin.

**Still want more info on BB Cream? Here’s a great in-depth post that features first-hand reviews about the different brands

Inspired? Share the Love...
Share on Facebook
Facebook
Tweet about this on Twitter
Twitter
Pin on Pinterest
Pinterest
Google+
Google+

{ }

Paused

by Natasha on January 21, 2013 in Uncategorized

img via Refinery 29‘s get well guide!

This past week was like some sort of roofied timewarp ya’ll.

On Tuesday the school called to say Sam had a low fever, an hour later it was almost 102 then by bedtime 103 and overnight 105! 104 temps stayed with us for two days after that. Headaches, Nausea, Body Aches & Brutal Chills, poor little lamb had it all! We made three different trips to our heaven sent pediatrician’s office over the course of the week. All of the flu tests kept coming back negative, chest x ray was clear & we were just about out of guesses when miraculously she woke up Friday with no signs of fever or illness AT ALL! It seemed to have left as quickly as it came. Go figure! Prior to her divine recovery I was quite willingly tied to Sam 24 hours a day all week long. It was exhausting but also mommy need at it’s finest. Here’s the part however that I wasn’t expecting to feel…

Disappointment.

It had been the first week after my big ‘A-HA!’ & things were already delayed. So quickly back to paused. Let me explain…

I had a bit of a revelation a week ago. I actually had a night to myself which gave me some time to think. Like really think. Not the fleeting idea of a thought which is promptly interrupted by someone needing to have their butt wiped & then just as promptly forgotten. This was soul searching thinking. I thought about why I wasn’t happy. Now this may sound confusing but I’m actually not UN-happy, I’m just not totally fulfilled & content with my life happy. I’m something’s missing unhappy. To be honest, I’m not sure if I will ever get to a point where I go, “Whew, you know what, there is nothing more for me to do, I’m completely & utterly content with my life.” Maybe that’s just a fault, or perk, of my personality. Regardless, I’ve somehow found myself, right here & now, in a part of my life where I feel ‘paused’. I think it had been under the surface for awhile but getting sick made it all halt full force. I was too tired to have any goals much less achieve them. It was all about getting through one day at a time. Which, to be honest, wasn’t a bad thing for me to do. It’s a good thing to slow down & appreciate each day for what it is. It is not a good thing however to find an excuse to put the things you really want in your life on hold. After awhile you’ll notice a void whether you had a good excuse for pausing them or not.

So while I was having this zen moment of self reflection I realized the only thing that can take my life off of pause is me. The surgery didn’t solve my health issues, it certainly helped some things but the rheumatoligist & I haven’t found a diagnosis yet for my other symptoms, & from some of the personal stories you’ve shared with me that day may not be anytime soon. I realized I was waiting to get better to do what I enjoy and that is a dumb way to live life. There will always be *blank* to get done first. Whether it’s waiting for the kids to be in school full time, waiting for the money to take classes, waiting for an illness to pass or waiting for the sky to turn purple it doesn’t matter. They’re all excuses. And I realized that for me, they were are all a product of fear. I have a massive, colossal, beast of a fear of disappointment. I’m terrified that if I really go for it, like completely & utterly throw myself into doing what would be ‘success’ for me what happens if it fails. What if I try my best & I fail. That fear is precisely why I clung on to having the excuse of being sick. I was stalling.

Perhaps a carefully drafted visual demonstration would help to accurately portray my thought process:epicIt’s epic, I know.

You know what though, recognizing what was keeping me ‘paused’ was a huge relief. It is the worst feeling to not be content & have no idea why. Now that I know, there’s only one thing to do, conquer that fear. I’m inspired by a great work in American cinema. A beautiful film of determination, loyalty & unconditional support. It’s An AMERICAN GIRL: McKENNA SHOOTS FOR THE STARS.51XOFuWhrCL._SX500_

Here’s the thing though, & if you bring this up in public I’ll totally deny it, that movie was good ya’ll. I put it on for Sam while I started writing this & found my eyes repeatedly drifting to the TV. I’m also a sucker for anything with Nia Vardalos. Long story short this adorable, perfect haired little girl is a great gymnast. She’s fiesty, she’s fearless, girly goes for it in a major way. Until she disobeys her coach & attempts a back handspring dismount from the beam. Predictably she breaks her ankle. I know. The next hour is all about her making friends with her wheelchair bound tutor & the lessons she learns about what’s important in life & the true meaning of friendship. Whatever. I learned absolutely nothing from that part. What did give me an ‘ah-ha’ moment however is when her cast comes off & she has one last chance to do great in this ultimate competition she’s been training for her entire life. She’s on the beam & suddenly realizes she can’t attack things like she used to, now she has fear in her. Her foot is healed but mentally she’s still bruised. How do you find the strength to really truly throw all you have into something when the fear wants to hold you back? If you just play it safe & go for it half-hearted you won’t win. It’s basically a waste of time. Of course she looks deep into the eyes of wheelchair girl & finds the strength to go for the gold! And wins. Of course.

My point is that it doesn’t matter that this movie is for 8 year old girls the lesson is still the same. You can’t let fear hold you back from your goals. I also think, and you may not want to hear this, that you can’t let your kids hold you back from them either. I want my girls to follow their passions, to be the type of women who see what they want & make it happen. Who don’t settle because it got hard. Because they were tired. Because they’re ‘paused’ in the world of diapers, carseats & Dora. And the best way to teach them that is by example. I could tell them until I’m blue in the face but how much better will they learn if they see their mother doing what makes her happy.

So let’s take a little visit back to where we started, a sick child who needed her mommy. That will never stop being my number one job. I committed to these girls when I brought them into this Earth & that will always, always come first. But the truth is Soph is in pre-school a few mornings every week & beginning this Fall my sweet babygirl Samster will be in Kindergarten! ((slow tear))

No more excuses, I have some time now to at least start laying the pavement. There will be blips, & set backs because I already have a very demanding full time job that I adore but I want more now & you know what? I’m officially un-pausing my reasons not to.

Have any of you had some luck taking online business courses? Do tell!

Inspired? Share the Love...
Share on Facebook
Facebook
Tweet about this on Twitter
Twitter
Pin on Pinterest
Pinterest
Google+
Google+

{ }

15 minute tortellini soup

by Natasha on January 15, 2013 in dinner 101

I was at a playdate with my girlfriends the other day & we were talking about how we all get sucked in to making ‘kid food’ at dinner. It’s such a slippery slope, make chicken nuggets or mac n cheese for your kids because they won’t eat what the adults are having & beware, you might just have to make two dinners for the next decade.

My friend Kelly was telling me how she was trying to get her 4 year old to try new things for dinner & the other night she served her tortellini soup with fresh spinach. I believe the story ended that her daughter had nothing to do with the soup but to be honest I stopped listening because I just wanted her to tell me more about the soup! It sounded so good…I usually only make creamy, heavy soups & loved the idea of this tasty light broth, fresh greens & pasta soup. Even better, it’s crazy stupid easy to make!

We’ve been sick around here, just colds, no flu {{knock knock}}, so I’ve made this for myself & P at least 3 times in the last week. It’s really easy to make a single portion which I love because you know how hard it is to get a hot, home cooked meal in the middle of the day.

This is seriously all there is to it. In a medium pot bring one 32oz box of chicken broth & 1 cu water to a boil. Add fresh cheese tortellini (you can usually find them in the dairy aisle of your grocery) & cook according to package directions. (Which is usually about 6 minutes) Turn the heat down to low & season very well with salt, pepper & any of your favorite herbs. Kelly said she used dill, I used some parsley I had on hand & added a dash of garlic powder. I also think fresh torn basil would be amazing. Add a few large handfuls of fresh baby spinach, it should wilt right away. Don’t you dare overcook that spinach either, you want beautiful bright green! Serve a nice ladle full of broth, tortellini & spinach in your favorite bowl & then seal the deal with a good strong sprinkling of some amazing parmesan cheese. I just love the thick shavings kind with this dish.

Is this the most powerfully flavorful soup you’re ever going to have? No. Is this what you’re going to crave & then make every time you get a cold from here until the nursing home takes away your stove access? YES.

Now everyone say thank you to Kelly for sharing.

Inspired? Share the Love...
Share on Facebook
Facebook
Tweet about this on Twitter
Twitter
Pin on Pinterest
Pinterest
Google+
Google+

{ }

Entryway Makeover: DIY Before & After

by Natasha on January 10, 2013 in tutorials

Let me just say this, upfront & honest, this project took me MONTHS to finish. First the frame was sitting around empty, then the chair was half painted in the garage, the buffet sat with no hardware…it’s been a work in progress to say the least. Sometimes when I see before and afters I automatically assume the person accomplished it all at once. And I’m a blogger! You’d think I’d know better that the way things appear online is not necessarily how they manifest in real life. So just don’t go thinking that other people manage to do these makeovers in reasonable amounts of time, ok, actually they probably totally do, just don’t assume I’m one of them.

Now that we’ve cleared up all expectations here’s the entryway to my house before:

Yikes! Outdated & beat up antique buffet with an extremely oversized mirror dangerously balanced on top. That sure was dumb.

And now…

Hooray! SO. MUCH. BETTER. And highly less likely to maim small children & animals.

Sources: Rug, (Ballard: No longer available but this & this are super cute too) Buffet (family), Buffet Paint, (Martha Stewart Chinchilla) Chair (thrift store), Chair Fabric, (Grey ZigZag from Fabric.com) Chair Paint, (Krylon in Rich Plum) Frame (thrift store), Photo printed through iphoto , Laquer Tray,(Teavana: Similar to this one) Lamp, Small shell frame & Wooden Box (Home Goods)

First I worked on the buffet. Tip- Use those furniture moving pad/discs to elevate the feet on your piece. This makes painting the bottom of the feet far easier & also protects your floor from paint mishaps. I started off by giving it a once over with a basic primer. (Ziln I think?) Next I used a small roller to cover the majority of the buffet with Martha’s Chinchilla grey paint. (LOVE this color, my bathroom is this color, I’m obsessed with this color, it’s the perfect mix of clean grey with soft warm tones) I used a small brush to get in the detailed spots & then the next day gave it another coat. For the white detail I used plain white acrylic paint & a small rounded tip paintbrush. I also unscrewed the hardware & spray painted it with a black spray paint. Tip- when spray painting small items place them in a cardboard box. This will keep the paint mist from getting everywhere & will also give your items a safe place to dry. Finally I gave the whole piece some ruffing up with a block of fine sandpaper. When you’re distressing it’s good to think about where the piece would naturally be worn off. Corners, edges, the feet… I absolutely should give this a final seal with a wipe on poly but alas I haven’t done it yet. Which is really stupid of me because nothing sucks more than working hard on something and then having all of your worked sabotaged by cleaning products or rings from someone’s drink.

The chair was a bit less intense. First I tried painting it a poppy orange with a sample can of paint & a brush and that just did NOT work. (I swear that cat is photo bombing me)

I suppose if I would’ve sanded it first or primed it the paint would’ve showed better but I was feeling lazy. In the end my laziness somehow paid off because I just love the aubergine purple of the finished chair. It was a Krylon Spray Paint with a flat finish from Kmart. I believe I used 2 cans. The cushion was stupid easy. I trimmed my fabric to have about a 3″ overlap around the cushion and then staple gunned away. The key is to work from opposite corners while pulling taughtly. Like do one staple at the center top, then one at the center bottom, center right, center left & around again. This way you can be sure to get a nice even finish.

The final piece of my entryway is that nice giant picture of Her Majesty. Can you believe that’s actually a CELL PHONE PICTURE?! I know, right? Who knew. P took it of Sam at our beach trip & then because I use iphoto it was as simple as importing the photo from his cell phone, clicking print picture and that connects you to the apple store where you can order large prints of your photos. The quality was fantastic & it came within a week. I purchased the frame from a thrift shop and tore open the back to remove the so not my taste print. I just fell in love with the yellow wooden frame though, isn’t it a nice pop of color? I added some accesories, including a picture of Sophie Monster because I have this fear that the girls are going to count how many times their pictures are in what rooms & then validate themselves based on that number. What? Could such an obsessive idiosyncrisy be from personal experience?? NO. Maybe.

That’s it! It’s been forever since I’ve done a furniture post so I’m super excited to put this one out there. If you like it too then feel free to put it on your Pinterest page, I mean, I wouldn’t object or anything.

Inspired? Share the Love...
Share on Facebook
Facebook
Tweet about this on Twitter
Twitter
Pin on Pinterest
Pinterest
Google+
Google+

{ }

Sweet & Savory Cranberry & Bacon Chili

by Natasha on January 7, 2013 in dinner 101

Mmm, nothing says January like a big bowl of hot chili. I’ve been working on my signature chili recipe for years. I remember I first started when my BFF Brooke made a giant pot of amazing chili in our college apartment. I don’t know if it was because Chick-fil-a was closed after an all night Saturday soiree or I was just in my chili prime but that bowl of spicy goodness felt like it saved my life. If memory serves the recipe was her Grandmother’s and although I begged & pleaded I just couldn’t get her to spill. So began the journey of my own signature chili recipe.

I’ve succeeded in making a fairly good beef & bean chili. If you smother anything with enough cheese, chives & sour cream it’ll certainly be good enough, but I’ve still always wanted something AMAZING. Something different. Something my kids would crave when they were off on their own & hungover in their own college apartment…and hello, I’m totally talking about crazy Soph. I have no doubt Miss Responsibility Samantha will always remember to consume a glass of water for each alcoholic beverage.

I’m not sure if this will be that chili recipe, it is a bit different, but I’m quite certain it will be something I make every winter for a long time to come…

LPM’s Sweet & Savory Cranberry & Bacon Chili:

  • 6 slices of thick bacon, cut into 1/2″ pieces
  • 1 yellow or white onion, diced
  • 1 cu dried cranberries
  • 14 oz tomato puree
  • 16 oz water
  • 1 15 oz can kidney beans, drained
  • 1 15 oz can pinto beans, drained
  • 2 tbs chili powder
  • 1/2 tbs smoked paprika
  • 1 tbs onion powder
  • 1 tbs salt
  • 1 tbs garlic powder
  • 1/2 tbs cumin
  • 1/2 tbs oregano
  • 1/4 tsp cinnamon
  • chopped scallions or chives for garnish

In a large pot cook bacon pieces over medium heat until crispy, set bacon aside on a paper towel but leave the rendered fat in the pot. In the fat cook the diced onion over medium high heat until soft, around 4 minutes. Add cranberries & toss with the onion, cook for 2-3 minutes. Add remaining ingredients to the pot including bacon & cook on medium low heat for at least 20 minutes. If you have more time let it simmer away, it’ll just get better the longer you leave it. At this point the chili is a little too watery for my taste, I prefer a bit of a thicker consistency, so I used my stick blender to very lightly blend some of the beans. Not all of the beans, just enough to thicken the sauce. If you do not have a stick blender a potato masher would also work well. Serve piping hot with a dollop of sour cream & some chopped chives for garnish.

Have you made your own signature chili dish or is this just some weird endeavor of mine??

Inspired? Share the Love...
Share on Facebook
Facebook
Tweet about this on Twitter
Twitter
Pin on Pinterest
Pinterest
Google+
Google+

{ }

Next Entries →
← Previous Entries

greeting

phone pic

LTL button

before after 

buttonbirthday buttonfamily dinner buttonmommy thoughts button

marthabadge1
Photobucket
Photobucket

Tags

beauty before/after birthday party cheater's cooking Christmas costume decorating dinner 101 DIY dress-up easy dinner fashion craft furniture gift ideas hair halloween health chats holiday home home decor instagram jewelry making kid's craft kid fashion lyme mommy blog mommy thoughts naptime crafting party pinbusters pinterest princess recipe review recipes sewing shopping sunday love thrift store finds tips & tricks toddler sewing tutorials valentines video vlog where am I?

Blogroll

  • A Beautiful Mess
  • Cancer Alliance Blog
  • Centsational Girl
  • Coco & Kelley
  • Cotton & Curls
  • Crafterhours
  • Craftiness is not Optional
  • Effortless Style Blog
  • Happy Together
  • Hi Sugarplum
  • Homemade By Jill
  • Honey We're Home
  • How Sweet It Is
  • Hyperbole & a Half
  • iHeart Organizing
  • Kristen F. Davis Designs
  • Lil Blue Boo
  • Little Green Notebook
  • Momastery
  • One Pretty Thing
  • Piccoli Piselli
  • PS- I made this
  • Skirt as Top
  • Smitten Kitchen
  • That's So Michelle
  • The Baking Robot
  • The Daybook
  • The Makerista
  • Victoria Elizabeth Barnes
  • Vintage Revivals
  • Young House Love

WordPress Admin