Little Pink Monsters

  • tutorials
  • Recipes
  • Contact
  • About Me
  • facebook
  • twitter
  • pinterest
  • instagram
  • rss

Salmon Sticks with Roasted Broccoli & Garlic

by Natasha on June 10, 2011 in broccoli recipe, dinner 101, fish recipes, salmon, salmon sticks

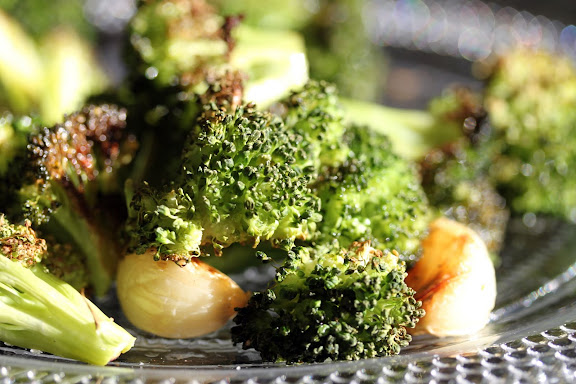
I make this dish at least once a month, I try to get fish on my family’s plate once a week & breaded salmon sticks with a cool tangy dip are definitely one of my best resources. Also if you’ve never roasted broccoli you have to try it, it’s so fun to have broccoli in a whole new way. Well, as fun as broccoli can be.

1 lb salmon filet, skin removed (just ask the butcher)
2 eggs
shredded parmesan cheese
italian breadcrumbs
fresh parsley, chopped (optional)
2 lemons

Broccoli florets, olive oil, garlic

1- Drizzle broccoli & peeled garlic cloves well with olive oil, spread on a baking sheet, season with s & p, bake at 375 for 7 minutes while you prepare salmon sticks.

2- Cut salmon into 1″ thick sticks. Line up dipping bowls by cutting board, one with whisked eggs & other with breadcrumbs, parm cheese & parsley. Dip sticks one at a time in egg (let excess drip off) then breadcrumbs, then place on greased baking sheet. (I like to bake mine on a rack on top of a sheet so the heat gets all around them)

3- Add salmon baking sheet to the oven & cook both broccoli & salmon for 15 min or until salmon sticks flake apart easily & broccoli has roasted tips.

4- While the food is baking make your dip as follows & let it sit in the fridge. Combine 1 cu lowfat sour cream (could also sub greek yogurt or lt mayo) with about 1 tbs dijon mustard, juice of 1 lemon, chopped parsley, 1 tbs lemon zest, s & p to taste.

What’s your go-to recipe to get fish on your family’s menu? Link up & share with the rest of us! Just click on the “view/add” button below, then link to the url of your fav fish recipe.
(Please ONLY fish recipes, the idea is that we’ll have a bunch of recipes that are specific to each category)

Please do not copy & paste any of my content without prior permission, pictures of Samster & Sophie are strictly prohibited. Links to my post however are always welcome!


Inspired? Share the Love...
Share on Facebook
Facebook
Tweet about this on Twitter
Twitter
Pin on Pinterest
Pinterest
Google+
Google+

{ }

Mosquito Planter

by Natasha on June 8, 2011 in gardening, mosquito massacre, mosquito repellant plants

Sam has my big brown eyes. Nice genetic bonus to being my kid.
Nasty swelling & days of itching from every bug bite she gets, not so great gene.

But to make up for it I’m going to do my darndest to keep the little buggers away so we can still enjoy the summertime outside, starting with a “Mosquito Planter”.Or maybe I should call it the “Anti-Mosquito Planter”The main anti-mosquito part of the plant is scented geranium, the lady at the nursery said they’re the same thing as Citronella plants. I think I believe her because they smell just like an all natural Citronella candle. Kind of like the citrus notes without the chemicals if your nose can picture that. Also in the planter are garlic chives, spicy oregano, regular geraniums (just for pretty) & catnip. (Although the catnip is really fragrant, I just threw it in there because I needed something that would cascade down the sides of the planter & also because P’s cat hates me.)

So far so good, I planted it right next to the back door so hopefully the mosquitoes will stop swarming around the dogs while they wait to come inside. I also gave Sam a little scented geranium next to her playhouse. If it doesn’t work surely the one-eared bunny will. Scary.Another plant whose odor is supposed to repel biting bugs is Peppermint. I planted one on it’s own because I was scared to put it in the planter with the others. At the nursery the Peppermint plants were going berserk with their little shoots crawling all over the plants next to them & wrapping every which way. That herb is a total clinger.

I also used an all-natural spray around & under our deck since it’s the perfect dark, wet breeding ground. I’m hoping my efforts will shut down the mosquito brothel without having to use any harsh chemicals. If you have any other suggestions please pass them along!Please do not copy & paste any of my content without prior permission, pictures of Samster & Sophie are strictly prohibited. Links to my post however are always welcome!

Inspired? Share the Love...
Share on Facebook
Facebook
Tweet about this on Twitter
Twitter
Pin on Pinterest
Pinterest
Google+
Google+

{ }

The Unbiased Guide for the New Mom

by Natasha on June 6, 2011 in best carseat, unbiased mom guide

If you have kids you might remember a point in your pregnancy where the initial excitement of the big news wore off long enough for you to go, “Oh crap. I have no idea what to do next?!” Maybe someone asked you if you were going to sleep train your baby, (“I have to train it?”) or you went to start your registry & saw there are 15 kinds of swaddling blankets. Where to start?? How can it be so easy to screw things up already?! Sucks you can’t have that glass of wine right about now huh?
I was talking with one of my preggers buds over the weekend who had found herself in this situation, I offered to write her up a list of everything I had bought that I liked & what to not waste your money on. (newborn clothes, don’t do it!) She suggested I put together a second blog that could be a place where veteran moms could share knowledge with the newbies on not just products but also all those other little gold nuggets of information we’ve learned along the way. (like don’t freak out if your first trimester genetic screening comes back positive, there’s a crazy high false positive rate on those things!)

So over the weekend I stayed up late each night (and cursed myself every morning) & created this…It’s going to be a work in progress, so far I’ve only written one post.
I quickly learned that each post requires a bit of time as there’s research to be done & a gazillion links to be inserted.

Also I’m kind of scared to launch it because it really will only work if the veteran mom’s leave comments with their opinions so we get a nice, fat, wealth of UNBIASED (meaning no babies r’ us/depot/crazy baby warehouse influencing any of the content) information.

Some of us are lucky enough to have besties around that can guide us through the insanity of pregnancy & the marathon of the newborn phase but for others either we live in a new city with no support system yet or we’re the first of our girlfriends to take the plunge into motherhood. It’s for you that I created the ‘Unbiased Guide for the New Mom’. I hope you like it.

You can read the first post on ‘Best Carseat: Infant seat V. Convertible Seat’ here. I figured getting the kid home was a good place to start.

Please do not copy & paste any of my content without prior permission, pictures of Samster & Sophie are strictly prohibited. Links to my post however are always welcome!


Inspired? Share the Love...
Share on Facebook
Facebook
Tweet about this on Twitter
Twitter
Pin on Pinterest
Pinterest
Google+
Google+

{ }

Mexican Frittata (Linky Party!)

by Natasha on June 3, 2011 in breakfast recipes, dinner 101, frittata, mexican, recipe linky party

I wanted to call this “leftovers frittata” but I wasn’t sure if anyone would click on the link.

The idea is that if you need to throw together a last minute breakfast you could really make a frittata out of any combo of ingredients you have lurking around your fridge, around 6-8 eggs & a bit of milk. Maybe asparagus & feta? Or apples, cheddar, bacon & onion? I had made tacos a few nights before so I had all the fixings for a yummy Mexican Frittata.First I threw some cubed avocado, chorizo sausage & a chopped tomato into a greased (Pam) casserole dish. Next in a bowl I added 6 eggs, 1/4cu half & half (I used half cream & half skim milk because I was out of half & half) some chopped scallions & a big handful of shredded cheddar. Season with S & P, mix well & pour the egg mixture over the other ingredients in the dish. Gently mix & bake at 350 for around 15 minutes or until center is set & cheese is golden & bubbly.So let’s try something new…what do you think about doing a “Linky Party” whenever I post recipes? That way you guys can share your favorites & we all walk away with a nice little stash of recipe ideas. You can link up to a recipe on a favorite website or your own personal blog recipe post, just make sure it’s an actual recipe & not a link to your grandma’s bookcase that you’re selling on Craig’s List. Deal?

Let’s link!
(If you’ve never done a link up party it’s SO easy, just click on the linky button below & follow the instructions, take makes 30 seconds)


Please do not copy & paste any of my content without prior permission, pictures of Samster & Sophie are strictly prohibited. Links to my post however are always welcome!


Inspired? Share the Love...
Share on Facebook
Facebook
Tweet about this on Twitter
Twitter
Pin on Pinterest
Pinterest
Google+
Google+

{ }

Color Wonder Creations

by Natasha on June 1, 2011 in iron on transfers, super fly grandma style, tutorials

I hate Color Wonder markers.

They take too long to show up, the colors are bland & they frustrate Sam. I assumed I would have the same disdain for all Color Wonder products until Sam tried their fingerpaints.

HelllooooOOOOoooo!Pretty freaking awesome, right?

I love this stuff! The colors are so vibrant & the way they blend together? Magnifique!I loved that little monster print she made so much that not only did I frame it…
(Gaudy gold frame picked on purpose. I thought it added a little humor)
BUT I also printed it out on iron-on transfer paper and…{Jcrew Painter’s Tee, Forever 21 skirt, large pet squirrel is actually a sheltie with a haircut}

P says it was very ‘grandmother’ of me to print my kid’s artwork on a shirt. I told him, “Yeah. But it’s just that effing good.”

Oh, and while we’re on the subject of kid’s art what do you think of Sam’s new art station?It’s just to the side of my kitchen island so she can not only have meals there but it’s also a great place to stay busy while I cook. Those little containers & rack are from IKEA (shocker, I know.) & can be found in the kitchen area. I think they’re “Gorbedsnookens”. Or maybe “Spetzers”. Nope, they’re Bygels. Table & chairs are from IKEA’s Critter collection

Please do not copy & paste any of my content without prior permission, pictures of Samster & Sophie are strictly prohibited. Links to my post however are always welcome!

Inspired? Share the Love...
Share on Facebook
Facebook
Tweet about this on Twitter
Twitter
Pin on Pinterest
Pinterest
Google+
Google+

{ }

A Word from Samster Daddy. On Polygamy. (eh?)

by Natasha on May 31, 2011 in polygamy, ramblings of a tired man, samster daddy


We just came back from a really great Memorial Day/Birthday weekend at the beach & on the car ride home from the airport my husband & I had an interesting conversation. He asked if he could blog about it & I said “Sure, why not. My fingers are tired anyway.”

“HELP WANTED: This Father’s Day”

I finally think I get it, I finally understand why being a polygamist could be kind of awesome & actually outweigh the possible public shaming of having multiple wives.

Before you read this and think that I’m a ‘typical male’ that wants to be waited on, taken care of, and sleep with lots of incredibly hot women.. I’m not. Well, I mean, I am. I’d LOVE that, but it’s not realistic.

The opposite really. My new revelation actually has nothing to do with sex.

This past weekend was my wife’s 31st 25th birthday. She loves spending the weekend with friends & family, so we decided to take a trip to Clearwater Beach, just outside of Tampa. We bought tickets for ourselves, our two kids and Megan. My wife’s best friend.Nana & Pop-pop would watch our kids, while we would enjoy a weekend at the beach with friends.

It took getting there and back with two kids, two car-seats, 5 bags, and a back-pack full of princesses to realize the major benefits to ‘un-sexual polygamy.’I’m not a fan of Cody from the TLC sister wives show. I don’t know how with a good conscience he can move from room to room, have relations, then face his other wives the next day. I’d be terrified, I mean, incredibly guilt stricken.

But I do understand how their help with daily life makes everyone happier.

Megan also has two kids of her own, but they didn’t come on this trip. She wanted to tag along for a much deserved girls weekend.

On the flight there she was able to help pick up some of the work which then allowed my wife to be more easy-going (airplane trips usually end with snippy remarks or what I call ‘the look’). My wife, being happier, then helped the attitude of the children who can read her like a book. Happy kids = un-stressed Dad (and 142 other passengers on our flight). See, everyone wins?

(note the beaming happiness here. ON an airplane. This is unheard of.)

What was the benefit for Megan? We paid for her flight, food and hotel. So, for all intensive purposes my family welcomed her.

Could this be the best, worst-kept secret ever?

Could this work with multiple husbands? My initial reaction is no, but it’s open for discussion.
I would think that guys, who are wired to want to solve problems and overcome obstacles, might be more likely to butt heads before reaching a solution. I imagine a family unit would look more like Animal Planet than a finely-tuned machine like mine.

And I kept thinking…

Other times having multiple partners would have a benefit over just one:
* There’s always someone to hold your place in line.
* Shoveling a large snowy driveway
* Fighting off an alien attack
* Working on a large puzzle
* Taking turns watching Dora moves to every third time (at the very least)
* Hanging holiday decorations
* Designated driver

There are certain events and special things I would only want to share with my wife, but perhaps there could be middle ground. A happy place between being married to one person and having the help of many. Minus the kitchen awkwardness after we all just heard you have sex with your 5th wife. Or maybe we should just hire a cleaning lady & call it a day.

-P

(samster daddy) Please do not copy & paste any of my content without prior permission, pictures of Samster & Sophie are strictly prohibited. Links to my post however are always welcome!

Inspired? Share the Love...
Share on Facebook
Facebook
Tweet about this on Twitter
Twitter
Pin on Pinterest
Pinterest
Google+
Google+

{ }

Iron On Onesie

by Natasha on May 24, 2011 in fabric paint onesie, iron on onesie, iron on transfers, tutorials

You guys know I love fabric paint & freezer paper stenciling but sometimes I forget how darn easy it is just to use printable iron-on paper…
My girlfriend just had a sweetpea of a little girl & named her Finley. I’m absolutely smitten with the name so I thought I’d stick it on a onesie for her…
1st I created the image in Picnik using stickers. Then I hit the “flip” button & made the image appear backwards
(Ok, fine. 1st I printed it out backwards, cursed under my breath & went back & flipped the image. Sheesh. Are you happy?)

Print it out on the transfer paper, iron it on the onesie & it’s actually pretty cute just like that but I smudged the image a bit (I didn’t iron it long enough) so I added embroidery around the edges. Sometimes mistakes are awesome because I absolutely love it with the stitches!

Next time you’re doing an applique clothing item try adhering some light-weight fusible interfacing to the inside. How pro does that look? It’s also super soft & protects the stitchwork from getting snagged.Finley also has an awesome big brother who’s Sam’s buddy so I thought I’d print something out for him too…
(Note to all new baby gift givers: A small something for the older siblings goes a lonnnng way for keeping the peace)
And while I was running my own personal t-shirt factory I figured who not make a “painted jeweled onesie” for Sophster.
Please do not copy & paste any of my content without prior permission, pictures of Samster & Sophie are strictly prohibited. Links to my post however are always welcome!


Inspired? Share the Love...
Share on Facebook
Facebook
Tweet about this on Twitter
Twitter
Pin on Pinterest
Pinterest
Google+
Google+

{ }

Space Baby

by Natasha on May 23, 2011 in Uncategorized

I love that kid.
This week I HAVE to:

-Finish projects for my super exciting super secret collaborative project (heehee, I can’t wait to tell you! I’m such a tease, I know.)
-Write tutorials for said projects
-Pack for Florida, I suppose that means washing the clothes first
-Remember to eat & change diapers, careful not to mix the two up

It’s going to be a busy week. You?

Please do not copy & paste any of my content without prior permission, pictures of Samster & Sophie are strictly prohibited. Links to my post however are always welcome!


Inspired? Share the Love...
Share on Facebook
Facebook
Tweet about this on Twitter
Twitter
Pin on Pinterest
Pinterest
Google+
Google+

{ }

Roasted Brussel Sprouts, Bacon & Apples

by Natasha on May 19, 2011 in dinner 101

SO. STINKING. GOOD.
I’m completely convinced that when combined with a caramelized coating & crispy bacon ANY item can taste amazing. Hence the brussel sprouts being inhaled by every member of my family. Even this one…
“Don’t take my PICTURE!”

The recipe is from EveryDay Food & is as follows:

Ingredients

* 3 slices bacon, cut into 1/2-inch pieces
*4 pints Brussels sprouts, ends trimmed and halved
*Coarse salt and ground pepper
*1 apple, cored and cut into 1/4-inch slices, each slice halved crosswise
*2 teaspoons red-wine vinegar
  1. Preheat oven to 425 degrees. Arrange bacon in a single layer on a large rimmed baking sheet. Bake until browned, 10 minutes. Add Brussels sprouts in a single layer; sprinkle with salt and pepper. Roast until they begin to brown, about 15 minutes.

  2. Remove from oven, and toss in apple. Return to oven; roast until Brussels sprouts are browned and tender and apple has softened, 10 to 15 minutes.

  3. Toss vegetables with vinegar, and serve immediately.

Please do not copy & paste any of my content without prior permission, pictures of Samster & Sophie are strictly prohibited. Links to my post however are always welcome!


Inspired? Share the Love...
Share on Facebook
Facebook
Tweet about this on Twitter
Twitter
Pin on Pinterest
Pinterest
Google+
Google+

{ }

The Return of Divasaurus (free stencil!)

by Natasha on May 17, 2011 in tutorials

If you’ve ever wondered if fabric paint will stand the test of time let this be your proof.
(So do you think my uterus has a carbon copy button or what?)

Can you believe it’s been almost 2 years since the first little Divasaurus?! Geez. I need to start videotaping these kids more. It’s just going by too darn fast.

Here’s the original stencil if you’d like to make your own Divasaurus. Just right-click on the image & save it, then print it out ‘fit to page’ so it’s 8 x 11. The instructions for each step are hand written on the stencil. Sorry if they’re a bit hard to read, thankfully I’ve learned how to put text on photos since then.

Also those snazzy striped legwarmers? Yep. Made those 2 years ago too. DIY Babylegs here.

Please do not copy & paste any of my content without prior permission, pictures of Samster & Sophie are strictly prohibited. Links to my post however are always welcome!


Inspired? Share the Love...
Share on Facebook
Facebook
Tweet about this on Twitter
Twitter
Pin on Pinterest
Pinterest
Google+
Google+

{ }

Next Entries →
← Previous Entries

greeting

phone pic

LTL button

before after 

buttonbirthday buttonfamily dinner buttonmommy thoughts button

marthabadge1
Photobucket
Photobucket

Tags

beauty before/after birthday party cheater's cooking Christmas costume decorating dinner 101 DIY dress-up easy dinner fashion craft furniture gift ideas hair halloween health chats holiday home home decor instagram jewelry making kid's craft kid fashion lyme mommy blog mommy thoughts naptime crafting party pinbusters pinterest princess recipe review recipes sewing shopping sunday love thrift store finds tips & tricks toddler sewing tutorials valentines video vlog where am I?

Blogroll

  • A Beautiful Mess
  • Cancer Alliance Blog
  • Centsational Girl
  • Coco & Kelley
  • Cotton & Curls
  • Crafterhours
  • Craftiness is not Optional
  • Effortless Style Blog
  • Happy Together
  • Hi Sugarplum
  • Homemade By Jill
  • Honey We're Home
  • How Sweet It Is
  • Hyperbole & a Half
  • iHeart Organizing
  • Kristen F. Davis Designs
  • Lil Blue Boo
  • Little Green Notebook
  • Momastery
  • One Pretty Thing
  • Piccoli Piselli
  • PS- I made this
  • Skirt as Top
  • Smitten Kitchen
  • That's So Michelle
  • The Baking Robot
  • The Daybook
  • The Makerista
  • Victoria Elizabeth Barnes
  • Vintage Revivals
  • Young House Love

WordPress Admin