Little Pink Monsters

  • tutorials
  • Recipes
  • Contact
  • About Me
  • facebook
  • twitter
  • pinterest
  • instagram
  • rss

The Cupcake Queen

by Natasha on May 16, 2011 in Uncategorized

I am not a baker. BUT. There’s something to be said for baking with your little girl so I picked up a box of yellow cake mix, added some pink food coloring & chopped strawberries to make princess-worthy pinkilicious cupcakes. The frosting is the super yummy cellulite inducing recipe below. Consume at your own risk.
Cream Cheese Frosting:
12oz cream cheese, softened
1/2 cu butter, melted
3 cu powdered sugar
1/2 tsp vanilla extract

Mix all ingredients until creamy. Lick spoon, bowl & any spillage.

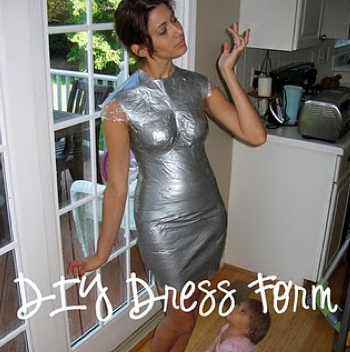
Also do you love my cute little animated Samster? I always assumed when I saw these little animated montages that they were extremely difficult & must require a large, complicated knowledge of HTML & internet savvy. Nope. It just requires you to go to a website & copy a code. Duh.
I used this site. Hmm, I wonder what else I could take sequential pictures of??

On another note…

This week I want to:

*Cook a homemade pizza. I’ve never tried it & am craving melted cheese.
*Sew something “mermaid”-ish for Samster. Lately the only way she’ll let us wash her hair is to pretend it’s her long, beautiful, Ariel hair. It makes bathtime MUCH easier, & I’m all about not battling her little 2yr old iron will lately so I think I want to encourage her mermaid phase. Maybe I can convince her Ariel poops on the potty. Hm. Do mermaids poop? I mean, it’s not like they wear underwear.
*Vacuum more often so Sophie stops wearing a fur suit.

You?

Please do not copy & paste any of my content without prior permission, pictures of Samster & Sophie are strictly prohibited. Links to my post however are always welcome!

Inspired? Share the Love...
Share on Facebook
Facebook
Tweet about this on Twitter
Twitter
Pin on Pinterest
Pinterest
Google+
Google+

{ }

Black Bean Tacos with Feta & Cilantro Slaw

by Natasha on May 11, 2011 in dinner 101

This recipe is originally from Smitten Kitchen however I made some of the adjustments she suggested & a few of my own to make the tacos below. I added beef, avocado & made my own cilantro slaw recipe. And let me just say,
THEY WERE GOOD.
(for Samster’s plate I just took some of the bean/beef mixture & melted cheese & made a quesadilla)

Ingredients for tacos:
1 15-ounce can black beans
1 lb ground beef
1 tsp ground cumin
EVOO
4 white or yellow corn tortillas
feta cheese
hot sauce
1 yellow onion, chopped
lime juice (1/2 lime)

Ingredients for cilantro slaw:
1 package shredded cole slaw
1/2 cu light mayo
3/4 cu chopped cilantro
1/2 tsp salt
1 tsp grated garlic (I rub mine on a zester, it tames the flavor a bit)
juice of 1 lime
1/2 cu chopped green onion

First I like to make my slaw (just combine all ingredients & mix well) & cover it with a piece of plastic wrap, then stick it in the fridge.
A little time will make it nice & juicy & let the flavors blend a bit.

Next in a large skillet saute your chopped onion over med heat with some EVOO, once it’s softened (4-5 min) add your ground beef. Brown the beef for a bit over med-hi heat & then add your can of beans, cumin, salt & a few dashes of hot sauce. Mix well & let simmer on low while you toast your tortillas in another skillet. Get a dry skillet nice & hot (if you have a gas stove you can do this directly over the flame) & sear your tortillas. (30 sec or so each side)

Set up dinner serve-yourself-style with tortillas, bowl of bean/beef, bowl of feta crumbles, sliced avocado & cilantro slow. YUM! I can honestly say we had zero leftovers with this meal.Please do not copy & paste any of my content without prior permission, pictures of Samster & Sophie are strictly prohibited. Links to my post however are always welcome!


Inspired? Share the Love...
Share on Facebook
Facebook
Tweet about this on Twitter
Twitter
Pin on Pinterest
Pinterest
Google+
Google+

{ }

Hello Kitty Duct Tape Hair Accesories: Part 2 Hairbows

by Natasha on May 10, 2011 in baby hair accessories, diy hairbows, tutorials

Did you get a chance to make a duct tape headband? Sam loves hers but only wears it when she’s in “Cinderella” character. I guess in her mind you have to be Cinderella to wear a headband.
What I wouldn’t give to get a peak inside that little mind of hers, I bet is covered in glitter & pink balloons.
For part 2 I’ve made some hairbows & I’ve got to say, I kind of love them. A lot. If I was a bit younger (braver) I would totally sport one.You’ll need duct tape, hot glue & an alligator clip or elastics for the pigtail versions.

1st- take around a 5″ strip of duct tape & fold it 1/2 in on itself lengthwise. (your kind of making fabric out of the tape by doing this) Then cut that strip in half so you have two 5″ x 1″ strips.
2nd– Take one strip & bring the short ends in so they meet in the center, tack down with a small dot of hot glue. After I went ahead & trimmed down each loop so they angle in & look more “bow-like” (ribbon would’ve done this naturally but since we’re working with tape it needs a bit of help)
3rd- Take your 2nd strip & trim so it’s the same length as your bow. Cut the ends with little “V” shapes (what is this called? something bird-ish. Sparrow’s beak? Dovetail? someone please tell me before it drives me crazy.) Also snip a little niche on each side of the center of the strip, this is to give a space for the next piece to tie around.
4
th– With what’s left of your 2nd strip you’re going to make the “knot” which gives the impression that the entire hairbow was just hand-tied perfectly. (it’s all smoke & mirrors people)
First trim down the width of the strip, it should be slightly thinner than what you used to make the other pieces. Tie a loose knot in the center of the strip (if this is difficult
because it’s too short to work with feel free to make a longer strip with your tape.) then using a small dab of hot glue adhere the knot to the center of the bow. Next flip the bow over & hold your clip onto the back of the bow, apply some more hot glue & wrap one of the ends from the knotted piece over the clip. Trim off excess. Repeat with other end of knotted piece. That’s it!!

The pigtail holders are similar but not quite as complicated...


1st- start off with an 8″ piece of duct tape that’s folded in half width-wise. Slice this in 1/2 lengthwise so you have two 8″x 1/2″ strips. Fold one of the strips so that the ends loop over making a bow-shape, tack down with a small dab of hot glue. Snip ends with “v” shapes.
2nd– Once again snip out a little “v” in the center of the bow. Then make a knotted strip like described above & adhere in same manner except instead of gluing it around a clip it’s around a hair elastic. That’s it!The possibilities are really endless…this one is done with just loops & loops of thin strips of tape & a button glued smack in the middle.Have fun & please send pictures if you make any!
Please do not copy & paste any of my content without prior permission, pictures of Samster & Sophie are strictly prohibited. Links to my post however are always welcome!


Inspired? Share the Love...
Share on Facebook
Facebook
Tweet about this on Twitter
Twitter
Pin on Pinterest
Pinterest
Google+
Google+

{ }

"The Hesitant Ballerina"

by Natasha on May 9, 2011 in Uncategorized

Every week she begs to go to ballet class & every week she refuses to go in once we get there. Does anyone else’s kid do this?
Hope you had a lovely mother’s day, I didn’t do any homemade gifts this year but my girlfriend Brooke made this adorable tote for her MIL using the photo silhouette technique & pictures of her girls. What a great idea, right?!
The one thing I really wanted today was time to myself. P kept the little ones busy all day & I actually did laundry, made my grocery list for the week, put away the hundred zillion piles that accumulate on all the dressers in the house & now it is THE BEST feeling to be laying in bed & know that I’m starting my week off with a clean, organized house.
Whewwwwwww, relief feels good.

With that done I think I can be a little more fun with my goals for the week:
1) Organize my old posts with labels
2) Finish Sophie’s monster softie
3) Cook 4 times (I know, I’m CRAZY!)

What about you? What would you be able to take a deep sigh of relief about if you got it done?

Please do not copy & paste any of my content without prior permission, pictures of Samster & Sophie are strictly prohibited. Links to my post however are always welcome!


Inspired? Share the Love...
Share on Facebook
Facebook
Tweet about this on Twitter
Twitter
Pin on Pinterest
Pinterest
Google+
Google+

{ }

Hello Kitty Duct Tape Hair Accessories: Part 1 Headbands

by Natasha on May 5, 2011 in tutorials

Are you a sucker for this super cute duct tape that’s out too? I usually try to resist, after all $5 for a roll of duct tape is silly right? But then I saw the Hello Kitty one at Target, I had to have it. Once I got it home I started thinking about what I could do with it, that’s when it hit me, a headband! Today I’ll show you how to make it & then in Part 2 I’ll post the tutorial for the bows.

Now next you see that fancy smancy duct tape you’ll have an excuse to buy it too.
You’re welcome. (apologies to your pocketbook. Hehe, pocketbook, what are you, 80?)
For the headband you’ll need duct tape, 1 & 1/2″ wide ribbon, 1/2″ elastic & a sewing machine

1st step is to cut your ribbon & elastic so the total length is the circumference of the child’s head. For Sam I used 12″ of ribbon & 6″ of elastic.
Fold the ribbon slightly over the ends of the elastic like in the image below (this creates a tapered headband) & stitch each end of the ribbon to each end of the elastic going back & forth several times.Next unroll enough of your duct tape to cover the ribbon. On the end of the tape fold over the edge a bit.While smoothing with one hand roll your headband onto the tape. Then smooth down one of the small long edges followed by folding over the tapered edges. Repeat with the other side.The final step is just to go around the entire perimeter with your machine. (I went around twice) The stitches will not only help to give the piece a finished look but they’ll keep the tape permanently tacked down.
That’s it! Up next, duct tape bows. Then perhaps flowers? And who knows…this could get kinky.
Please do not copy & paste any of my content without prior permission, pictures of Samster & Sophie are strictly prohibited. Links to my post however are always welcome!

Inspired? Share the Love...
Share on Facebook
Facebook
Tweet about this on Twitter
Twitter
Pin on Pinterest
Pinterest
Google+
Google+

{ }

Weekend Away

by Natasha on May 2, 2011 in Uncategorized

I’ve been daydreaming about this past weekend for…well, about 8 months & 2 days.

Peace & quiet, amazing food (more importantly uninterrupted food), an entire night’s sleep, good wine & most importantly time away with my husband to remember who we were before we had kids.

So off to our annual anniversary getaway we went. In past years we’ve made the 1 hr & 1/2 drive to this little inn for a romantic dinner but this year we decided to splurge & stay the night. I can’t even think of words to describe how amazing it was…perhaps some pictures will paint a better picture.

We arrived early afternoon just in time for tea & snacks in the garden. (Sighhhh, deep breathing officially began here)We toured the inn for a bit, this is one of the many “sitting rooms”. Can you imagine?! A room where you get to do nothing but…gasp…SIT!Now wait just a doggone minute. Who is that I spy amongst the pictures of people who have enjoyed our little inn??Well then. Now I know I belong.

Next we relaxed in our room. I read a book. A real, grown-up book. I’m so happy I remembered how. (in case you’re wondering I’m reading Tina Fey’s “Bossypants”. You will literally laugh your ass off. Out loud. To the point where people stare. It’s fantastic.)

Then it was time to primp for our dinner date downstairs…I wish I had stolen the camera to snag some pictures of my dinner date. He looked so handsome.

As always (this is our 4th year coming here for our anniversary) the food was mind-blowing. This year we did the chef’s choice pairing/tasting menu where Chef Patrick chooses your courses & then they pair it with the perfect wine. For all 8 courses. You can probably figure out why there aren’t any more pictures after this…
The next morning we had eggs benedict by the garden & decided that although we had been craving this time alone we already missed our little girls & couldn’t wait to get home.

I said earlier that I was looking forward to rediscovering who we used to be before kids but what I figured out was that those people don’t exist anymore. Having children together has changed us. The ups & downs, sleepless nights & first smiles. We’ve grown into something so much better than I ever could have imagined. And although lately I’ve been craving those exciting, madly in love feelings you have when you’re first married this couple we’ve grown into is so much better.

It’s amazing what revelations you can have after one good night’s sleep.

This week I’d like to:

*Cook a lovely dinner for my dad tonight who’s visiting
*Make some Hello Kitty duct tape hair accessories (you’re intrigued aren’t you)
*Spoon with my husband for those 10 minutes we’re alone before two little bodies crawl in our bed

What do you think you’ll do differently this week?

Please do not copy & paste any of my content without prior permission, pictures of Samster & Sophie are strictly prohibited. Links to my post however are always welcome!

Inspired? Share the Love...
Share on Facebook
Facebook
Tweet about this on Twitter
Twitter
Pin on Pinterest
Pinterest
Google+
Google+

{ }

Union Jack Dresser

by Natasha on April 27, 2011 in tutorials

(PS, I’m so sorry to be fudging with the blog layout/look so much, I just can’t seem to find “it”. I promise as soon as I get it right I’ll leave it be!)

Now, this, this you’re going to love…

BEFORE:
AFTER:
BEFORE:
AFTER:
BEFORE:
AFTER:Don’t you love it?! I’d love to take credit for being so creative but I saw this idea on Miss Mustard Seed (a fab home furniture makeover blog btw) & followed her tutorial completely. Usually I at least change a few things to make a project my own but not this time, I wanted hers exactly!

The dresser was a thrift store find for $75 & the whole project probably took me 3 or 4 evenings after the kids went to bed. I cleaned it, sanded it, splotched some wood filler in it’s holes, painted it & then stained the whole thing with a dark walnut color. Throw some clear sealant on top & you’ve got yourself a Union Jack just in time for the royal wedding. Now I really wish I was having a “BYOT (bring your own tiara) Royal Wedding Party! ):

Inspired? Share the Love...
Share on Facebook
Facebook
Tweet about this on Twitter
Twitter
Pin on Pinterest
Pinterest
Google+
Google+

{ }

Hello world!

by Natasha on April 26, 2011 in Uncategorized

Welcome to WordPress. This is your first post. Edit or delete it, then start blogging!

Inspired? Share the Love...
Share on Facebook
Facebook
Tweet about this on Twitter
Twitter
Pin on Pinterest
Pinterest
Google+
Google+

{ }

Sunday Best

by Natasha on April 25, 2011 in Uncategorized

“Sunday Best”
Getting this photo was like wrestling a box of puppies…

This week I want to:

1.) Finish that doggone friggin laundry pile! I was thinking of more choice words but those little innocent faces above guilted me out of it.
2.) Make Sophie a pink monster softie
3.) Enjoy the sunshine while it lasts!

What about you? Any projects you’re working on this week or just boring chores? Bleh!

On a side note…
photo courtesy of Make Ahead Meals…

We had a ton of people over for our brunch/egg hunt this year & there was just no way I was even going to attempt to cook breakfasts for that many people. I used a catering service which after shopping around was really not much more expensive than groceries would’ve cost. But I did feel the need to bake something so I made these little tomato, basil, cheese & bacon muffins o’ goodness. They were SO easy & took all of 20 minutes from beginning to end. The only change I made was I left out the onion (because I didn’t have one) & I made regular sized muffins (because I didn’t have a mini muffin tin, can you tell how much I planned ahead here?) but they were still delicious! For full size muffins just don’t split the biscuit & give it an extra 3-4 minutes to cook. Be sure to try out the recipe here.
Please do not copy & paste any of my content without prior permission, pictures of Samster & Sophie are strictly prohibited. Links to my post however are always welcome!

Inspired? Share the Love...
Share on Facebook
Facebook
Tweet about this on Twitter
Twitter
Pin on Pinterest
Pinterest
Google+
Google+

{ }

Grandma’s Travel Tote

by Natasha on April 21, 2011 in tutorials

***A note to my Grandma, do not read any further until after your birthday. You will ruin the surprise & then you’ll have to fake like you’re surprised & that’s no fun is it?

For Christmas my family all chipped in on a vacation to California for my Grandma to go visit her cousin & see the sites. Her trip is coming up & happens to coincide with her birthday so I made her this little travel tote to wish her ‘bon voyage!’
(by “made” I mean “embellished”. Target “made” the actual tote…if only I had that kind of time…sigh.)I was inspired by the adorable “I {heart} my state” onesies seen here & here. I just printed out the image of Cali below (found by google searching ‘California Silhouette’) traced it onto freezer paper, cut out the state & then used white fabric paint inside the stencil. (you can find more detailed freezer paper stenciling instructions here) The heart is just red puffy paint.

Included are all the necessities for one’s trip to Hollywood…
-rhinestone encrusted sunglasses
-scarf for convertible rides
-trashy magazine, disposable camera & autograph book for part-time paparazzi work
-mints & gum
-travel wallet with some spending ca$h
-games, magazine & photo album of the babes for in-flight entertainment.

Hope she likes it, now I totally want one too!
Please do not copy & paste any of my content without prior permission, pictures of Samster & Sophie are strictly prohibited. Links to my post however are always welcome!

Inspired? Share the Love...
Share on Facebook
Facebook
Tweet about this on Twitter
Twitter
Pin on Pinterest
Pinterest
Google+
Google+

{ }

Next Entries →
← Previous Entries

greeting

phone pic

LTL button

before after 

buttonbirthday buttonfamily dinner buttonmommy thoughts button

marthabadge1
Photobucket
Photobucket

Tags

beauty before/after birthday party cheater's cooking Christmas costume decorating dinner 101 DIY dress-up easy dinner fashion craft furniture gift ideas hair halloween health chats holiday home home decor instagram jewelry making kid's craft kid fashion lyme mommy blog mommy thoughts naptime crafting party pinbusters pinterest princess recipe review recipes sewing shopping sunday love thrift store finds tips & tricks toddler sewing tutorials valentines video vlog where am I?

Blogroll

  • A Beautiful Mess
  • Cancer Alliance Blog
  • Centsational Girl
  • Coco & Kelley
  • Cotton & Curls
  • Crafterhours
  • Craftiness is not Optional
  • Effortless Style Blog
  • Happy Together
  • Hi Sugarplum
  • Homemade By Jill
  • Honey We're Home
  • How Sweet It Is
  • Hyperbole & a Half
  • iHeart Organizing
  • Kristen F. Davis Designs
  • Lil Blue Boo
  • Little Green Notebook
  • Momastery
  • One Pretty Thing
  • Piccoli Piselli
  • PS- I made this
  • Skirt as Top
  • Smitten Kitchen
  • That's So Michelle
  • The Baking Robot
  • The Daybook
  • The Makerista
  • Victoria Elizabeth Barnes
  • Vintage Revivals
  • Young House Love

WordPress Admin