Little Pink Monsters

  • tutorials
  • Recipes
  • Contact
  • About Me
  • facebook
  • twitter
  • pinterest
  • instagram
  • rss

Baby Blanket BooBoo Patches

by Natasha on April 19, 2011 in tutorials

This is Sophie’s beautiful rainbow, dip-dyed baby blanket that I bought her for Christmas.
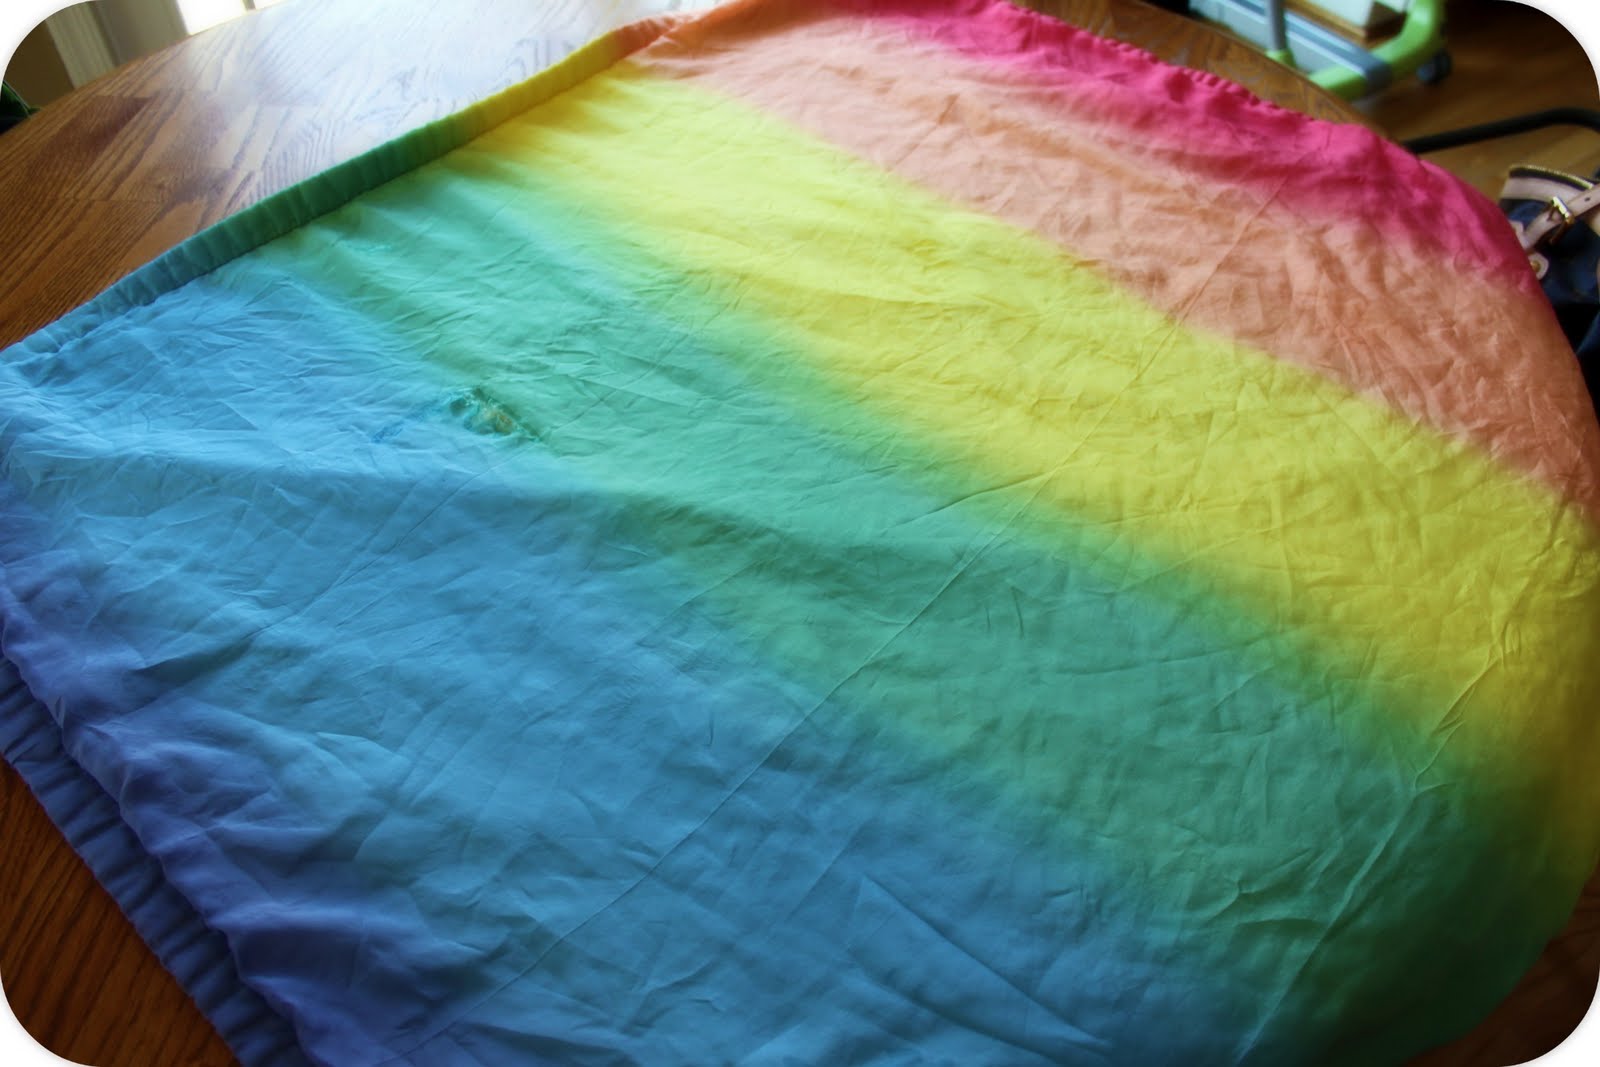
This is the rip in said baby blanket that happened when I was trying to fold up the stroller at the end of the jetway with two kids & bags & a line of annoyed people behind me. Hmph.I was really bummed about this because I love this blanket & it was finally getting nice & soft. I had no idea how to mend silk so I was thinking I might have to find her a new blankie.
Sadness.
But then during the two hour flight I had this bright idea…A little “boo boo patch” that documents how the injury occurred,
I figured if it’s going to stand out then it might as well be something fun to look at, right?I also made another one with her name…just for fun…The airplane patch is made out of a light-weight jersey knit which was not my brightest idea. I chose form over function & my stitches suffered because of it. The heart is cotton flannel which worked MUCH better.

A few tips for your patches…

1.) Work with an embroidery hoop, it makes life SO much easier. Also I drew my designs with fabric markers 1st, I don’t mind that the ink shows up between my stitches but if you do you could use a water soluble pen.2.) I didn’t want to stitch my patches onto the blanket because I didn’t think it would “lay” nicely with the two layers stitched together. So to attach the patches I used non-sewable interfacing. I have the say the edges where the blanket stitching was didn’t adhere too well so I went back & used some iron-on hem tape cut to size. It did the trick. Also I ironed on the interfacing before doing my embroidery, it gave the fabric a bit more stability.

I hope you like, homemade patches are pretty fun. I wonder what else I could stick them on?
Please do not copy & paste any of my content without prior permission, pictures of Samster & Sophie are strictly prohibited. Links to my post however are always welcome!

Inspired? Share the Love...
Share on Facebook
Facebook
Tweet about this on Twitter
Twitter
Pin on Pinterest
Pinterest
Google+
Google+

{ }

My BFFs

by Natasha on April 18, 2011 in Uncategorized

“BFFs“
I cleaned out my shoe closet today to make room for a couple of new friends (have you tried Gap’s city flats? Ugh, they’re buttery goodness!) And after much stalling I finally parted with 4 pairs of shoes. I’m still not ready to talk about it yet but I will say that although so many of these beautiful heels do nothing but collect dust lately they’re still wonderful, sexy memorabilia of another time & one day just maybe they’ll make a comeback.

What are you up to this week? Here are my weekly goals…
1.) Finish Grandma’s Bday present & mail it in time that it doesn’t require overnight shipping
2.) Cook a minimum of 3 times
3.) Work on a new look for the blog. I’m just not loving this one.

Please do not copy & paste any of my content without prior permission, pictures of Samster & Sophie are strictly prohibited. Links to my post however are always welcome!

Inspired? Share the Love...
Share on Facebook
Facebook
Tweet about this on Twitter
Twitter
Pin on Pinterest
Pinterest
Google+
Google+

{ }

Guiltless Spinach "Gratin" with Poached Eggs (aka heaven)

by Natasha on April 13, 2011 in dinner 101

I have a confession to make.
I haven’t been cooking much at all lately.

Last week we ordered take-out 6 times, the 7th night P. cooked.
I know, right?

I actually love to cook. It’s relaxing & I think that food cooked at home tastes better than a restaurant’s anyway. (And of course is stupidly cheaper) But lately I’m just too darn tired. You know what it is? It’s the grocery shopping required that gets to me, the thought of planning meals & then shopping with two kids is enough to make Chinese delivery again sound like the best meal ever. Last night while blog cruising however I stumbled onto a recipe that called to me. I had to have it. Even if it meant grocery shopping.So today sweet Soph made the sacrifice of taking her morning nap on the run so I could grocery shop with her while Samster was at school…I don’t know if she’d agree but judging by the bulging bellies of everyone in my house right now I’d say it was soooo worth it.

The recipe is Julia Child’s which normally I’d be completely intimidated by but it actually wasn’t bad at all. You can find it all on my favorite food blog, Smitten Kitchen. It really is true too that you don’t even miss the cream in this recipe! The only thing I’d add is to take your time with the step where you stir the spinach in the pot while waiting for the water to evaporate. I probably would’ve given it a few more minutes because it was a tad stewy. Oh, & don’t you dare forget the crusty baguette to sop up all that yolky goodness.

Deb also has a wonderful post on how to poach an egg. If you don’t mind let me blabber about this for a minute. If you do mind then you can check out here, I won’t be offended.
Egg chat isn’t exactly a titillating topic.
In the 10+ years I’ve been cooking I’ve never poached an egg. I never really had one that was that great & fried eggs seem so much easier. Then a year ago we were at our annual amazing anniversary dinner & they served poached eggs with raviolis as one of the courses.
IT WAS SEX ON A PLATE.
Seriously. The rich egg yolk was a decadent sauce in itself, & the whites were so delicately light they were almost an airy embrace around the yolk. (heehee, how ridiculous was that last sentence?!) Ever since then I’ve been obsessed but have been too intimidated to try them at home. Even when I called my mom this morning to ask how to make them she warned me about how hard they are but this recipe was burned in my brain & a fried egg just wouldn’t do.
So I gave it a try…
And guess what?
It worked on the first try!
And the 2nd, 3rd, 4th, 5th & 6th…6 little ducks that I once knew…

And THEY WERE GOOD.
I think it has a lot to do with the vinegar & Deb’s sliding egg bowl method perhaps.

Me thinks this post is getting really chatty. Basically I just wanted to tell you that dinner was amazing & thanks to this recipe I’ve got my cooking groove back (for now). Please go try it, I know it may sound weird to some of you (my girlfriend Megan who happened to stop by at dinnertime & P both looked at me with that cocked head confused doggie look when I told them what we were having for dinner) but I gotta say, every plate was licked clean.

Please do not copy & paste any of my content without prior permission, pictures of Samster & Sophie are strictly prohibited. Links to my post however are always welcome!

Inspired? Share the Love...
Share on Facebook
Facebook
Tweet about this on Twitter
Twitter
Pin on Pinterest
Pinterest
Google+
Google+

{ }

"Reading Material"

by Natasha on April 11, 2011 in Uncategorized

“Reading Material”
I’m quite certain she’s going to kill me for this someday.

This week I want to…

1) Tackle laundry mountain…again
2)Be consistent with Sophie’s new schedule & “sleep training” (hahhahhaaaahaaa)
3) Find a cute way to mend Soph’s baby blanket

What are you going to get done?

Please do not copy & paste any of my content without prior permission, pictures of Samster & Sophie are strictly prohibited. Links to my post however are always welcome!

Inspired? Share the Love...
Share on Facebook
Facebook
Tweet about this on Twitter
Twitter
Pin on Pinterest
Pinterest
Google+
Google+

{ }

Mirror Silhouettes

by Natasha on April 8, 2011 in Uncategorized

I received an email from Melissa at Pitter Patter Press telling me she loved my color silhouettes but wanted to try doing it on mirrors. What?? Mirrors you say? Oh yes. Mirrors.
Look how fabulous they came out…
Great, right?! I think it would be downright charming to have one in Sam’s bedroom over her dresser.

You can find the full tutorial on her blog here.
Nice work Melissa!

Please do not copy & paste any of my content without prior permission, pictures of Samster & Sophie are strictly prohibited. Links to my post however are always welcome!

Inspired? Share the Love...
Share on Facebook
Facebook
Tweet about this on Twitter
Twitter
Pin on Pinterest
Pinterest
Google+
Google+

{ }

DIY Cinderella Dress

by Natasha on April 6, 2011 in tutorials

Awhile ago Adrianna made the most adorable knit Belle dress, (her 2nd knit princess dress I might add, Snow White was 1st) then I was reading Jill’s blog & she made a mini Belle version for her little one’s 1st Disney trip. Well, after seeing my fellow bloggers churn out these creations how could I not make one for my princess fanatic?The top of the dress is made from the same peasant dress tutorial Adrianna & Jill used but for the bottom I did some experimenting. The bottom layer is a light blue chiffon, the middle is a sparkly synthetic fabric & the top white ‘poofs’ are also a sparkly polyester creation. (For tips on creating the ‘poofs’ you could use this tutorial Adrianna made for the Cinderella tutu)

At the last minute (and this means in the passenger seat on the drive to Disney) I decided to add some ribbon ties so I could cinch the waist a bit. The fullness of the skirt tended to pull the knit top out a bit. Also on the drive I took some light blue ribbon & made a quickie headband like Cinderella’s. (it’s just ribbon hand stitched to a 3″ piece of elastic) For some reason Samster was obsessed with having a headband, in fact when she 1st saw the dress she said,
“Oh! Cinderella dress!! Where’s the headband?”
One last tidbit…if you feel like splurging get yourself a child dress form. I found mine on Ebay for $40 & let me tell you it’s completely changed the way I sew kid’s clothes. Something about being able to pin & assemble the dress while seeing exactly how it will hang…

Please do not copy & paste any of my content without prior permission, pictures of Samster & Sophie are strictly prohibited. Links to my post however are always welcome!

Inspired? Share the Love...
Share on Facebook
Facebook
Tweet about this on Twitter
Twitter
Pin on Pinterest
Pinterest
Google+
Google+

{ }

"I know you…"

by Natasha on April 4, 2011 in Uncategorized

Did you see last Sunday’s post? If so than you know Samster is a bit of a Sleeping Beauty fan.

(for those who couldn’t tell what she was saying weren’t familiar with the song, it’s what Aurora sings in Sleeping Beauty)

Well, this past week her little brain exploded.

Her 1st real live princess, I don’t know who was more excited, she or I, (her or me? oh poopoo on you grammar) but IT WAS AWESOME. And Aurora was sooo sweet. She walked Sam away from the line & knelt down next to her. The two of them had private princess chat. I can only imagine what they discussed, I’m assuming they kept it light. One thing princesses & 2 yr olds have in common is neither cares to discuss politics, finance or religion.

I do know that at some point Aurora asked Sam about her dress, to which she said “my mommy made it”. Just about brought tears to my eyes. Ok, it totally did but cut me some slack, I was sleep deprived after staying up all night before our morning flight finishing that thing. Totally worth it though. Totally.

I’ll have more pics of her DIY Cinderella dress & tell you what tutorials I used to do it tomorrow, for now I’m going to check off no.1 on my list below.

1. Get some sleep
2. Replace the fish tank motor before it gives out & I commit involuntary goldfishslaughter
3. Paint the entryway table blue

You??
also if you have a blog be sure it’s either linked to your profile or leave it in the comment, I love to click on your comments & then go snooping to put a face with the name (:

Please do not copy & paste any of my content without prior permission, pictures of Samster & Sophie are strictly prohibited. Links to my post however are always welcome!

Inspired? Share the Love...
Share on Facebook
Facebook
Tweet about this on Twitter
Twitter
Pin on Pinterest
Pinterest
Google+
Google+

{ }

Baby Bug Hat

by Natasha on March 31, 2011 in tutorials

I’ve had this hat idea circling around in my head for a few weeks & the cold snap we just had combined with the guest post I wanted to write for Prudent Baby was the perfect reason to whip it up! By the way, have you guys been over to Prudent Baby?? Of course you have. I mean, so stinkin’ cute right?! Well the girls were nice enough to invite me to write a tutorial for their readers, please pop on by there when you get a chance & say “hi!”
On to the hat…

You can make this out of fleece or knit if it’s warmer at your home. For supplies you’ll need small amounts of two colors of your material choice & some applique interfacing.
Now a word on sizing…

After a small mis-measurement…(I know, right?)

I was able to reconfigure to the correct sizing below

You’ll need TWO RECTANGLES in these measurements:
Newborn: 6″ x 8″
Infant: 7″ x 9″

Plus a strip of contrasting fabric:
Newborn: 4″ x 12.5″
Infant 4″ x 14.5″

Plus a small amount of contrasting fabric for the spots & antennas.

Take each of your rectangles & fold them in half, cut a curve on the non-folded edge.
*cut both rectangles at the same time so the pieces will be symmetrical

Next cut out a few circles for your little bug’s “spots”

Finally cut a small 2.5″ slit down the center of each hat half. (These will give the hat a better shape) After those 3 steps your pieces should look something like this…Next go ahead & applique your spots to the hat halves. (basic applique instructions here)

After the spots are in place fold piece in half with the right sides together. Sew the slit you made shut. Repeat with other half of hat. Set aside.
Now to make some antennae. (antennas?) Cut out 4 mushroom shaped pieces that are around 2.5″ long. You can either topstitch them shut or stitch & then turn them to hide the seams. I just stitched around the edge for the fleece but with knit I might turn them & then push a little stuffing inside so they’d stand up. It’s really up to you…
Next up, let’s put the hat together. Place your two halves, right sides together, with the antennas stuffed inside. Pin the antennas so the bottom of the antenna edge is lined up with the hat’s edge that way you catch them in the seams. (See below)Stitch around curved sides of hat. Turn right side out.

Last step is the brim! Fold your long contrasting piece of fabric in half & stitch the short sides shut. Next fold the tube down so it’s about 2″ wide.
Place the tube inside your right side out hat so that the edges line up. Stitch around the bottom of the hat being sure to catch all 3 layers.
It should look like this after stitching…
Flip up your brim & your little bug is ready!

Please do not copy & paste any of my content without prior permission, pictures of Samster & Sophie are strictly prohibited. Links to my post however are always welcome!

Inspired? Share the Love...
Share on Facebook
Facebook
Tweet about this on Twitter
Twitter
Pin on Pinterest
Pinterest
Google+
Google+

{ }

The Poofering Princess

by Natasha on March 28, 2011 in Uncategorized

This week I’d like to…

1.) Pack for Florida
2.) Successfully get both girls on an airplane to Florida (and stay on it)
3.) Get a tan in Florida

You?

(btw, I don’t know why but I just love seeing your to-do’s for the week too! I guess it’s a bit of a voyer/relatable thing)
Please do not copy & paste any of my content without prior permission, pictures of Samster & Sophie are strictly prohibited. Links to my post however are always welcome!

Inspired? Share the Love...
Share on Facebook
Facebook
Tweet about this on Twitter
Twitter
Pin on Pinterest
Pinterest
Google+
Google+

{ }

Best Hummus Ever Recipe

by Natasha on March 25, 2011 in dinner 101


I think you know me well enough by now to know that I’m all about saving time. If something is just as good store bought I’m not about to make it myself. HOWEVER, some things are worth it & a big garlicky tub of homemade hummus is totally one of those. I promise, there is no store-bought brand (at least that I’ve tried) that tastes this good. It’s the only one my husband 2 yr old won’t turn his her nose up to & say “yucky”.

Homemade Hummus
2 15oz cans chickpeas (also called garbonzo beans) Drain but reserve 1/4 cu of the liquid
Juice from 1 lemon
1/4 cu Tahini (this is like sesame seed peanut butter, stir it well)
2 garlic cloves (or less to your liking, I grated mine with a zester to negate any raw garlic chunks)
Coarse salt to your liking (I put about 2 tsps)
Pepper & 1/4 tsp Paprika
Extra Virgin Olive Oil

Combine all above ingredients except olive oil in food processor
As the food processor is running drizzle the oil through the top, keep drizzling until the hummus reaches a creamy consistency. I love to serve mine as a dip with mini pitas & cucumber slices or I stick the whole bowl in the fridge & make myself hummus sandwiches with avocado & tomato throughout the week. So good & healthy. Love it!

Oh, and a tip I found for my teething baby? Nice cold cucumber stick. I barely peeled off the skin (if you peel it too deeply I find it’s too mushy) & let her gnaw on it. She was in baby HEAVEN.
(obviously closely supervise your little one, if it starts to fall apart or they break off a piece you want to be there to take it away…duh, I know.)
Please do not copy & paste any of my content without prior permission, pictures of Samster & Sophie are strictly prohibited. Links to my post however are always welcome!

Inspired? Share the Love...
Share on Facebook
Facebook
Tweet about this on Twitter
Twitter
Pin on Pinterest
Pinterest
Google+
Google+

{ }

Next Entries →
← Previous Entries

greeting

phone pic

LTL button

before after 

buttonbirthday buttonfamily dinner buttonmommy thoughts button

marthabadge1
Photobucket
Photobucket

Tags

beauty before/after birthday party cheater's cooking Christmas costume decorating dinner 101 DIY dress-up easy dinner fashion craft furniture gift ideas hair halloween health chats holiday home home decor instagram jewelry making kid's craft kid fashion lyme mommy blog mommy thoughts naptime crafting party pinbusters pinterest princess recipe review recipes sewing shopping sunday love thrift store finds tips & tricks toddler sewing tutorials valentines video vlog where am I?

Blogroll

  • A Beautiful Mess
  • Cancer Alliance Blog
  • Centsational Girl
  • Coco & Kelley
  • Cotton & Curls
  • Crafterhours
  • Craftiness is not Optional
  • Effortless Style Blog
  • Happy Together
  • Hi Sugarplum
  • Homemade By Jill
  • Honey We're Home
  • How Sweet It Is
  • Hyperbole & a Half
  • iHeart Organizing
  • Kristen F. Davis Designs
  • Lil Blue Boo
  • Little Green Notebook
  • Momastery
  • One Pretty Thing
  • Piccoli Piselli
  • PS- I made this
  • Skirt as Top
  • Smitten Kitchen
  • That's So Michelle
  • The Baking Robot
  • The Daybook
  • The Makerista
  • Victoria Elizabeth Barnes
  • Vintage Revivals
  • Young House Love

WordPress Admin