
 It’s pretty simple, super cheerful & makes a great racket if you have a little one who likes to shake her toys like a dog.
Oh, & it’s a big hit with a jealous 2 yr old too… Step One: Use a small plate to cut out 2 circles from your fabric (I used leftover yellow t-shirt from my scrap pile, yours doesn’t have to be knit but I do think it makes it nice & soft)
(Optional: I ironed my knit circles onto some light-weight interfacing to give them some strength since I planned on embroidering them & knit can get all wonky when you poke too many holes in it)
Step Two: Snip out 6 small triangles equally spaced (eyeball it) around your circles.
Tip-cut the two circles at the same time that way all your pleats will be the same size
Step 3: working with one circle at a time you’re going to stitch the triangles shut. This will give the sun it’s 3-dimensional rounded shape.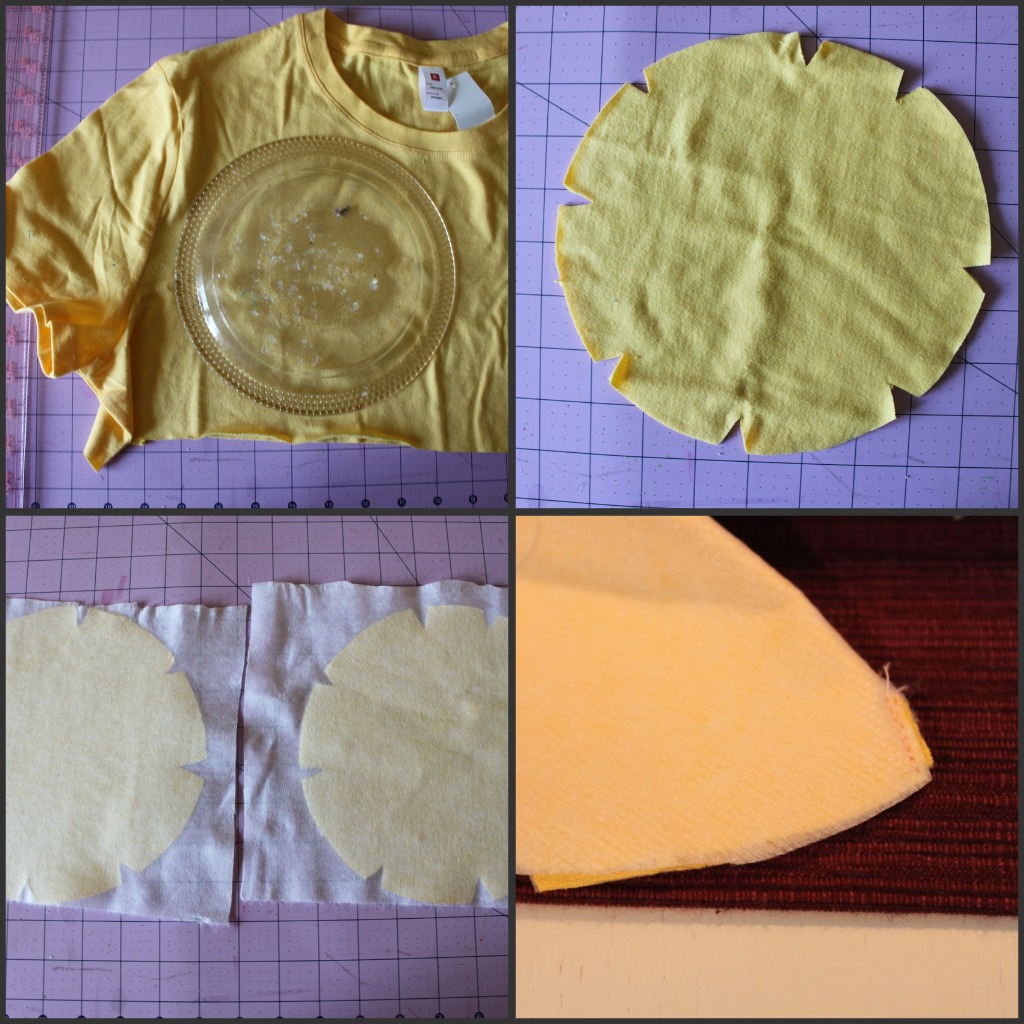
 Step 4: At this point I went ahead & embroidered Mr Sun’s face. To make sure my stitched shapes turned out how I envisioned I went ahead & drew the face with some fabric markers & then just stayed inside the lines with my stitches. Kind of like coloring with thread.
 Step 5: To make the “rays” I cut out eight 6″ strips of ribbon. I folded each in 1/2 & with the sun facing right side up I pinned the edges of each folded ribbon around the sun.
 Also note that I left out one ribbon on the bottom right, this is because that’s where we’ll turn the piece right side out & stuff it. The ribbon will be sewn in at the end.
Step 6: With right sides facing together & all ribbons tucked in re-pin around perimeter Step 7: Being sure to catch both edges of the sun & the ribbon edge sew around the perimeter leaving a 3″ opening (where we left out a ribbon) I actually went around the sun twice & was sure to backstitch at each end that way it would hold up while turning & stuffing.
Turn right side out, set aside.
Step 8: Time to make a rattttttttle! Really the rattle can be made of whatever you have on hand that will make a racket. I chose to use a plastic case that had held my stickpins with a handful of cheap heavy beads on the inside. Just be sure to tape your case shut. In case it ever came out we wouldn’t want choking hazards to spill all over the floor. 
 Step 9: For stuffing I made a bit of a sandwich inside my sun. First I laid a couple pieces of batting
 (cut a bit smaller than original circle size) on the bottom, then some Poly-Fil
, then the rattle, then more polyfil around the rattle, more polyfil on top of the rattle, then another piece of batting on the back. I think the batting helps to smooth out any lumps from the polyfil.
Tip- after you think you’ve stuffed enough, stuff some more. Push that filling all around, use a paintbrush or chopstick to work it in. Use a ladder stitch to sew your seam shut, as I sewed it shut I also kept stuffing more polyfil in. Don’t forget to include that last “ray” of ribbon in your seam.
 That’s it! It’s not very complicated but there’s something about it…maybe it’s the simple sweet face or perhaps it’s because it’s one of my favorite & often forgotten colors, yellow, but this is one of my favorite projects in a long time. Hopefully the little one will agree.
 Please do not copy & paste any of my content without prior permission, pictures of Samster & Sophie are strictly prohibited. Links to my post however are always welcome!


