Little Pink Monsters

  • tutorials
  • Recipes
  • Contact
  • About Me
  • facebook
  • twitter
  • pinterest
  • instagram
  • rss

Happy New Blog!

by Natasha on January 2, 2011 in blog design

I can’t think of a better way to start the new year than with a new blog!

(well, perhaps I can think of a few…lose 5 lbs, a pair of Christian Louboutin heels, a place to wear said heels, healthy happy children…bleh bleh bleh)

Every year I try to make New Year’s resolutions that I can actually accomplish. Sure I want to be a better wife, mother, person…but I think those should be everyday decisions. Not something you can ever really check off, you know? For my resolutions I keep them pretty shallow & pretty attainable. I love patting myself on the back for getting things done so I’m not really going to go crazy here. First one I decided a few months ago, to gain a basic understanding of html code. In particular, I wanted to be able to change my blog’s design myself.
CHECK!

I gotta say, the only reason this one is done by the end of day one is because it’s so much easier than I ever thought it’d be! I took step by step screenshots of how I built my baby deer header (isn’t he cute?) so look for a tutorial on that in the next couple of days but for everything else there’s already such awesome tutorials out there that I’m just going to pass those links along to you…
How to make a navigation bar

How to make your image larger than Blogger allows (this was HUGE for me, like life changing I wanted to weep with happiness HUGE! I’ve been trying to figure out how to have larger images because that’s um, kind of crucial for detailed tutorial shots & this worked perfectly!!!)
How to make a photo header using Picasa (my tutorial will be with Picnik)
This page has a great general blogger tutorial list
Picnik photography editing tips
How to use Picnik for creating printables (this totally got me started on the Picnik kick, now I’m an addict)
How to center your header

I really used Sneaky Mommy Blog Design for most of the help, what a great resource.
I also used 3 online programs to do all the image work (and they’re all free, woot! woot!)

Picasa (photo storage & editing) Picnik (photo & design editing) & Photobucket (online storage, generates html code for images)
All three are super user friendly, I HIGHLY recommend them!

Last I’m hoping you guys will let me know if I left anything off in the new design that maybe you really liked about the old one. (or really like on other blogs) There are still a few things to tweak (the tutorials list will be back, still working on a signature) but it’s mostly done.

So be honest (but gentle) do you like it???

***By the way…does anyone know how to make each of my columns wider? My base template is blogger’s ‘simple’ template but each column seems really narrow when I compare it to other blogs. Anybody know? Anyone? Bueller?

Inspired? Share the Love...
Share on Facebook
Facebook
Tweet about this on Twitter
Twitter
Pin on Pinterest
Pinterest
Google+
Google+

{ }

Homey Holidays

by Natasha on December 19, 2010 in Uncategorized

And that’s “homey” like comforting, warm & cozy “homey”, not “yo, yo, homey don’t play that way” kind of homey. In case you were confused.So Daddy is finally on vacation & I’m in full force Christmas mode. This is the first year we’ve stayed home for Christmas, it really is bittersweet because I won’t be with my family in Florida but I get to create our own traditions that will be happy memories for Samster & Soph. I guess I really am a big girl now.

To get in the holiday spirit here a couple of little festivity nuggets if you will, that we’ve been doing & are going to do…
My sister Elisha gave me this awesome recipe for making the house smell amazing. I think perhaps this is what “mulling” spices is? No?


In a small pot simmer 2″ water, 2 cinnamon sticks,
small handful of cloves, pinch of all spice &
squeeze of lemon juice. I also threw in a vanilla bean
because it was there & I thought it’d smell good.
I’m not so sure it made a difference.

Then I popped some pumpkin bread in the oven using this easy peasy recipe from my BFF Brooke. (I am SO not a baker, this truly is easy baking)

For crafttime this week we’re going to do saltdough ornaments with this recipe & a thumbprint reindeer family like the one here. (I’ll post some pics of those when they’re done)

And I didn’t take any pics (kicking myself) but the other night I did a test run for Christmas Eve dinner. I wanted to make some traditional Cuban dishes because that’s what I grew up eating so I’m making a slow-cooked pork in mojo marinade, black beans with yellow rice & sweet platanos. Mmmm. If all goes well I post pics & the feast recipes.

Oh, and by far my favorite tradition is napping by the Christmas tree, I mean look at these guys, is that not the coziest-could just eat ’em up- thing you’ve ever seen?!So I need more ideas…what are some of your favorite Christmas traditions either from your childhood or ones you’ve created for your children???

Inspired? Share the Love...
Share on Facebook
Facebook
Tweet about this on Twitter
Twitter
Pin on Pinterest
Pinterest
Google+
Google+

{ }

Samster Mommy’s Gift Guide

by Natasha on December 14, 2010 in Uncategorized

I just love all the gift guide segments on TV & in my magazines, it’s totally how I get my shopping fix these days…
In case you’re looking for some last minute gift ideas either to tell the “Mr” to get for you or something for someone else here are a few that I love…
*The fine print…No one has compensated me for any of these links, none are sponsors, they’re strictly my opinion. However, if you come across a link that’s through Amazon than you can support Samster Mommy by making any purchase. They’ll give me 5% commission for sending you to their site. Woo-hoo Amazon!

For Her:

They say grey is one of the hottest Winter nail colors, I bought this one & love it! Not too dark, not too light, not too concrete…perfectly chic.Chinchilly Essie Nail Color

Ok, this one’s a bit of a splurge….but seriously, how often do Juicy Couture & the sewing world combine? It’s a rare once in a lifetime event people! (yes, I am that friend who will help you come up with any excuse to purchase anything)

Juicy Couture Sewing Charm

Although I haven’t had time to finish my 30 for $30 endeavor that doesn’t mean I don’t pull this collection out from time to time to just ogle all the pretty glittery goodness. Oooooo, sparkles.

Martha Stewart Glitter Multi-Pack

These are on my list to Santa…I wonder if I’ve been good enough? I mean, purple rainboots with a faux fur insert?!? What girly girl would say no to that?!Hunter Snow boots with fleece inserts

I’m all about a good robe & this one is worth wayyy more than the $16 Target is charging. I wear it every morning. It’s super soft, super warm & a great gift for any girl in your life.

Target Plush Robe

Yes, these are a tad pricey for sweatpants but I bought mine two years ago and can honestly say I wish I had 10 more. I get excited when I’m folding clothes & see these are clean. Is that sad? They’re just so darn warm but still cute butt pants…win!win!North Face Fleece Pants

Friends & Family:

These brownies come as a recommendation from my mom and man oh man are they incredible! Perfect for the person who you have no idea what to get. (Btw, here’s a recipe I came across in case you’d like to make a knock-off version at home, please let me know if you try it!)Mari’s Salted Caramel Brownies

Everyone has someone in their family who loves musicals. This year the Sound of Music released they’re “Favorite Things Limited Edition” DVD set for the 45th anniversary, I’m hoping our musical loving family member will like this as much as I hope she does!The Sound of Music DVD Set (Limited Edition Collector’s Set)

And the munchkins:
Samster is so head over heels obsessed with princess dress-up and although I do try to make her some lately I’ve had to just suck it up and buy them. Now I’m sorry Disney store, I hope I won’t be banned from Disney for saying this, but your dresses kind of suck. And those prices? How do you charge $30+ for scratchy fabric that rips & shreds within a week of being home?! That’s why I’m highly recommending the “Play Wonder” brand from Target. We have the pink one below & not only is it a gorgeous dress (lovely pink velvet flowers & a super soft pink tulle underlay) but it’s lasted through 3 mths of constant “Sleeping Doody” dressplay. Super thumbs up!

Fairytale Princess Gown

For the newest little ones I always like to give one of these blankets along with a homemade hat or burp cloth set. I used these blankets every night on Samster and now it’s Sophie’s turn. They’re nice & soft with plenty of warmth but without the bulk. (FYI, Amazon prices them at about $10 cheaper than the baby boutiques.)SwaddleDesigns Ultimate Receiving Blanket

My husband & I have a love hate relationship with Melissa & Doug. I think we’re just mad that we didn’t think of making simple wooden toys & charging a buttload of money for them. I do love their puzzles though, they’re a Samster favorite & the nice strong pieces don’t fall apart when she tries to force a piece in the wrong spot!12 Pc Playful Pets Jigsaw Puzzle

And of course there’s always a handmade gift, what kind of craftster would I be if I didn’t mention a few of these?!
Click here for my tutorial on personalized brown sugar body scrub, here for a hand knit baby hat pattern & also One Pretty Thing has an awesome collection of homemade gifts, you can check out her links here.

If you have a favorite item or gift you love to give then please share it with everyone in the comments below.

Merry Christmas & here’s to Santa bringing you everything you want!

Inspired? Share the Love...
Share on Facebook
Facebook
Tweet about this on Twitter
Twitter
Pin on Pinterest
Pinterest
Google+
Google+

{ }

Crewcuts Knockoff: Sequin Holiday Tee

by Natasha on December 10, 2010 in diy jcrew, tutorials

I’m totally in love with this project, like truly madly deeply will end up driving past your house stalking you in love…

JCrew Version $32.50
Samster Mommy Version $3***I originally created this project for howdoesshe.com, it’s a great mommy site so if you have some internet time set aside go check it out.

For this project you’ll need: 1 permanent fabric marker, 1 package small sequins, needle & thread, t-shirt1st step- Draw the outline of the tie. One thing I really like about the original tee was how it wasn’t a literal image of a tie, it’s very hand-drawn looking which works out well for us! Don’t stress about just going for it with the marker, just take your time & follow the outline below.
**if you’re really worried about free-handing the tie then you can draw it first with a water-soluble fabric pen whose ink disappears with a bit of water. If you like what you see then draw over it with the permanent marker.

(I was using the image I had snapped in the store to draw mine)

2nd step- Sew on your 1st sequin. Do this by pulling your thread through the shirt & then back down through the hole of the sequin.final step- Keep sewing those little suckers on. For the 2nd sequin through the last you’ll do the same thing, bring your thread up through the shirt & then down through the hole of the sequin. I believe proper sequin sewing etiquette would be to layer the next sequin over the first so it covers up your previous sequin’s thread, they should also be sewn on in nice, neat little lines. For this tee however I think a bit messy & random is the way to go. Once again, it’s what makes it kind of fun & casual for a kid’s tee.So that’s it! A final step that isn’t necessary but might be a good idea is to use some light weight iron-on fusible interfacing on the inside of the shirt, it’s that stuff you see on the inside of kid’s tees to keep the applique design from scratching little ones’ skin. In this case it will keep your little one from snagging any the threads that are holding together all of your hard work.

Now just go find yourself a Christmas party to crash!

Inspired? Share the Love...
Share on Facebook
Facebook
Tweet about this on Twitter
Twitter
Pin on Pinterest
Pinterest
Google+
Google+

{ }

Project Advent: Complete

by Natasha on December 8, 2010 in tutorials

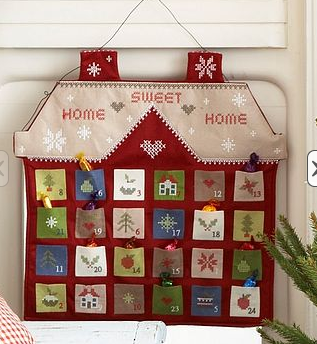
Whew. This is one of those projects where I totally bit off more than I could chew. Hence why I’m blogging about an Advent Calendar on December 8th BUT it is done & I am pretty proud of it.I had to wake Samster up from her nap (don’t even get me started on the naptime purgatory we’re currently stuck in…she naps & she’s up all night, she doesn’t nap & she’s a bear all evening & begging me to go ‘night-night’) but at least her wake up grumpiness was immediately cured when she saw the calendar up on the wall with stickers, lollipops, trinkets & smarties hanging out of the pockets. Add that to the fact that I let her sleep in her Sleeping Beauty princess dress & you’ve got Samster’s BEST. DAY. EVER.I really love the way the pockets turned out but I have to say I’m a bit disappointed in the overall construction of the house. After December 1st went by I started rushing & that equals sloppy. But what can you do, everyday that went by I began to curse this calendar more than love it. It was time to wrap it up so I spent the last two nights staying up until midnight but at least it’s done. Whew.I wasn’t sure if there was still interest in the templates since I doubt anyone’s going to still be sewing an advent calendar but if you do want the templates for the pocket designs than just leave a comment letting me know. I suppose they’d make good holiday applique designs, no?

I’m going a little light on the Christmas decorations this year but the calendar really did pull everything together…Best idea I’ve had lately? Putting Sam’s little Ikea play table in the kitchen. She eats all of her little snacks there, colors, plays & it’s right in the middle of where I’m usually at…the kitchen. We dragged it out when we had a friend over for dinner & it’s stayed in the kitchen ever since. BTW, playtables & chairs are really overpriced in my opinion but the ‘Critter’ set from Ikea is only $24 for the table & $12 a chair. Woot! Woot!

OH! And other exciting news, I actually managed to create a tutorial this week too! It’s a great J Crew knockoff that I did for a guest blogging post I’m doing for www.howdoesshe.com this Friday, can’t wait to share it with you guys. You’ll be so proud, it’s like I’m almost back on the blog wagon! (fingers crossed!!!)

Inspired? Share the Love...
Share on Facebook
Facebook
Tweet about this on Twitter
Twitter
Pin on Pinterest
Pinterest
Google+
Google+

{ }

Little Pink Monster

by Natasha on December 1, 2010 in Uncategorized

There’s something in my house…It’s the reason why it’s Dec 1st & I still don’t have an advent calendar finished…It’s also why my husband & I had to cancel our special date to go see Michael Buble last night. We feared we’d come home to find the babysitter huddled in the corner of a dark bathroom mumbling some incoherency about the “bu-bu-buhbaby, wuh, won’t, st-t-t-t-t-top CRYING!”And it’s also why Daddy is cooking Mommy’s yummy enchilada recipe instead of Mommy…It’s my…

Little
Pink
Monster!AaaaAagggGhhhhHHH!!!

Don’t be deceived, she’s a cunning little temptress.I love my kids but they both seem to go through this awful phase where they scream their heads off EVERY SINGLE EVENING. My husband lovingly said during one of these fits that we make awesome toddlers but “bum babies”. Hmph. Don’t know what to say about that one, there are points where they make me want to check out their warranty.

I have heard other parents talk about this, they call it “the witching hour”. I do have to give Sophie some credit though, she desperately wants to be the happiest baby on earth. Really she does. So many times she’ll be screaming her head off & then she’ll look up at you & smile through her red, puffy, teary eyes. “I love you guys, I swear I’m happy…I just don’t know why I’m so upset?! Wahhhh!”

So that’s why you haven’t heard from me lately, it’s also why I didn’t get much sewing done over Thanksgiving. Peter & I are really the only ones who can comfort her. (or deal with the screaming) But I’m hopeful, from what I’ve read this phase only lasts until 3 or 4 mths & Sophie’s 3 & a 1/2 months. I’m so excited to get back on the blog bandwagon, I really miss this little time for myself.

Don’t feel too bad for me though, the evenings are hard but other than that we’re really having a blast with our little girls. I never did show you their Halloween costumes…And Thanksgiving was so much fun…(a certain father of my children thought it’d be funny to teach Samster to give a big lick when someone asks her for a kiss. Unfortunately that neat little trick is also what she did when asked to kiss her sister for our Christmas card photo)

So here’s the sewing calendar goal, I’ve come too far to give up now!

*Finish all pockets today
*Embroider all numbers tomorrow
*Assemble house on Friday & give Sam 3 days worth of candy to ease guilt about not having calendar ready on Dec 1st
*Take several weekend naps

Good plan.

Inspired? Share the Love...
Share on Facebook
Facebook
Tweet about this on Twitter
Twitter
Pin on Pinterest
Pinterest
Google+
Google+

{ }

Advent Calendar Sew Along

by Natasha on November 21, 2010 in Uncategorized

I had the rare opportunity to catch up on some of my craft blogs the other night & just fell in luvvv with what Homemade by Jill is up to.

It’s an Advent Calendar Sew Along, woo-hoo!

I have the best memories of Advent Calendars growing up, it’s amazing how much better a piece of really crappy chocolate tastes when you have 24hrs of anticipation & all the wonder of what could be behind those little perforated windows. I just love the idea of making a homemade one that Samster & Sophie can look at year after year…

I wasn’t exactly sure how I wanted to do my calendar so I went through some google images, pulled from the ones below & then did a little sketch up.

(pottery barn kids)

(notonthehighstreet.com)

So far I’ve got 3 done…22 to go! Not to mention the house background & all the hand-embroidered numbers. I’m hoping to get most of it done over the Thanksgiving break, between the long car ride & built in babysitters I’m cautiously optimistic. (:

Oh, also I’m tracing my shapes as I go that way I can throw up a template in case you’d like to make some of them. Jill already has a bunch up on her site, you can find them here as well as some good embroidery links here. I still kind of suck at my decorative stitching but I’m pretty sure after this project I’ll be ready to go pro.

Inspired? Share the Love...
Share on Facebook
Facebook
Tweet about this on Twitter
Twitter
Pin on Pinterest
Pinterest
Google+
Google+

{ }

DIY Sleepsack (Hurray! Sleep!!)

by Natasha on November 16, 2010 in diy sleepsack, tutorials

***there is no guarantee that the following pattern will in fact produce a sleeping child

First off, “HELLLOOOoooooo dear blog friends!”

You thought I’d lost myself in a deep mommyland abyss didn’t you?! Well no my dearest, despite reflux, stomach bugs, potty training & mastitis (TMI, I know…) I’m still trucking along & somehow by the dear grace of my Lord above I was able to sew something!!!

I don’t know what it’s like where you live but around here it’s getting downright chilly. Despite my best effort to bundle up little Soph she still wakes up every night with icebox hands. That’s why I decided to make an uber-warm, fully lined, mitten sleeved sleepsack for her. (anything that might produce more sleep is worth the effort in my book)

The outside is a no-pill fleece print from Jo-Ann’s (50% off this week!) & the lining is this luxuriously soft chamois type fabric that I snagged from the fabric store scrap pile over a year ago. Throw in a 22″ long zipper, a sleepsack to make the pattern from & a panini sandwich (mmmm…cheeeese) & you’ve got everything you need to make your own ultra cozy sleepsack.
With the directions below feel free to leave out the sleeves for a traditional sleepsack (& super fast project) or leave out the lining if you want it for more everyday use.

First things first, I got Samster down for a nap & tucked Sophster into her swing…Next I got started making my pattern by using one of Sophie’s existing sleepsacks. I make most of my projects by drawing patterns from existing items, I find it easiest to use a big roll of paper (Ikea) & a highlighter to outline my pattern since I inevitably will get some on the clothes. Then I add a 1/4″ seam allowance around the outside of the drawing.Use your new pattern to cut out 1 piece of your outer fabric & 2 of your lining fabric.Take one of the two lining cutouts & slice it right down the middle. Also cut a V shape at the neck. These will be the lining pieces for the front half of the sack.To make the outer front pieces place one of your new lining fabric halves on top of your outer fabric & cut out the outer fabric to the same dimensions except for adding 1″ along the inside edge. (this is going to be used for your zipper lining)Next while you’re still in the pattern making mood go ahead & whip up some sleeves. I used a pair of Sophie’s pj’s whose armholes were roughly the same size as my sleepsacks. Be sure to fold the fabric in 1/2 along the top of the sleeve that way you’ll only have to sew up the bottom to form a tube. Cut out 2 & set aside.Now back the main body…time to sew in your zipper. (let me just say this is the first time I’ve ever sewn a zipper into anything. They intimidate the crap out of me. I tried reading the enclosed directions but they were all in professional seamstress jargon & I just couldn’t translate. The way I ended up doing it may not be appropriate zipper etiquette but it did work for me so I’m happy with it. The end.)
Working with just the front sleepsack pieces I pinned my lining & outer fabrics together so they were all lined up. Next I folded the 1″ extended piece of the outer fabric over & pinned it along the zipper.(In the picture below bottom piece is what it looks like when you pin the extended piece over & then if you flip it over & stitch it to the zipper it’ll look like the top one)For stitching the zipper on I worked with it zipped, first down the left & then down the right.
I did lots of pinning first to make sure it would lay properly.I also hemmed the edge of the neck “V” above the zipper.
Repeat on opposite side of zipper, unzipping if you need to.

Now that you have the front piece finished you’ll need to hem the neckline along the back 1/2 of the sleep sack so it matches up with the “V”. I just pinned it over & stitched it down. For both that seam & the “V” hems I did one straight stitch seam & one scalloped looking zig zag stitch. It ended up this way because of a mistake I made not catching the lining the first time I stitched it but I kind of like it…Next up, with your right sides facing together go ahead & stitch across the shoulders. Afterwards open the two pieces up & take a sleeve piece (opened up as well) & pin it along the armhole area.Stitch one sleeve along the “armhole arc” & then repeat on other side.

At this point the swing was no longer cutting it for Soph but I was determined to finish.
Bring in the Bjorn…Now for the little mitten cover ups I basically just sewed a little flap of fabric into the sleeve that could be flipped over to cover hands or left flipped up to allow the hands to come through the sleeve. You’ve probably seen these on most newborn long sleeved onesies or those little kimono tops they wear in the hospital. Well, I confused the heck out of myself with how to sew them on & in the end did it wrong so if you want to give it a try I’d say take a good long hard look at a onesie that has them. If you figure it out correctly please let me know!

And finally the last step…whew!

Take your entire piece & turn it inside out. Take great care to smoooooth out the fabric (paying special attention to catch both outer fabric & lining) & pin along the perimeter of the sleepsack & bottom of sleeves. Stitch one nice long stitch around the whole thing, flip it right side out & wah-lah!I think my husband’s comment sums it up…”can you make one in my size?”

Inspired? Share the Love...
Share on Facebook
Facebook
Tweet about this on Twitter
Twitter
Pin on Pinterest
Pinterest
Google+
Google+

{ }

(Chirp Chirp)

by Natasha on November 2, 2010 in Uncategorized

That’s what I’m hearing everytime I sit down to write a blog post. I suppose I have a bit of blogger’s block. Yes, I could give another rant about my baby who’s permanent address is my left boob or my tiara wearing toilet paper trashing toddler or even my new found rage for my husband when he snores while I’m still getting up all night. At times I find myself daydreaming about him waking up to find me standing next to his side of the bed with a butcher knife & half cocked smile. (Just kidding of course…kind of. No seriously, completely joking. Probably.)

But I’ve written enough about the tough parts of mommyhood, you don’t need to hear it again. Most of you are living it.

I would LOOOOVVVVE to share a great new crafting project with you but sadly (sniffle sniffle) my sewing room is getting cobwebs.

So here I am, just checking in with a little hello (Hi.) so you know I’m still around.
(I’m actually doing quite well, we’re slowly but surely adjusting to our new family…two steps forward one step back at a time.)

Good news is my BFF from Florida is flying in today with her two little girls and is staying all week long for a visit! HOORAAAY! She’s also a new sewer, perhaps some virgin blood will get me going…

BTW! The random winning comment for the beauuuutiful tutu from All the Roses is….

Nancy’s Couture!

Nancy, please send me an email with your address & I’ll pass it along to Heather!

Inspired? Share the Love...
Share on Facebook
Facebook
Tweet about this on Twitter
Twitter
Pin on Pinterest
Pinterest
Google+
Google+

{ }

Sister Tutus (Giveaway!)

by Natasha on October 25, 2010 in Uncategorized

Pretty darn cute, huh?
Well yes, I am a bit fond of the kids but I was referring to the tutus.

Heather from “All the Roses” sent Samster & Sophie those two beauuuutiful tutus as a baby present. And as a present to you guys she’s got a “Tot Tier’s Tutu” for you too!
Pretty nice lady if you ask me.

The contest will be the usual standard stuff, leave a comment, (tell me what little princess you know that the tutu will be for) & at the end of the day on Friday I’ll choose a winning comment at random. But wait, there’s more! (cue Price is Right music)

If you don’t want to leave it to chance that you’ll win one then here’s your motivation to buy your own. Heather has been sweet enough to offer all Samster Mommy readers 10% off if you purchase a tutu from her between now & Friday! (Just converse with her through her etsy shop)

I think I can pretty much call myself a tutu connoisseur after the Tutu Drive & I can say in utter honesty that Heather’s tutus are some of the most stunning, well-crafted tutus I’ve ever scene. THEY. ARE. GORGEOUS.

And yes, I’m a tad bias since she sent me some but hopefully you guys know me well enough by now to know that I’m not one to b.s. you, if I say it’s a good tutu than doggonit IT’S A GOOD TUTU! (Shaking Fist!!)

Here are a few more from her shop, I just love the cascading layers & big satin ribbon bow in the back…pretty, pretty, pretty!I’ve got to see if I can convince Heather to teach me how to make that pink tulle dress, isn’t it the dreamiest thing you ever did see? And the hydrangea tutu with petal bathing cap?! My goodness, you could do your own Anne Geddes photo shoot with these outfits!

Good luck!

Inspired? Share the Love...
Share on Facebook
Facebook
Tweet about this on Twitter
Twitter
Pin on Pinterest
Pinterest
Google+
Google+

{ }

Next Entries →
← Previous Entries

greeting

phone pic

LTL button

before after 

buttonbirthday buttonfamily dinner buttonmommy thoughts button

marthabadge1
Photobucket
Photobucket

Tags

beauty before/after birthday party cheater's cooking Christmas costume decorating dinner 101 DIY dress-up easy dinner fashion craft furniture gift ideas hair halloween health chats holiday home home decor instagram jewelry making kid's craft kid fashion lyme mommy blog mommy thoughts naptime crafting party pinbusters pinterest princess recipe review recipes sewing shopping sunday love thrift store finds tips & tricks toddler sewing tutorials valentines video vlog where am I?

Blogroll

  • A Beautiful Mess
  • Cancer Alliance Blog
  • Centsational Girl
  • Coco & Kelley
  • Cotton & Curls
  • Crafterhours
  • Craftiness is not Optional
  • Effortless Style Blog
  • Happy Together
  • Hi Sugarplum
  • Homemade By Jill
  • Honey We're Home
  • How Sweet It Is
  • Hyperbole & a Half
  • iHeart Organizing
  • Kristen F. Davis Designs
  • Lil Blue Boo
  • Little Green Notebook
  • Momastery
  • One Pretty Thing
  • Piccoli Piselli
  • PS- I made this
  • Skirt as Top
  • Smitten Kitchen
  • That's So Michelle
  • The Baking Robot
  • The Daybook
  • The Makerista
  • Victoria Elizabeth Barnes
  • Vintage Revivals
  • Young House Love

WordPress Admin