Little Pink Monsters

  • tutorials
  • Recipes
  • Contact
  • About Me
  • facebook
  • twitter
  • pinterest
  • instagram
  • rss

Update: Project Chum Chum

by Natasha on July 19, 2010 in Uncategorized

Hi guys, sorry to disappear on you. (again) No vacation this time, unless you consider labor & delivery a vacation in which case we should probably talk about getting you out more often.

Little Chum Chum has been quite busy, my occasional Braxton Hicks contractions have turned into something more but after spending last night in the hospital & this morning at my Dr’s office we’ve all decided to just let me be at home & not doing anything more to stop labor. (medications to stop labor didn’t work last night) I’ve only dilated 1cm with the strength the contractions have been holding steady at so my Dr’s seem to think I’ll still be able to keep the little one in another week or so, keep your fingers crossed! (I’ll be 35 weeks on Friday)

Anyone spend several days, weeks (eek!) having contractions before real labor got going? What about having a 34 or 35 week preemie? Did they do ok?? I love when you guys leave comments about your experiences, it always makes me feel better. (:

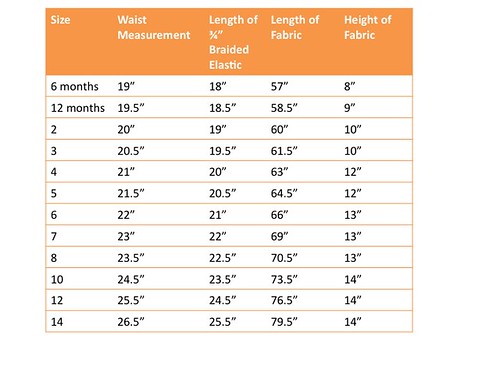
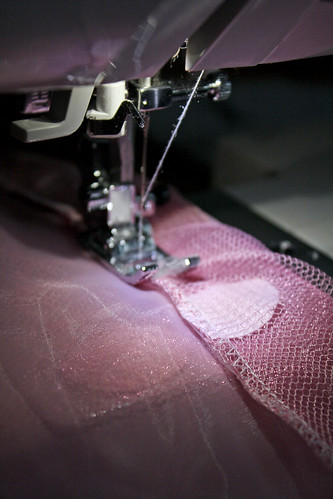
Be patient with me for these next few days till we know what’s going on. Family is coming tonight to come & stay with us so on one hand I should have plenty of time to rest while blogging or stitching up tutus but then again you never know what could happen…

Inspired? Share the Love...
Share on Facebook
Facebook
Tweet about this on Twitter
Twitter
Pin on Pinterest
Pinterest
Google+
Google+

{ }

Crafterhours Guest Post: Cinderella Tutu!

by Natasha on July 14, 2010 in Uncategorized

Oh my goodness. You guys are going to luvvvv this one!

I’m so excited that Adrianna from Crafterhours is helping out with the Tutu Drive & guest posting for me today. I absolutely adore the Crafterhours blog. You know when you find a blog & the way the author writes just speaks to you, almost like you’re talking to an old friend? That’s how Adrianna & Susan are at Crafterhours, they’re funny, sweet, creative & even a bit crass. To me, the perfect combination in a friend. (:

After you take a look at this tutorial & crank out about a half a dozen of them (wink, wink) promise me you’ll go take a peek at their blog. I bet you’ll love it.

Take it away Adrianna!

Hello everyone! Adrianna from Crafterhours here. Thank you Natasha for having me over today! I think you’re pretty awesome for hosting this charity event, and am very flattered that you invited me to do a tutorial. I hope all of you reading this will help Natasha reach her goal of 100 tutus for this very worthy cause!

If you need a push in the right direction, there are tons of tutu tutorials out there (that’s fun to say), but this is what I came up with. I kind of made it up as I went, so it may seem a little strange. Feel free to do it your own (better) way!

Supplies:
– 4.5 yards of 60 inch wide light blue tulle
– 1 yard of shiny white fabric (I used a polyester satin) You’ll have plenty left over.
– 1 yard of synthetic white ribbon
– length of 1 inch elastic, cut to fit around wearer’s waist
– fire

Using these supplies, I was able to make a size 4ish tutu, but depending on how long you want your tutu to be, this could easily fit a 2-100 yr old 🙂

Step 1:
Cut your tulle into 60 x 32 inch rectangles. If you fold your tulle lengthwise into fourths, you’ll have an easier time cutting across the entire width. You should end up with 5 rectangles and a little scrap leftover.

Step 2:
Take your rectangles and stack them all on top of each other like a big tulle sandwich.

Step 3:
Carefully fold that entire stack in half lengthwise, so you now have a 60×16 inch rectangle. Pin at the fold so nothing shifts. It is more important that the tulle stay put at the fold than at the raw edge. If the raw edges aren’t perfectly equal, that’s just fine.

Step 4:
Using a very low heat setting, press the fold to secure it, but leave the pins in. Make sure the iron doesn’t melt your tulle!

Step 5:
Sew a seam 1.5 inches away from the fold, all the way across the 60 inches. You will be sewing through 10 layers of tulle.

Step 6:
Thread the elastic through the tube you just sewed. Sew the ends of the elastic together and arrange the tulle over the elastic so it is all covered and the gathers are evenly distributed. Now you should have this:

See how the uneven hem just makes it more frothy and tutu-ish?

Step 7:
Fold your white fabric and cut 2 rectangles that measure 15 x 13 inches. You’ll end up with 4 rectangles.

Step 8:
Lay all the rectangles on top of each other so the 13 inch sides make the top and bottom, and cut them all so the two bottom corners are rounded.

Step 9:
Sew two of the rectangles right sides together: First, sew a seam across the flat top. Stop halfway across and leave a 2 inch hole so you can flip it right-side-out later. Then, using your longest stitch length, sew 4.5 inches down both sides of the rectangle. Continue sewing around the rounded corners at a normal stitch length.

Step 10:
Pull on the bobbin thread to gather the top 4.5 inches of each rectangle where you used a longer stitch length. Once these are gathered as tight as they’ll go, sew over them with a regular stitch to secure. This picture might help:

Step 11:
Flip the rectangles right-side-out, push out all the corners and curves, and press. Repeat steps 9 & 10 on your other two rectangles.

Step 12:
Find the point on your tutu where the tulle is open and sew one top corner of each white rectangle to the elastic at that point. This will attach the white parts, but also ensure that your elastic doesn’t flip around. Seriously, what are those white parts called on Cinderella’s dress? I’m calling them “white parts”.

Step 13:
Bring the white parts around to the front of the tutu, and sew them down, leaving a gap in between.

Now your tutu will look like this. See how the white parts stick up at the top? Let’s take care of that, shall we?

Step 14:
Flip the white parts up and find the center point.

Sew that point down, right sides together, to the elastic of your tutu.

When you flip it back down, it’ll look like this. Now we have that nice poofyness and drape like the white parts on Cinderella’s dress!

Step 15:
Use your ribbon to make a bow and sew it to the front of the tutu. You could do this by actually making a bow, or by assembling each bow “part” separately and sewing them all on for a “faux bow”. Ha! Faux bow! I’ve got to copyright that! Ok, sorry, it’s been a long tutorial.

The fire I mentioned earlier is to melt the ends of the ribbon so it doesn’t fray. Make sure you don’t actually put the ribbon into the flame, but hold it near enough that it begins to melt. My Faux Bow© construction looked like this:

Step 16:
Slip that tutu onto the cutest belly around and enjoy!

Thanks again for having me over today, Natasha!

Oh my goodness Adrianna. Seriously? Seriously?! That is the CUTEST THING EVER! I’m dying over here, can you please ship an extra 2 for me & Samster? That wouldn’t be a problem right? (;

Inspired? Share the Love...
Share on Facebook
Facebook
Tweet about this on Twitter
Twitter
Pin on Pinterest
Pinterest
Google+
Google+

{ }

Tutu FAIL.

by Natasha on July 13, 2010 in Uncategorized

Before I get into my disaster of a tutu creation let me mention that the Tutu Drive has been officially expanded through the end of the month. So get crack-a-lackin!

Now on to utter tutu sadness…well, perhaps that’s a bit dramatic.

I had this great idea for today’s tutorial, I love big ruffly pettiskirts but have always been intimidated by the amount of work they require. I thought I had come up with a good way of making a “quickie” simplified version. But as often happens in the crafting world (in mine at least) what started off making a lot of sense ended up getting a big ol’ stamp of craft FAIL.

Samster didn’t even want to model it…You can’t really tell just how bad it is in the pics. It’s pretty wonky. I’m not quite sure where I went awry but I’m just too tired today to try and give it another go.

I’m not going to totally leave you hanging though, I do have two tutu tips that I think are pretty darn good!

One- use your tutu scraps to make a matching doll tutu to go with your donation. Making one this tiny really took no more than 10 minutes & when I gave it to Samster you wouldn’t believe how she lit up to see her doll in a matching tutu. I’m sure it would make the little girls receiving these tutus just as happy. (you can find the stuffed tutu tutorial here)

(By the way, did you ever have a doll like this?? It was my FAVORITE when I was young, I think you would pick one out that looked like you. Although I chose one with green eyes & fair skin. Clearly I didn’t quite understand the assignment.)

Two- It’s been driving me crazy how the little balls in Samster’s pompom tutu always congregate at the ends. I’m sure it bothers me much more than it does her but regardless I needed a solution. With this one that I made for the Tutu Drive last night I decided to stitch a little line down the tutu every 8″ or so, this way the stuffings are contained in their own little pouches. Since the tutus all gathered you really can’t even see the lines. I love it! (stuffed tutu tutorial here)
So there you go. Sorry about the lack of tutorial. Thank goodness Adrianna from Crafterhours will be here on Thursday to save the day with a guest post! Whew!

Inspired? Share the Love...
Share on Facebook
Facebook
Tweet about this on Twitter
Twitter
Pin on Pinterest
Pinterest
Google+
Google+

{ }

Reader donations, Banged-Up Catbirds & Big Ol’ Bellies

by Natasha on July 12, 2010 in Uncategorized

I just figured I’d catch you up on everything at once. You don’t mind do ya?

So 1st off let me introduce you to Lucky the Catbird.Lucky had the unfortunate unlucky experience of flying into our window yesterday..BUT lucky for Lucky the Catbird he flew into our window when Samster was on patrol & she immediately started yelling at him through the window. “Birdieeee! Birdieeee! Alllooooo? Tweet Tweet! Tweet Tweet!!”

P & I both came to inspect & although my dear husband swore the bird was just “chilling” in the shade of our front doorstep I told him that no able-bodied bird would hang around on a doorstep while a 2 yr-old screeched at him using unnaturally high-pitched noises.

Sure enough when I went outside he couldn’t fly away, poor thing. We looked up & saw feathers stuck to the window above the door, not too hard to figure out what happened.

I tossed a dishtowel over him (which is when I discovered why they call them “Catbirds”, they meow at you) & placed him in a cardboard box. After a few phone calls to Vet Emergency Clinics we got the number of “Second Chance Wildlife Rescue“. What a great place, they take all sorts of injured or abandoned animals & were happy to take in our little visitor. I called today & Lucky made it through the night. He doesn’t appear to have broken anything so they’re hoping that he was just stunned & would be able to be released soon. Godspeed little Lucky, we’re rooting for ya.

Next I thought I’d throw in a token belly pic since who knows how long little Chum Chum is going to stay in their cocoon.I’m almost 34 weeks & went to the Dr. this morning for a non-stress test. She said everything looks good & she thinks we’ll be fine for making it a few more weeks. Woohoo for no bedrest! (I had bedrest with Samster, miserable ordeal. I wish that on no-one, especially no one who likes to keep busy)

And finally the best for last. Look at all these WONDERFULLY BEAUTIFUL dress up items you guys have sent me for the Tutu Drive so far!!!4 AWESOME superhero capes from McGeemommy. I swear she must a superhero to crank all these out!
Kate from Houston made the poofilicious hot pink tutu, the lovely pink & blue tutu is from Kathryn in Tennessee, I’m head over heels for the purple stuffed petal tutu from Rachel in Maryland. And last is the gorgeous purple/pink rhinestone tutu from Bonnie at the Bow Basket. (Bonnie is also giving a tutu discount in her etsy shop here!)That ADORABLE pirate hat & eyepatch? From Beth at Mama Bee Designs…So cute! (thanks for the little gift for me too Beth! Made my day.) The pink & blue stuffed tutus are from the Nelsons in Virginia, I just love that they’re stuffed with felt hearts & rhinestones, so creative! And those two pink pom pom apron tutus are from Mary in Cali, beautiful!

That brings the tally to 36 dress-up items total. Hmm, 64 to go. That’s a lot. I’m going to get cracking tonight on a few that I have in the works (that’s my tutu factory in the bottom left of the above pics) & I know you guys have some more coming because of all the wonderful emails you’ve sent. Perhaps I should expand the cut-off date till the end of July? Would that help??

Inspired? Share the Love...
Share on Facebook
Facebook
Tweet about this on Twitter
Twitter
Pin on Pinterest
Pinterest
Google+
Google+

{ }

Baby Amtrak

by Natasha on July 10, 2010 in Uncategorized

That’s what we almost had today, at least it felt that way. But more on that in a minute…

1st off, sorry I had to disappear on you for a few days. We decided to take one last quick vacation & took the train up to Connecticut to see my in-laws & take Samster to the beach.

(As I’ve mentioned before I don’t like to post about when we’re going out of town because I’m super paranoid that some Internet creeper is going to use the opportunity to break into our house, move into my closet & secretly spy on me for weeks before popping out at 2a. I know, I could use therapy.)

It was hot as can be but we did have a really good time…we kept trying to savor our time with Samster & show her lots of attention since she’s about to get her little world rocked.I’ve been having some contractions on & off for a few weeks now but starting on Friday evening while we were gone they got more intense than I’m used to. They never got closer than 20 minutes apart though so when I gave the Dr a call she wasn’t too worried. I went to sleep & eventually they wore off. Until the next morning, when we’re sitting in the Connecticut train station, about to get on a 4 hr train trip…they started up again about every 15 minutes. We contemplated our options & in the end I told P that I felt very confident that even if this was early labor I wasn’t going to be popping out a baby in the next 5 hours & we should be fine to get home. And it’s a good thing we did get on our train because a terrible storm came through right after we left & knocked out all train service! People on the train after us got stuck for 2 hours in the train with no a/c! Oh my gosh, I would have DIED. Seriously, if we had decided to wait a bit & take the next train & I had been stuck on a hot stuffy train for 2 hours with a 2 yr old we’d have “Baby Amtrak” right now. Actually it’d probably be more like “Baby I Hate Amtrak” if they left me on a powerless train.

But that didn’t happen & we’re home safe & sound, back to blogging from the comfort of my own bed while Samster watches Dora.

I have to admit I’m a little consumed with the possibility of this baby coming early. I’m only 33 weeks but my body is acting like it did when I was 36 weeks along with Samster. But who knows, I know this time of early contracting can last for weeks so I may be getting all wound up for nothing. Sigh. I hate not knowing!

Regardless the Tutu Drive is still in full force! Tomorrow I’ll post pics of the BEAUTIFUL tutus I picked up from the post office, seriously, you guys are incredible!!!

Hope you’re having a great weekend. Do me a favor & send some good cervix luck my way that baby Chum Chum stays in a few weeks longer. (:

Inspired? Share the Love...
Share on Facebook
Facebook
Tweet about this on Twitter
Twitter
Pin on Pinterest
Pinterest
Google+
Google+

{ }

Tutu Tutorial- Happy Together’s Dress Up Skirt!

by Natasha on July 6, 2010 in tutorials, tutu drive

Ok guys, for this week’s Tutu Tutorial Tuesday I’ve got an extra special treat, Jessica from Happy Together has oh so graciously agreed to write a wonderful “Dress up Skirt” tutorial for the Tutu Drive! (read all the Tutu Drive details here) I’m SO excited to have her be a part of this, I’m sure you all read Happy Together but if you’ve somehow missed it please go take a peak (after you churn out the following project of course) it’s an amazing craft/mommy blog & has been one of my favorite reads for over a year now. But enough rambling, I’m gonna let Jess take over…

Hi everyone! My name is Jessica from Happy Together.

I am a blessed mom to my daughter and wife to my hubby who gets some extra time to craft and share about it on my blog. I also have an Etsy store where I sell patterns and a few creations from time to time.

When Natasha contacted me about her tutu drive, I knew I had to help out. I have known young ones who have gone through some serious illnesses, like cancer, and I know how even the littlest thing can bring such joy to their lives.

Playing Dress Up me????

Little things like fun dress up clothes 🙂 So they can pretend to be pretty princesses or astronauts in space….

My little Princess She wants to be an astronaut!

I decided to do a tutorial for a dress up skirt, which you can use all tulle (to make it more “tutuish”) or you can add other types of materials as well. Enjoy and I hope you are able to contribute to this cause some way if you feel led to.

The Dress Up Skirt Tutorial

The Dress Up Skirt Sizing Chart

*The above chart indicates the size (I stuck to Natasha’s chart she posted earlier), the length of 3/4″ braided elastic needed, and the height x length that the material needs to be. For the trims, you need enough that is the length of the fabric tier.

*Suggested fabrics: The easiest to deal with will be fabrics that don’t fray, like tulle, nylon chiffon, lace, etc. But I also used satins, organza, and silk for them to be fancy.

*I didn’t have enough time to calculate the specific yardage, but some simple math can help out. I ended up using fabric from my stash and just had to sew some pieces together to make it long enough.

*I did several layers on mine, but you could even just do one if you like.

1. Take your piece of fabric and sew the height (short) sides together, right sides facing if applicable. Repeat for any other layers you will be adding.
*Tip: If doing more than one layer, you can make the heights differ so they are more tiered like.

2. Sew on ribbons, pom poms, lace, other trims, etc. onto the bottom of the layer(s).I found some amazing $1 spools that had plenty of trim on them for one layer at JoAnn’s and Micheal’s. I also had some stuff from $1 grab bags that I had bought from Hobby Lobby.

Pretty trimmed layers
Pretty Pinks Pink and Black
Pretty Trims

*If using fabrics that fray, I suggest one of the following: -add a bit to the height so you can make a hem; -use a zigzag stitch over the edge; -or leave if for a frayed look on purpose.

3. Place layers together and pin together.

*Note: I made some layers longer in width than others, so I just kind of pleated them and pinned them on to equal the other layers length.

4. Sew 1/4″ in at the top and finish the raw edge (Meaning: use a v or zigzag stitch on your sewing machine to catch the edges)

5. Turn inside out and fold top down (towards the inside part) 1 inch. Sew in place right on top of where you sewed in #3, but make sure to leave about a 1″ opening for the elastic to go in.

6. Place a safety pin on the end of your elastic piece. Thread it into the 1″ opening all the way around the casing you just made. Bring it out and place the ends on top of each other (make sure elastic didn’t get twisted inside). Sew together.

7. Push elastic in opening and sew that opening shut.

Dress up Skirts for Tutu Drive

Checking it out....

Imagination Quote

Thank you to all who are able to help, even if you can just say a prayer for children in these situations, you have done more than you will ever know……

Oh my goodness Jess, those are ADORABLE!!! Seriously stinkin’ cute. I’m definitely going to churn some out & after the tutu drive is over you better believe Samster is going to get one like the light blue one you made! Thank you SO much for taking the time to write us such a great tutorial!

Samster readers, please go check out Jessica’s blog, Happy Together, you won’t be disappointed!

Inspired? Share the Love...
Share on Facebook
Facebook
Tweet about this on Twitter
Twitter
Pin on Pinterest
Pinterest
Google+
Google+

{ }

Pottery Barn Butterfly Mobile

by Natasha on July 4, 2010 in diy pottery barn, tutorials

I’m quite certain you all know about the wonderful mommy site, luv in the mommyhood right? But if for some reason you’ve been under a rock then please go check out Shannon’s Baby Bonanza that she has going on right now, there’s all sorts of wonderful baby project for you to do & this tutorial is from my guest post over there. (Thank you SO much Shannon for letting me write on your site today, what an honor! Woohoo!)

Ok, so tell me, have you seen the beautiful paper mobiles that Pottery Barn Baby always has? They’re just gorgeous, so airy & just plain PRETTY. But that pretty also comes with a $60 price tag…for paper cutouts. I couldn’t justify it so instead I chose to make it. Here’s a quick (ok, not really quick, it’s kind of a lot of steps but totally worth it) tutorial so you can make your own.and here’s Pottery Barn’s…*Update: I just looked online & the butterfly mobile I’m knocking off is on sale for $40. If I’m completely honest with you there were several times I was cursing myself for not shelling out the $40 but at least now I can take pride in knowing I made it myself. At least that’s what I’m telling myself…

You’ll need:

*1 Wire Wreath Base
*Punches of your choice (mine are the large & small monarch butterfly punch from MS)*Cardstock
*Fishing line (jewelry aisle)
*Pennies
*White spray paint
*Wreath doo-dads for decor (optional)
*Hot glue gun/sticks

1st step is to spray paint your wreath base white. Next start punching away! It’s important to use a good cardstock paper (verses printer paper) so your punches will have some durability to them. It’s hard to tell how many you’ll need so I just punched a whole slew & then as I used them up I would punch more.

To assemble the top of the mobile tie 4 separate strings to the top of the mobile making sure they’re evenly spaced apart. The length is really up to you, I cut super long pieces (around 2′) at first & then trimmed them down later. Pull the 4 string together & make sure they’re even by letting your wreath form dangle, it should hang evenly. If not adjust the strings accordingly. Once you get them right tie them in a knot at the top, then tie a loop with the extra string. This is what your mobile will hang by.

(I hung mine temporarily from the kitchen chandelier so I could work on it & still be near Samster)

Now time to string some butterflies. Take a 2′ piece of line & knot it to the top of the mobile on on the of the rings, string on your butterflies by either weaving the line through the punch-made openings or to make them look like they’re flying you can make a small hole in the center of the butterfly’s body with a needle, thread the string through that hole & then double knot the line under the butterfly so it can’t slip down.Another technique is same type of process as making a “stop bead” for you beaders out there. Basically, string the butterfly & then thread your line back up through where you came out of, when you tug down on it the butterfly should be secured into place.I think the finished product looks best if you vary where, how many & what type of punches you use. Also attach your lines to the different wreath rings so some hang a little further back than others.

*To keep my lines from getting all sorts of tangled while I worked I taped change to the bottom of the lines.

Once you get as many lines strung & hung as you’d like it’s time to permanently weigh them down. I really gave this a lot of thought…maybe glass beads, or several punches glued together…hmmm. What I finally decided on was to glue a penny between two large punches with the string glued in there too. You can do this by gluing a punch to one side of the penny, place glue on the other side of the penny, then the string, then another punch…almost making a butterfly sandwich with the penny & the string in the middle. In hindsight I wish I would’ve laid out all my pennies & given them a quick coat of white spray paint 1st but instead I went back & painted each butterfly sandwich white after they were glued on to camouflage the copper pennies. I suppose either way gets the job done.The last step is optional, I really liked how the one from PBKids had a bit of pink berry looking things at the top. I dug into my silk flower stash & found these leftover from my Fall wreath. A bit of blue spray paint & they were perfect!I also took a few leftover butterfly punches & hot glued them along the top of the mobile, if you bend their wings back a bit they look like they’re perched right on top. Super cute in my opinion.This mobile is actually for me, I want to hang it over my work table in the craft room but that requires me getting out a ladder to reach the ceiling. P is all weird about me climbing ladders while 8 mths pregnant. Go figure. So for now that’s why I had to photograph it out on the back deck…does make for pretty pics though.

Inspired? Share the Love...
Share on Facebook
Facebook
Tweet about this on Twitter
Twitter
Pin on Pinterest
Pinterest
Google+
Google+

{ }

Tutu Shop Discounts!

by Natasha on July 1, 2010 in Uncategorized

Several of you who run your own shops have contacted me about donating some tutus & offering discounts to readers who would like to purchase theirs for donation. YOU ARE THE BEST!!!

So here you go Samster readers, some lovely links for Tutu shops with big hearts! Please just contact the ladies when you’d like to place your orders & let them know it’s for the Samster Mommy Tutu Drive.

Amy from Sparkles & Fluff is offering her single color tutus with ribbon at cost. That’s $20 including shipping.

Corissa from Baby O Designs will create a duplicate Tutu or Cape for donation when one is ordered! Awesome!!

Bonnie from Bonnie’s Bows just sent me the most adorable tutu for the drive & also said she’s offering 50% off of items purchased for the Tutu Drive & is going to donate 10% of all of her July sales to the Princess Alexa Foundation! WOW! Thank you Bonnie!

Also this isn’t a shop but another wonderful fundraiser to tell you about…
Click here to read more about how you can create baby legwarmers for little ones in the ICU who aren’t well enough to wear fun outfits. I have a tutorial here too for turning adult sock’s into legwarmers. What a great cause, I just love all these homemade ways we can help!!

If you emailed me about offering a discount & I didn’t include you in the above please email me again, (samstermommy@gmail.com) my inbox has been stuffed lately with tutu goodness (which i luvvvvv!) so I have this hankering feeling that I’ve forgotten somebody. Eek!

Inspired? Share the Love...
Share on Facebook
Facebook
Tweet about this on Twitter
Twitter
Pin on Pinterest
Pinterest
Google+
Google+

{ }

Garden Tutu & Headband (No Sew!)

by Natasha on July 1, 2010 in tutorials

Samster’s reaction when she finds out she doesn’t get to keep them…Sorry Babe.

The tutu is made using my “10-minute tutu” tutorial which you can find right here. I bought everything from Michael’s for less than $10. The tulle are spools of wedding tulle, silk flowers from the garden section & 1″ elastic from the sewing aisle. Easy peasy.

The flower additions are pretty simple too. I just popped them off their stems, trimmed off the stubby plastic back & for the skirt one attached a safety pin to a felt circle so it would be removable.For the headband I like to deconstruct the flower a bit more & then glue it back together without the plastic pieces so it’ll lay close to the head. You can find a detailed tutorial I did awhile back for the “Big Bloom Baby Headband” here.Nothing in the mailbox yet so I’ll just have to say 2 tutus down, 98 to go but I’m not too terribly worried because I received so many wonderful emails from you guys saying your sewing away & the donations should be here soon!

Inspired? Share the Love...
Share on Facebook
Facebook
Tweet about this on Twitter
Twitter
Pin on Pinterest
Pinterest
Google+
Google+

{ }

Tutu Drive – Superhero Capes!

by Natasha on June 29, 2010 in tutorials

I am SO excited today because not only do I have a great guest blogger for you but a wonderful tutorial for the Tutu Drive!

I found Lynette over a ‘Get Your Craft On‘ several months ago & ever since then have been completely addicted to her adorable blog. She rocks at little boy crafts & today’s is downright awesome! So enough of my blabbing…here’s Lynette!

I’m so excited to be here on Samster Mommy! I’m Lynette, from Get Your Craft On, and I think this is a great idea that Natasha has to help out such an awesome cause. I hope we can all help her reach her goal of 100 tutus!

But, girls aren’t the only ones that like to dress up, right? What about the boys? Here’s a fun and easy tutorial to make a superhero costume. It can be made for boys or girls! You can even make it reversible, because sometimes you want to be Batman and sometimes you want to be Superman.

SUPERHERO COSTUME TUTORIAL
(cape, mask, and wristlets)

Supplies: sewing basics (machine, thread, scissors, iron), Wonder Under, fabric (cotton, costume satin, pleather), velcro, knit fabric, felt for applique, 10″ of 1/8-1/4″ elastic
*Note: if you use pleather, be especially carefully ironing it since it is so synthetic. I usually will iron it on the backside or the back of whatever you are fusing it to.

Superhero CAPE:

1.) Cut out cape shape from fabric. You’ll need to determine the size based on the age/size of your child. To give you an idea, mine was for a 3 year old and it was approximately 21″ across at the bottom and 27″ from top to bottom. You will have a front and back to the cape (I used pink pleather for the front and polka dot flannel for the back). If you want you can do applique on both sides and the cape can be reversible (like one side batman, one side superman). If you’re making a superman/batman cape, you’ll want one side of the cape made out of black fabric and the other side of royal blue. If the fabric isn’t too thick, you can cut both the front and back cape pieces at the same time. I used a bib to get a general idea for the neck hole and then free handed the rest of the cape, having it gradually slope down toward the bottom and rounded at the corners. I like to fold my fabric in half length-wise, draw half the shape on the folded fabric, then cut out. This way it will be symmetrical. Or you can do this with the front and then lay it on the other fabric to cut out the back piece (shown in picture #2).2.) Cape Applique. There are tons of fun things you can do for the applique. You could do Superman or Batman…or one on each side! For this cape, I made a crown and put the child’s initial in the middle.
-With Iron, fuse wonder under to the wrong of the fabric scrap you want to use for the crown (I used silver pleather).
-Draw crown picture on wonder under side of fabric. Cut out crown.-Peel wonder under off and with iron, fuse crown to felt (or cotton, if you want). Stitch around crown, close to edge. You can use a straight-stitch, zig-zag, or blanket stitch.
-Cut crown out of felt, leaving a 1/4″ felt border around crown.
-With Iron, fuse wonder under to wrong side of scrap fabric you want to use for the child’s initial. Draw or trace letter on wonder under side. Make sure you do this backwards b/c it will be reversed. Cut letter out.-Peel wonder under off and fuse to middle of crown. Stitch around letter close to edge (I used a blanket stitch).
3.) With iron, fuse a piece of wonder under to main part of crown. Peel off wonder under and fuse crown to center of front cape piece. Stitch around crown close to edge.

*For making the reversible Superman/Batman cape, you will use the Wonder Under applique technique and you can use these graphics, printed to size, for your appliques. I used felt for my appliques and stitched around all edges with a blanket stitch.

4.) If you want to do another applique on the back side of the cape to make it reversible, do this now.

5.) Cut a 2″ piece of velcro. Sew one side of the velcro to the left side of the front cape neck piece and the other side of the velcro to the left side of the back cape neck piece. Once the cape is sewn together, one piece of velcro will be on each side of the cape to match up together.
6.) Place front and back cape pieces with right sides together. Pin. Sew around entire cape, leaving a 4″ hole at bottom to turn cape right-side out.
7.) Clip all curves, especially the neckline.
8.) Turn cape right side out, flipping it through the 4″ hole.

9.) Iron cape, especially edge. Topstitch around entire cape, making sure to sew closed the 4″ hole. Using a hot glue gun, glue on jewels to crown points. You’re done….but don’t forget about the Superhero accessories!!!

Superhero MASK:
1.) Fuse wonder under to back of mask front fabric. Draw a mask outline on paper (or if you’re confident, draw it directly on the wonder under side of the fabric) and then trace it onto back of mask fabric. Cut out (again I usually fold in half, so both sides are identical). Peel off wonder under and fuse mask to fleece or other soft fabric. I used pleather for the mask front and microfleece for the mask, which worked well b/c neither of these fabrics fray. Make sure to use a soft fabric for the back, since this will be up against the child’s face.

3.) Stitch around mask, close to the edge. Make sure that when you are at each side of the mask, you slip an end of the 10″ elastic in between the two pieces. Backstitch a few times over the elastic to secure it well. Also make sure to stitch around eye openings.
4.) Trim excess fabric from around the mask. You’re done!
Superhero WRISTLETS:
1.) Cut two pieces of knit fabric 5″ x 7″.
2.) With fabric folded in half, sew similar “dash” pattern or “spike” pattern to pleather for the other part of the wristlet. If you’re not using a thicker fabric, such as pleather, you may want to add a little interfacing or piece of fleece in the middle. You’ll want it to be about 6″ long. Cut out shape.
3.) Fold one knit fabric piece in half lengthwise. Insert the “dash” piece, so raw edges line up. Sew and serge down long edge, making sure to backstitch a few times at each end. I didn’t finish the ends of the tube b/c I wanted to make sure it would stretch appropriately over the child’s hand.
4.) Flip wristlet right side out and iron if necessary. And you’re done!!

Wow. That’s all I have to say. Wow! Those are incredible! I’m sure whomever the little superboy or supergirl is that receives these is going to LOVE IT! Thanks Lynette!!

Inspired? Share the Love...
Share on Facebook
Facebook
Tweet about this on Twitter
Twitter
Pin on Pinterest
Pinterest
Google+
Google+

{ }

Next Entries →
← Previous Entries

greeting

phone pic

LTL button

before after 

buttonbirthday buttonfamily dinner buttonmommy thoughts button

marthabadge1
Photobucket
Photobucket

Tags

beauty before/after birthday party cheater's cooking Christmas costume decorating dinner 101 DIY dress-up easy dinner fashion craft furniture gift ideas hair halloween health chats holiday home home decor instagram jewelry making kid's craft kid fashion lyme mommy blog mommy thoughts naptime crafting party pinbusters pinterest princess recipe review recipes sewing shopping sunday love thrift store finds tips & tricks toddler sewing tutorials valentines video vlog where am I?

Blogroll

  • A Beautiful Mess
  • Cancer Alliance Blog
  • Centsational Girl
  • Coco & Kelley
  • Cotton & Curls
  • Crafterhours
  • Craftiness is not Optional
  • Effortless Style Blog
  • Happy Together
  • Hi Sugarplum
  • Homemade By Jill
  • Honey We're Home
  • How Sweet It Is
  • Hyperbole & a Half
  • iHeart Organizing
  • Kristen F. Davis Designs
  • Lil Blue Boo
  • Little Green Notebook
  • Momastery
  • One Pretty Thing
  • Piccoli Piselli
  • PS- I made this
  • Skirt as Top
  • Smitten Kitchen
  • That's So Michelle
  • The Baking Robot
  • The Daybook
  • The Makerista
  • Victoria Elizabeth Barnes
  • Vintage Revivals
  • Young House Love

WordPress Admin