Little Pink Monsters

  • tutorials
  • Recipes
  • Contact
  • About Me
  • facebook
  • twitter
  • pinterest
  • instagram
  • rss

Polka Dot Walls

by Natasha on June 29, 2010 in tutorials

I have this image in my head that after the baby is born I’m going to reach mommy mass capacity & not have time or presence of mind to do anything besides feed mouths & clean poop. That said, I have a constant need to get everything fun or extracurricular done ASAP. Priority #1 (besides the Tutu Drive of course) is Chum Chum’s nursery.

The walls are painted but I have this vision of sweet white polka dots all over the bottom half of the wall. (below the chairrail) I’m still trying to keep the gender of the baby a surprise (you hate me for it, I know) but I don’t think light blue & white will give too much away. (;

The method for making perfectly spaced polka dot walls isn’t necessarily complicated but it is time consuming. I used “garage sale” dot stickers to mark where my polka dots would be. By using stickers I could adjust them & not make a single mark on the wall until the whole thing looked absolutely perfect. Using a level I placed my stickers 6″ apart in horizontal lines. The next line down was 6″ below the first & as I kept adding lines the pattern became one dot every 6″ in both horizontal & vertical directions. Pictures would probably do a much more adequate job of explaining this…When you get done with all your 6″ marks you’re going to want to go back & place a sticker every 3″ down & 3″ in, then those should be 6″ apart from eachother as well. Like below…
Once I had the entire wall marked I decided to go back & use my level to make sure all the rows were evenly placed both vertically & horizontally. Yes, this took about an extra 20 minutes but if the dots were off a bit it would’ve driven me crazy every time I went in the room. I know my weaknesses people, crooked lines are definitely one of them.

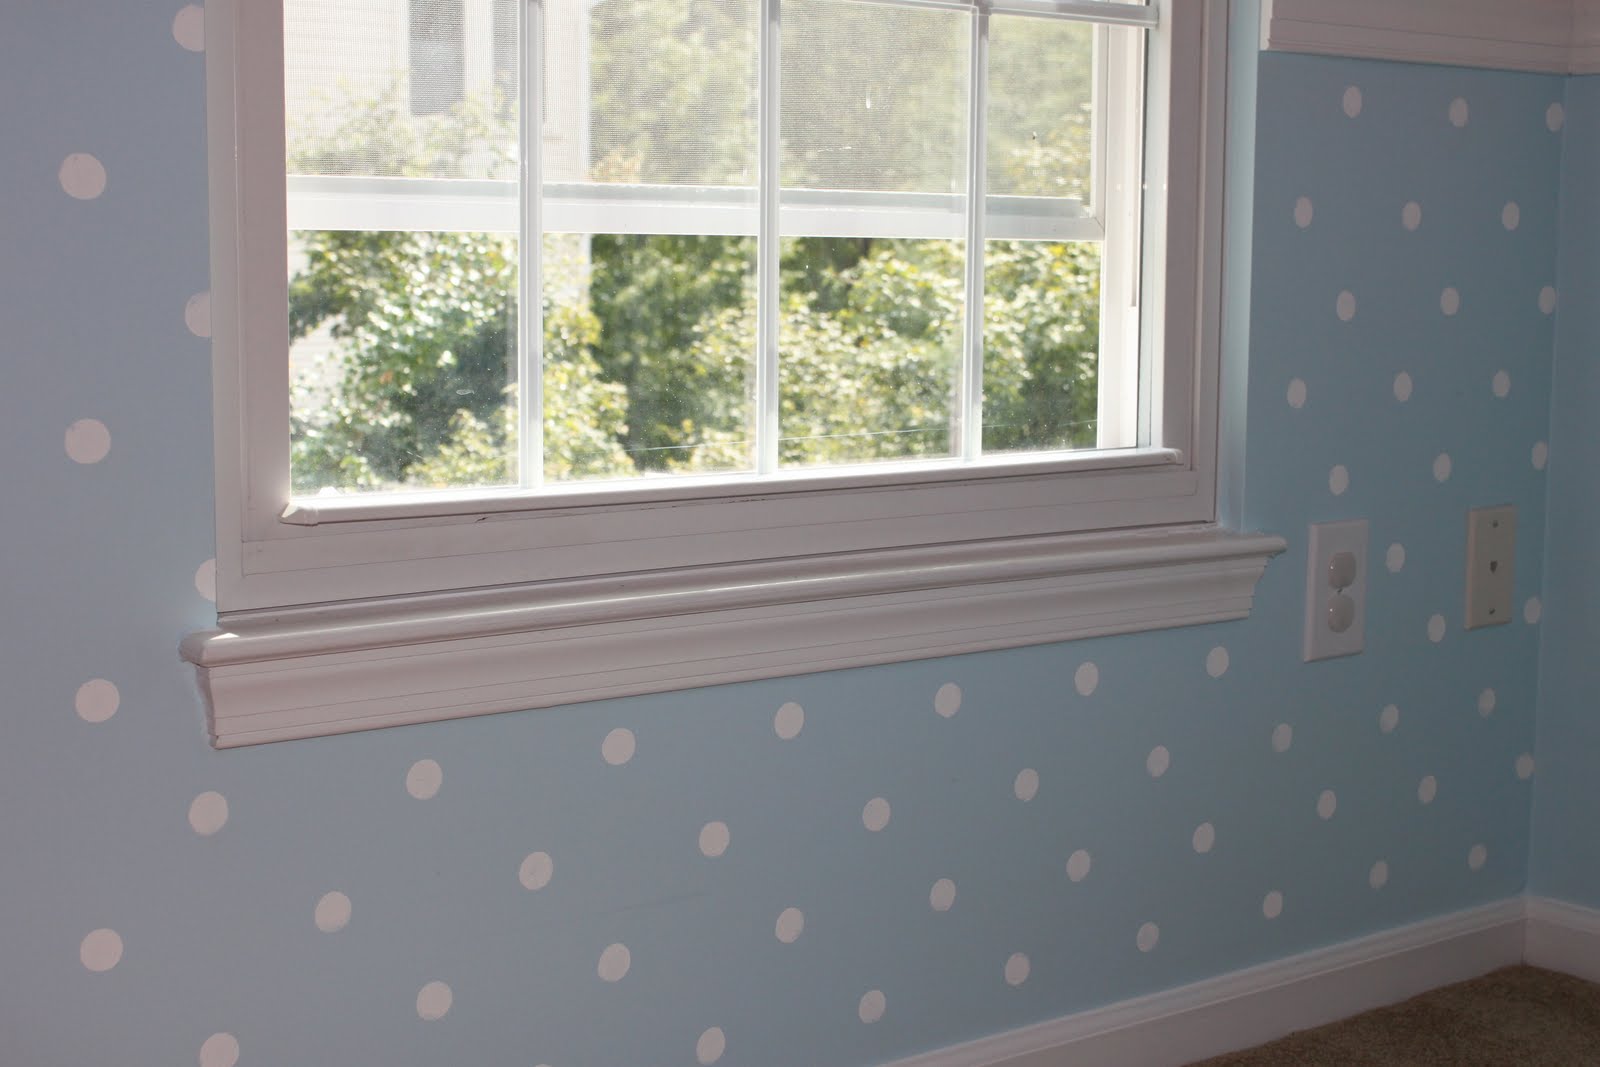
After I felt good about my dot placement I started going back & as I peeled off the dot I carefully pressed a round sponge stamp with white acrylic paint in it’s place. (I just happened to find a 1″ wide round stamp at the craft store but I was also thinking that one of those envelope sealer bottles would be perfect for this, you could even fill it with paint & just squeeze a little out! Makes sense in theory at least…)

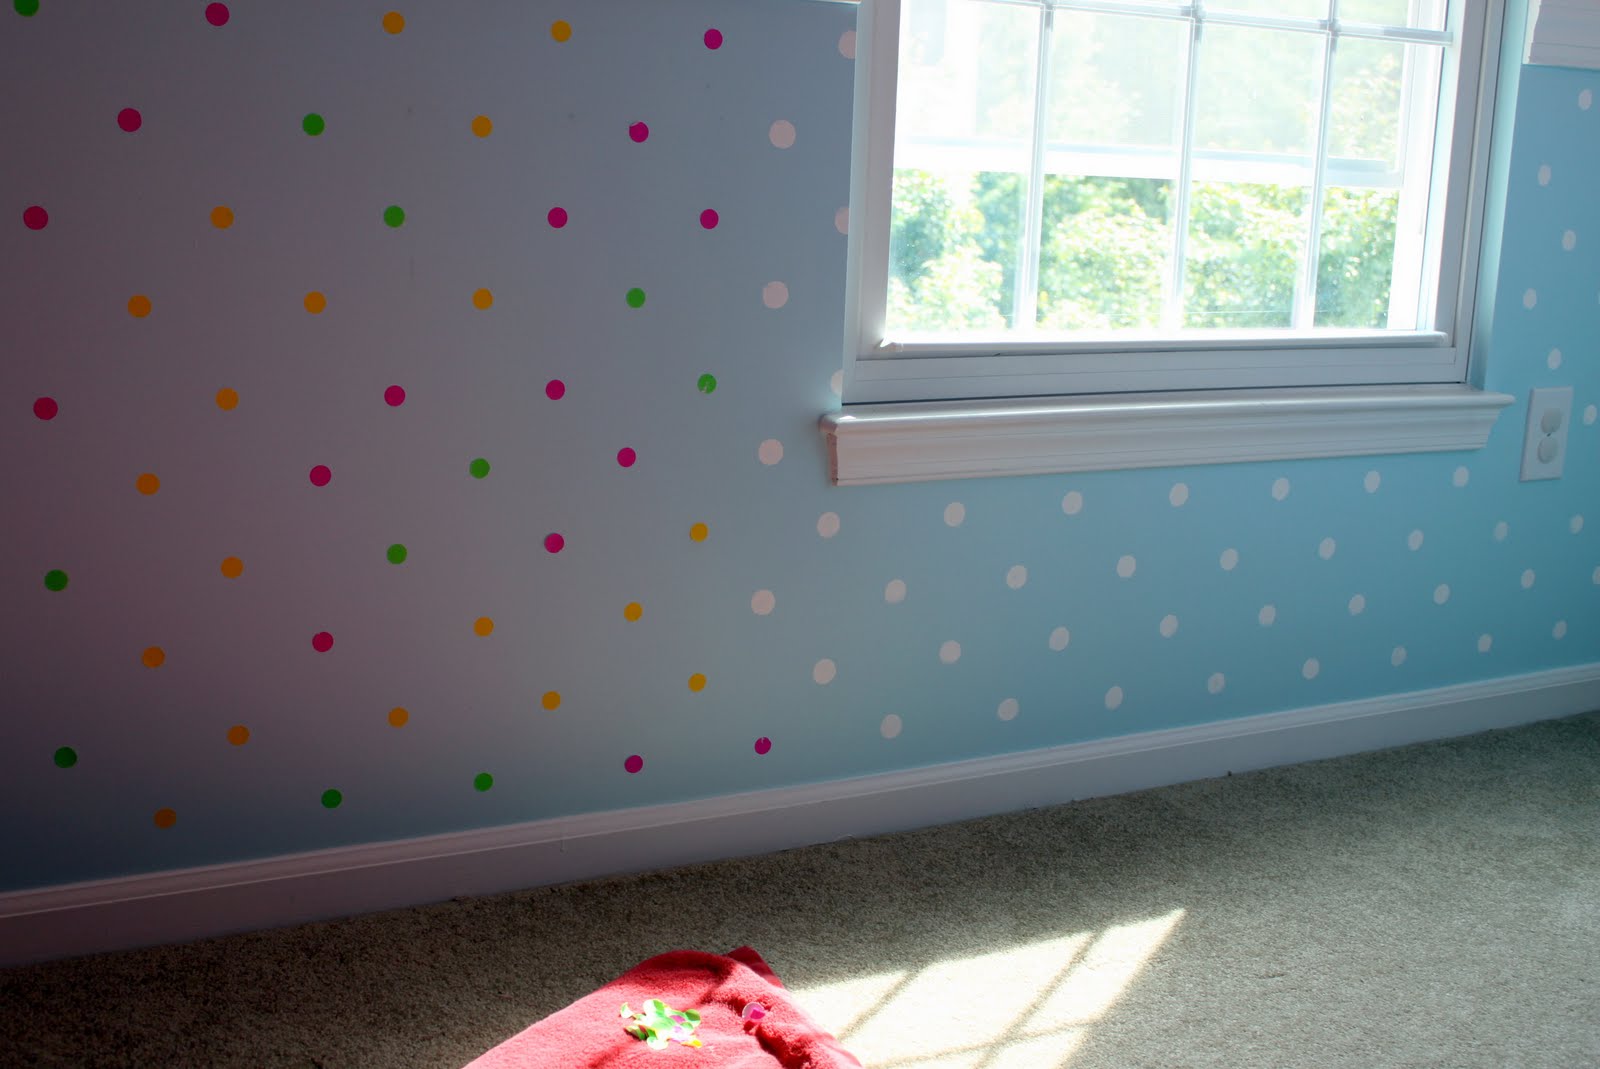
And here’s a little peak of the finished product, I LOVE LOVE LOVE it!!! One wall down, 3 to go!

Oh! And Lucy popped by to say hi. “Hi.”

Inspired? Share the Love...
Share on Facebook
Facebook
Tweet about this on Twitter
Twitter
Pin on Pinterest
Pinterest
Google+
Google+

{ }

Tutu Sizing Chart

by Natasha on June 24, 2010 in Uncategorized

A few of you have emailed me asking about girl’s sizes for your tutus. I did a little research on what the standards are for sizing and here’s some charts I thought might be helpful.Really the waist size is what you need to know, I think as far as length goes somewhere between 12″-20″ depending on where you are between 2t and girl’s size 10 is probably good. It’s not like you wear a tutu by itself anyway, at least not in public. (:

Inspired? Share the Love...
Share on Facebook
Facebook
Tweet about this on Twitter
Twitter
Pin on Pinterest
Pinterest
Google+
Google+

{ }

Tutu Tutorial #1 – Stuffed Tutus

by Natasha on June 23, 2010 in easy sewing project, quick sewing project, tutorials, tutus

Thank you guys SO SO much for the great response to the Tutu Drive! I have the best blog buddies ever (:

Before I get to the tutorial let me mention a couple of things in regards to the Tutu Drive…also if you’ve sent me an email I promise I’ll write back soon!

#1 All items must be handmade & never used. Nothing second hand or worn can be donated. If you think about it, it makes sense. These are going to sick kids, cleanliness is of the utmost importance. Also please make sure all items come from a smoke-free home & if you have pets please keep them away from your creations. No dog fur tutus. Any non-handmade items need to still have tags/packaging on them. Handmade creations should be sealed in a ziploc baggie before being mailed.

#2 A few of you have mentioned ideas for boys. Lynette has an AWESOME tutorial for little boys’ capes that I’m going to try and snag her to come post about. If you have any great tutorials please email me at samstermommy@gmail.com!

#3 Look what I found in the dollar bins at JoAnn’s yesterday! Princess crowns & magic wands! I picked up a handful to throw in the donations box. Keep your eyes out ladies!Now on to my favorite tutu, I just couldn’t wait till Tuesday to share this one!(click on any picture to enlarge it)

Are these not the sweetest things ever?? The pink & blue ones are Samster’s & the yellow one is the newbie for the Tutu Drive. My favorite part about stuffed tutus is that the possibilities are endless, you can stuff them with pom poms, confetti, silk petals, scrapbooking do-dads, anything! The blue one is actually from this post, it has foam snowflake stickers that I glittered the adhesive backs of. I love how it sparkles but it does leave a bit of a glitter trail…

*I originally learned how to make these from this Martha Stewart video tutorial but now have made a few changes, if you get stuck however the video is helpful.

For this project my measurements will fit a size 2t-kid’s 6/8.
You’ll need:
80″ of 1″ grosgrain ribbon (cut into one 20″ piece & one 60″ piece)
1 & 1/4 yards of 54″ wide tulle
Stuffings (mine were “confetti” butterflies, hearts & flowers from the dollar bin at JoAnn’s)

Start off by cutting your tulle into a 54″ x 1 & 1/4 yard piece if it isn’t already. Fold this in half lengthwise & then in half again. Pin across the top. You’ll be pinning through 4 layers, 2 of which are raw edges. This will become the waistband while the bottom will be the “pocket” for the stuffing. Make sure you catch all 4 layers with the pins, tulle can be a slippery lil’ devil!Next take one of the short ends & tuck the edges in to form a nice seam. Pin & stitch this side shut.


Now it’s time to toss your goodies in the tutu from the other open short end. Fold this end like you did the first & stitch shut.

Next you’re going to sew the top shut with a gathering stitch. (your widest stitch length setting). Leave the strings long because we’ll use these in a minute to gather up the top.

Fold your tutu in half & mark the center with a pin. Take your 20″ piece of ribbon & find the center of that as well, pin the center of the ribbon to the center of the tulle.

Now you’ll tug on one of those end threads (the bobbin thread to be specific) & gather the fabric up from one side so that the length of the tulle is the same as that half of the ribbon & pin in place every couple of inches. Pictures would probably be an easier way to explain this…

Do the same with the other side. Here’s what it looks like all gathered & pinned. Also notice that at the ends I’ve wrapped the ribbon over the edge & pinned.

Now take your 60″ piece of ribbon & find the center of that as well. Layer this piece of ribbon on top of the 20″ piece, aligning the center & repinning so you’ve got ribbon, tulle & ribbon on top.

Carefully work your way through all the pins, taking them out one at a time & repinning through the additional new piece of ribbon. Really take your time on lining up this ribbon sandwich…

Now you’re going to stitch it all closed. Start at one corner & stitch down to the other corner, when you reach the end leave the needle in the fabric but lift the foot, this will enable you to turn the fabric so you can head in the next direction without cutting the threads. Head on down the long end of the ribbon really taking your time to make sure the ribbon edges are perfectly lined up. Once again when you get to the end life the foot & turn, head up to the next corner & them back down the other long side.

If you notice that a bit of tulle is going to be hanging out the top then feel free to trim it, just don’t cut the gathering stitch!

As a finishing touch just heat seal your two ribbon ends by running them over a lighter really quickly. (it’ll melt the ends & keep the ribbon from fraying) That’s it! But be warned, these little suckers are addicting!

Inspired? Share the Love...
Share on Facebook
Facebook
Tweet about this on Twitter
Twitter
Pin on Pinterest
Pinterest
Google+
Google+

{ }

Tutu Drive 2010!

by Natasha on June 21, 2010 in Uncategorized

I’m SO SO SO excited about this!
Samster Mommy Tutu Drive

A few weeks ago my sister-in-law emailed me a link to this great charity that she thought maybe I could tie in with my blog. It’s called The Princess Alexa Foundation & wait till you hear what they do…

They take dress up clothes & match them with kids who are seriously ill so they can have a bit of fun & make-believe. A little something to put a smile on their face during such a hard time. Is that not the sweetest thing you’ve ever heard?!

The foundation was started by a mom named Crys in honor of her daughter Alexa…

photo courtesy of www.princessalexafoundation.org

Alexa began battling cancer just before her 2nd birthday, throughout her battle with cancer Alexa loved to go everywhere in princess dresses & became known as “Princess Alexa”. I’m so sad to say she passed away in June of 2008. I know many of you are mommies & when you hear a story like that it just breaks your heart. I just can’t imagine… But that’s what I love about this organization, there’s actually something I can do to help. A direct impact I can make & help out some little girl who’s going through a hard time just a little bit. You can click here to read more on their website, you’ll see what organization or hospital their currently “dressing”, pictures of the kids & ways to donate. So that’s where we come in!I emailed Crys & asked if they’d except dress up clothes that were handmade, she said “Absolutely!”. So I got to thinking about what we could make & I thought what could be more the epitome of little girl dress up than a tutu?! There are so many ways to make them too that it’s a great opportunity for some fun tutorials as well. For the next month you’ll be hearing me mention the Tutu Drive quite a bit, I’m going to be posting tutu tutorials every Tuesday (say that 3x fast!) & asking you to jump in & make one as well. My goal is to donate 100 tutus to the Princess Alexa Foundation! Do you think we can do it?? Also if you don’t sew (although some will be “no-sew” projects) feel free to purchase yours & donate it that way. Oh, & although it’s a “tutu” drive you can donate any dress up item you like for little girls or boys. The sizes can range from 2t-10. Over the next month I’ll feature pics of tutus you donate (& I’ll link to your blog) as well as feature guests posts from some of my favorite bloggers who are going to participate!

So to review there’s 2 things I want to ask of you…

#1 Make/Buy a tutu sometime between now & the end of July & mail it to me. It’s needs to be sealed in a ziploc baggie & the baggie should be labeled with the size. I’ll gather all the goods together & send them off to Crys in one big box of tutu goodness! And if you can, email me a pic of your creation so I can feature it on the blog. Also click here for tutu shops that are offering Samster Mommy Tutu Drive discounts!

Please mail all donations to:

Samster Mommy
P.O. Box 84132
Gaithersburg, MD 20883

#2 Please help spread the word! (100 tutus is a lot & if I don’t get enough people involved I’m going to be spending a lot of all-nighters with my tulle stash.) You’ll see there are two buttons available on my sidebar for the Tutu Drive, if you have a blog all you have to do is copy the html code below the button & paste it as either a gadget (there’s a gadget for html) in your sidebar or just paste it directly into your blog post in “edit html” mode. If that doesn’t make sense you can email me & I’ll walk you through it.

Thank you guys so much! Oh! And if you have a tutorial you’d like to share for a tutu or similar dress up item than email me (samstermommy@gmail.com) & maybe you could share it with everyone for the Tutu Drive!

A few updates:

#1 All items must be handmade & never used. Nothing second hand or worn can be donated. If you think about it, it makes sense. These are going to sick kids, cleanliness is of the utmost importance. Also please make sure all items come from a smoke-free home & if you have pets please keep them away from your creations. No dog fur tutus. Any non-handmade items need to still have tags/packaging on them. Handmade creations should be sealed in a ziploc baggie before being mailed.

#2 A few of you have mentioned ideas for boys. Lynette has an AWESOME tutorial for little boys’ capes that I’m going to try and snag her to come post about. If you have any great tutorials please email me at samstermommy@gmail.com!

#3 Here are a few of the tutorials we’ve had so far so you can get tutu crackin!

Superhero Capes
Stuffed Tutus
Girl’s/Toddler Sizing Charts
Happy Together’s Dress Up Skirt
10-minute Tutu

Inspired? Share the Love...
Share on Facebook
Facebook
Tweet about this on Twitter
Twitter
Pin on Pinterest
Pinterest
Google+
Google+

{ }

DIY iPad Case

by Natasha on June 20, 2010 in diy ipad case, tutorials

For Father’s Day Sam gave Daddy a sweet book called, “I Love My Daddy” & I made him a…
…giant felt cassette tape?

It’s actually a case for his iPad, he’s been asking me to make him one for months so for Father’s Day I bumped him above all my baby & maternity projects. Aren’t I sweet? Poor guy, he’s never asked me to sew him anything (well, once he asked me to sew a button back on his shorts) so I probably should’ve jumped at the chance when he first asked. Anyway, I picked a cassette tape because I knew he’d love to throw it back old school. Don’t tell me you didn’t make a mix tape when you were young…I didn’t do a step by step tutorial because a.) I wasn’t sure how many people would even be interested, b.) there’s actually not a whole lot to it & c.) the camera was downstairs while I was working upstairs & lately it has to be an absolute necessity for me to make any extra trips up & down the stairs. (c. is probably the real reason if I’m being totally honest here)

Basically I took a big piece of felt & cut out a rectangle that was the width of the iPad + 1/4″ (seam allowance) and the length of the iPad x 2 + 6″ for the fold over flap. Then I finished the top edge with my serger & pinned the case part right side together with a piece of elastic across the middle. After sewing up the sides I turned it right side out & besides decorating the outside the pouch was pretty much done! For the cassette I cut out a felt white “label” & the grey center part on the label. I stitched those on as well as the details using embroidery floss & a back stitch. (A back stitch is an embroidery technique that allows you to make a solid line, it’s really easy, here’s a good video demo) That’s it!Daddy loved it & promised to show it off to all his friends. He says when they all ask where they can buy one he’ll say, “You can’t. My wife made it for me. Hahahahahahahaaa!”

I gotta admit, I kind of love that. (:

Inspired? Share the Love...
Share on Facebook
Facebook
Tweet about this on Twitter
Twitter
Pin on Pinterest
Pinterest
Google+
Google+

{ }

List of Kid’s Drinks/Fruit Snacks with Lead

by Natasha on June 20, 2010 in Uncategorized

Ugh, I HATE hearing stuff like this. But do you know what’s extra terrifying? The fact that the organic brands that I thought were safer (and therefore worth the extra bucks) are on this list too!

85% of kid’s fruit drinks & fruit snacks were found to have unsafe levels of lead…the entire list is below & you can read the full article here. I’m still going to keep buying stuff at Whole Foods but I’m certainly going to avoid what’s on this list. Sigh, if only I had the time/energy to squeeze my own juice at home…wouldn’t that be so nice & mother earth of me? Too bad it’s not gonna happen.

LEAD-TAINTED PRODUCTS:

1. 365 Everyday Value Organic 100% Juice Concord Grapes
2. Beech Nut 100% Apple Juice
3. Best Yet Bartlett Pear Halves in Heavy Syrup
4. Best Yet Chunky Mixed Fruit in Pear Juice
5. Best Yet Yellow Cling Peach Halves in Heavy Syrup
6. Chef’s Review Fruit Cocktail
7. Del Monte 100% Juice Fruit Cocktail
8. Del Monte Chunky Mixed Fruit in 100% Juice (peach, pear, grape, etc.)
9. Del Monte Diced Pears in Light Syrup
10. Del Monte Freestone Peach Slices in 100% Juice
11. Del Monte Fruit Cocktail in Heavy Syrup (peach, pear, grapes)
12. Del Monte Fruit Cocktail No Sugar Added
13. Del Monte Lite Fruit Cocktail in Extra Light Syrup
14. Del Monte Pear Halves in Heavy Syrup
15. Del Monte Pear Halves, Bartlett Pears in 100% real fruit juice from concentrate
16. Del Monte Sliced Yellow Cling Peaches in 100% Juice
17. Del Monte Sliced Yellow Cling Peaches in heavy syrup
18. Dole Diced Peaches, Yellow Cling in light syrup
19. Dole Mixed Fruit in Light Syrup
20. Dole Pear Halves in Juice
21. Earth’s Best Organics Apple Juice
22. Eating Right Fruit Cocktail packed in Sucralose
23. Eating Right No Sugar Fruit Cocktail
24. First Street 100% Apple Cider from concentrate
25. First Street Apple Juice from concentrate 100% juice
26. First Street Diced Pears
27. First Street Fruit Cocktail in heavy syrup
28. First Street Grape Juice from concentrate 100% juice
29. First Street Sliced Bartlett
30. First Street Yellow Cling Peaches in heavy syrup
31. Full Circle Organic Apple Juice
32. Full Circle Organic Bartlett Pear Slices
33. Gerber 100% Juice – White Grape Juice
34. Gerber 100% Juice Apple Juice
35. Gerber 3rd Foods Peaches
36. Gerber 3rd Foods Pears
37. Golden Star Mixed Fruit in Light Syrup (peach, pineapple, pears)
38. Golden Star Peach Halves in Heavy Syrup
39. Great Value 100% Grape Juice
40. Great Value 100% No Sugar Added Apple Juice
41. Great Value Bartlett Pear Halves in 100% Juice
42. Great Value Bartlett Sliced Pears in Heavy Syrup
43. Great Value No Sugar Added Fruit Cocktail
44. Great Value Yellow Cling Sliced Peaches
45. Hansen’s Natural Apple Juice
46. Kedem Concord Grape Juice 100% pure grape juice
47. Kroger 100% Juice Apple Juice
48. Kroger Fruit Cocktail in Heavy Syrup
49. Kroger Grape Juice 100% Juice
50. Kroger Lite Fruit Cocktail in Pear Juice
51. Kroger Value Fruit Mix (Peaches, pears, grapes)
52. Langers Apple Juice 100% Juice
53. Langers Grape Juice (Concord)
54. Langers Red Grape Juice
55. Libby’s Fruit Cocktail No Sugar Added (Sweetened with Splenda)
56. Libby’s Yellow Cling Peach Slices No Sugar Added (Sweetened with Splenda)
57. Market Pantry Diced Peaches in light syrup
58. Market Pantry Diced Pears in light syrup
59. Market Pantry Mixed Fruit in light syrup
60. Maxx Value Fruit Mix in Light Syrup (peach, pear, grape)
61. Maxx Value Pear Pieces in Light Syrup
62. Minute Maid Juice Apple – 100% Apple Juice
63. Motts 100% Apple Juice
64. Mrs. Brown’s Fruit Cocktail in Heavy Syrup (peaches, pears, grapes)
65. O Organics Organic Grape Juice from concentrate
66. O Organics Organic Unfiltered Apple Juice Not From Concentrate
67. Old Orchard 100% Apple Juice
68. Parade 100% Juice Apple
69. Polar Mixed Fruit
70. Polar Peach Slices
71. Polar Pear Halves in light syrup
72. R.W. Knudsen Just Concord Grape Juice
73. R.W. Knudsen Organic Just Concord
74. Raley’s 100% Grape Juice
75. Raley’s Fruit Cocktail in Heavy Syrup
76. Raley’s Premium 100% Apple Juice not from Concentrate
77. Raley’s Sliced Yellow Cling Peaches in Heavy Syrup
78. S&W Natural Style Fruit Cocktail in Lightly Sweetened Juice
79. S&W Natural Style Pear Slices in Juice
80. S&W Natural Style Yellow Cling Peach Slices in Lightly Sweetened Juice
81. S&W Premium Peach Halves Yellow Cling Peaches in light syrup
82. S&W Sun Pears Premium
83. Safeway 100% Juice Apple Cider
84. Safeway 100% Juice Apple Juice
85. Safeway 100% Juice Grape Juice
86. Safeway Diced Peaches in Light Syrup
87. Safeway Fruit Cocktail in Heavy Syrup
88. Safeway Light Sugar Fruit Cocktail
89. Safeway Lite Bartlett Pear Halves in Pear Juice
90. Safeway Lite Fruit Cocktail in Pear Juice
91. Safeway Organic Grape Juice
92. Safeway Pear Halves in Light Juice
93. Safeway Yellow Cling Peach Slices in Pear Juice
94. Santa Cruz Organic Concord Grape Juice
95. Simple Value Yellow Cling Peaches in light syrup
96. Stater Bros. 100% Juice Apple Juice
97. Stater Bros. 100% Juice Grape Juice
98. Stater Bros. 100% Juice White Grape Juice
99. Stater Bros. Fruit Cocktail in Heavy Syrup
100. Stater Bros. Yellow Cling Peach Halves
101. Stater Bros. Yellow Cling Sliced Peaches in heavy syrup
102. Sunny Select 100% Apple Juice
103. Sunny Select 100% Grape Juice
104. Sunny Select Fruit Cocktail in Juice
105. Sunny Select Pear Halves in Pear Juice
106. Sunny Select Yellow Cling Sliced Peaches in Pear Juice
107. Trader Joe’s Certified Organic Apple Juice, pasteurized
108. Trader Joe’s Concord Grape Juice made from fress pressed organic concord grapes
109. Trader Joe’s Pear Halves in white grape juice
110. Trader Joe’s Yellow Cling Peach Halves in while grape juice
111. Tree Top 100% Juice Apple Cider
112. Tree Top 100% Juice, Grape
113. Truitt Brothers Pacific NorthWest Bartlett Pear Halves, in pear juice from concentrate
114. Valu Time Grape Drink from Concentrate
115. Valu Time Irregular Bartlett Pear Slices
116. Valu Time Yellow Cling Peach Slices
117. Walgreens Apple Juice from concentrate 100% juice
118. Walgreens Grape Juice from concentrate 100% juice
119. Walnut Acres Organic Concord Grape
120. Walnut Grove Market 100% Apple Juice
121. Walnut Grove Market Grape Juice
122. Walnut Grove Market Natural Peaches Sliced Yellow Cling in Light Syrup
123. Walnut Grove Market Natural Pear Halves in Heavy Syrup
124. Welch’s 100% Grape Juice (from Welch’s Concord Grapes)
125. Welch’s 100% Red Grape Juice from Concentrate

Inspired? Share the Love...
Share on Facebook
Facebook
Tweet about this on Twitter
Twitter
Pin on Pinterest
Pinterest
Google+
Google+

{ }

Sewing Pants 101

by Natasha on June 18, 2010 in tutorials

Every once in awhile I kind of get the feeling that maybe it would be helpful
to do a back to the basics tutorial…all the details, no assuming you know how to do *blank*.

Yes?

I thought I’d start with a good play by play on how to sew pants. I don’t care how little you know about sewing, if you have a machine & you know how to thread it give these a try. (click on any picture to enlarge it)This process will work for all sorts of pants…elastic waist, drawstring, sweats or pj’s. Also if you want to turn them into foldover waistband yoga pants then after reading these instructions click here for the next steps. These pants are just some light-weight knit lounge pants for Samster. Feel free to use any fabric though, it really won’t change the instructions much.First off you’ll need to make a pattern. Best way to do that is find a pair of pants that fit the way you’d like & lay them out on your fabric (or paper if you want to make a copy you can use over & over) with the crotch pointed out like in the picture below. Trace the legs just to the outside (and therefore adding about a 1/4″ seam allowance) & extend your pattern 2 & 1/4″ at the top of the leg to account for the waistand you’ll be making. Cut out the fabric pieces so they’re folded in half like so. (that way when you open it up it’s an entire pantleg & not just the front, it’ll save you from sewing a side seam like a pair of jeans would have)

You’ll need two of these.
Next up I like to finish the bottom hem. (however if you want to hem that after you’re done so you can try them on first that’s fine too) Since mine are knit (won’t unravel) I just ran the edge through my serger to give them a finished look. If they were cotton I would have ironed them under 1″ & then stitched that hem down.

Now you’ll want to sew each pantleg from the crotch down to the bottom of the pant with the right sides facing together. Pin first, sew second. (you can see my stitches in blue)

*Also here’s a tip, if using a regular sewing machine (NOT a serger, been there, done that, no bueno) if you pin seams horizontally (perpendicular to the way your machine is stitching) then you can just sew right across the pins, no need to take them out as you go.

Next step is a neat trick. Lay your two legs next eachother like the pic below. Turn the leg on the left right side out but leave the right one inside out. Slide the right-side out leg into the inside out leg. Line them up & pin the seams from the bottom of the crotch to the top of the waistband.

Stitch this seam being sure to stitch back & forth (reverse & forward) a bit at the beginning & end of the seam. This is sometimes called a “lockstitch” & just means you’re locking the seam into place so it won’t unravel later when it gets stressed. After stitching you can pull the leg back out & wah-lah!

They’re lookin’ a lot like pants, aren’t they?

Last step is making the waistband. I’ll show you how to do both an elastic waist & also a drawstring…

Measure the waistline of the intended pant-wearer & cut a piece of elastic that is that length + 1″.
Set elastic aside. Next I went ahead & finished the top edge of the waistband with my serger but that step’s optional.

If you’re making a drawstring now would be a good time to go ahead & make the entry/exit holes for the drawstring. Using a water-soluble fabric pen (comes off with water) mark 1 & 1/2″ down & 1/2″ away from the center seam. Do the same on the other side of the center seam.

Stitch a buttonhole around these markings. (Your machine should have instructions or settings for sewing buttonholes but it’s basically a satin stitch, which is really a close together zig-zag stitch) Use an exacto knife to carefully cut open the inside of the buttonhole without cutting the buttonhole stitches.

Now back to the basic pant instructions…fold the waistband in one inch & pin in place.
*Another trick, if you aren’t crazy about pinning or just want to make your stitching easier you should iron your seams first, then stitch. I rarely take the time to do this because it requires setting up the iron but whenever I do it really does make things easier.

Stitch waistband down (therefore making a casing for the elastic) but don’t go all the way around, leave a 2″ opening so we can thread the elastic through it. Take a safety pin & attach it to one end of your elastic, use the safety pin as something to hold onto while you thread the elastic through the waistband casing & back out the 2″ opening. Being careful to make sure the elastic isn’t twisted anywhere inside the casing first, go ahead & stitch the two ends of your elastic together. Go back & forth several times to make sure that sucker’s not coming apart no matter what. Stitch the 2″ opening shut.

If you were just making elastic waist pants then congrats, you’re officially done! To make a faux drawstring like mine however you’ve got a couple more steps…

I made my drawstring out of some stretchy knit fabric. I like that it curls in on itself so I don’t have to sew anything. If your fabric isn’t knit however you can make a drawstring by sewing a long 1″ wide tube with the right sides facing together, use the safety pin trick to turn it right side out. (you could also just use some ribbon as a drawstring, I love the way satin ribbon looks on pj pants) The length of your drawstring should be the size of your waistband + 12″.


Once your drawstring is assembled attach one end to a safety pin, thread the drawstring through one of the buttonholes, through the waistband casing & out of the other button hole.

Remove safety pin & knot the ends of the drawstring. To be extra sure your little one can’t pull the drawstring out of their pants (hellooo choking hazard!) I like to pull the drawstring so it’s even & then tack it down in the back center of the pants with a my sewing machine.

That’s it! Lots of directions but it’s actually kind of easy, right? Once you make a few you’ll be able to make pants in 15 minutes, easy. Not to mention capris, shorts, bloomers…they’re all just slight variations. Get this & you’ve got down some good basic skillz.So what’d you guys think? Do you like getting back to the basics sometimes? Were the details & massive amounts of pictures helpful??

Inspired? Share the Love...
Share on Facebook
Facebook
Tweet about this on Twitter
Twitter
Pin on Pinterest
Pinterest
Google+
Google+

{ }

Homemade Hamburger Helper

by Natasha on June 16, 2010 in dinner 101

Tonight’s dinner happened by accident. Accident/I didn’t feel like going to the grocery store.
I only had ground beef for a meat & no fresh veggies, but I did have milk, cheese, noodles & basic dry seasonings. After doing a bit of googling for a homemade hamburger helper recipe I found this one for Cheesy Chili Mac “Hamburger Helper”. I’m not going to repost all the details because ‘Chickens in the Road’ did such a great detailed post (click here) with the recipe. I will say that I thought it was pretty good, P loved it & Samster…well, let’s just say Samster had three helpings. Yes, THREE.

I have proof too…YUM!

Inspired? Share the Love...
Share on Facebook
Facebook
Tweet about this on Twitter
Twitter
Pin on Pinterest
Pinterest
Google+
Google+

{ }

Gameday T-shirt Dress

by Natasha on June 15, 2010 in tutorials

A few weeks ago I saw one of my dearest friends while I was at home in Tampa, she gave me this UCF t-shirt & asked if I could make it into a dress for her 2 yr-old to wear to football games with her daddy. I said “abso–freakin–lutely!” I love me a challenge.

Here’s what I came up with, it’s a cross between the t-shirt dresses I’ve been doing lately & a pillowcase dress. I think I’m pretty darn happy with it. (:Best part it is, it’s was easy to do. Love it! Here’s how to make your own “Gameday Dress” for your favorite sports team, special event or just a favorite tee!

Start off with your basic adult tee…Next I cut across the top so the total length was my desired length for the finished dress (although actually a bit shorter since I knew I was going to add a 2″ ruffle) I also cut two “J” shapes off the top that were 3″ wide & 3″ deep for the armholes.*Measurements are for a 2t but the armholes are pretty much the same for most toddler sizes, with the finished product you’ll have a lot of sizing wiggle room b/c of the adjustable straps.

Next I used my serger to finish off the edges around the top of the dress. This isn’t a necessary step per say, since it’s knit you could just leave the edges unfinished, but I like to give it a bit more stability & also a neater look. If you don’t have a serger you could iron/hem the edges or just stitch them with a zig–zag stitch.Now it’s time for the casing, simply fold the top front & back edges down 1″ & stitch into place.Ready for ruffle time? Cut a strip of coordinating fabric that is twice the width of the base of your dress by 3″Finish the bottom edge of the ruffle if you wish (I ran mine through the serger on a rolled hem stitch) & then ruffle the other edge of the fabric using the ruffling method of your choice. (You can read more in depth ruffling instructions/variations in this pillow post) Take the two short ends of your ruffled piece & stitch them together, right sides together, you should have a ruffled tube at this point. Pin the ruffled edge to the base of your dress with the right sides together, tug & adjust the ruffle so it fits the base of your dress & your ruffles are spaced evenly.Stitch the ruffle to the dress using a serger or zig–zag stitch so it has a bit of stretch. Fold the ruffle down & then topstitch the seam down with a regular stitch. This will just help keep things in place & give it some strength. (it’s done in white thread, click pic to enlarge & squint really hard)For the straps you could just use ribbon or bias tape but I chose to use the same knit pink fabric that I’m using for the bottom ruffle. If the fabric didn’t have that natural knit curl to it then I would’ve sewn a tube with the right sides together, turned it right side out, & used that. But the beauty of super stretchy stuff is it tends to curl in on itself. I simply sliced 2 long pieces that were aprox 1″ x 28″, attached a safety pin to one end so I could thread it through the casing & then once through knotted the ends. Repeat for the back casing & then you can just gather the fabric as much you like & tie in bows on the shoulders! Easy, no?

Inspired? Share the Love...
Share on Facebook
Facebook
Tweet about this on Twitter
Twitter
Pin on Pinterest
Pinterest
Google+
Google+

{ }

Summer PJ Makeover

by Natasha on June 14, 2010 in tutorials

One moldy bathroom & a stomach flu the whole family was taken down with later & today the house is finally back in order enough to get back to blogging. Whew!

This morning’s project was just a quickie but it’s one of those things that afterwards I went, “Huh, why didn’t I do this sooner?”I feel like I spend so much money on pj’s for Samster, constantly changing sizes & then throw in the seasonal change & well, you get the picture. I hated to replace all her long-sleeve 2T cotton footie pj’s since I just bought them so instead I “summerized” them. If you have some scissors & a sewing machine you can do the same.Start off by making 3 cuts (or just two if you only want to make it short-sleeve but keep the footies, I did this to one pair since I know how I get trigger happy with the a/c in my 3rd trimester)

*One at the short sleeve length
*Two cut off the ribbing at the wrist

*Three at the feet right below the zipper

Take your ribbing & re-attach it by stitching the 3 edges together, two from the ribbing & one from the pj. (you can see a bit more detail about attaching ribbing here) I chose to attach mine at the base of the short sleeve when I was leaving on the footies & at the ankle when I took the footies off. Also I should point at that since the pj’s are knit they won’t unravel regardless, you could just cut them off & be done, it just adds a nice finished look to re-attach the ribbing. Below is a pic of the wrist ribbing after being reattached at the ankle.That’s it! 10-minutes worth of work & I’ve got short-sleeve summer cotton pajamas. Nice.

Tonight I’m going to finish up a dress that I’m SO excited to share, it’s a project for a girlfriend’s daughter to wear to her local football games. So stinkin’ cute. Almost as cute as Samster playing fetch with “U-shee” (translation: Lucy)

Inspired? Share the Love...
Share on Facebook
Facebook
Tweet about this on Twitter
Twitter
Pin on Pinterest
Pinterest
Google+
Google+

{ }

Next Entries →
← Previous Entries

greeting

phone pic

LTL button

before after 

buttonbirthday buttonfamily dinner buttonmommy thoughts button

marthabadge1
Photobucket
Photobucket

Tags

beauty before/after birthday party cheater's cooking Christmas costume decorating dinner 101 DIY dress-up easy dinner fashion craft furniture gift ideas hair halloween health chats holiday home home decor instagram jewelry making kid's craft kid fashion lyme mommy blog mommy thoughts naptime crafting party pinbusters pinterest princess recipe review recipes sewing shopping sunday love thrift store finds tips & tricks toddler sewing tutorials valentines video vlog where am I?

Blogroll

  • A Beautiful Mess
  • Cancer Alliance Blog
  • Centsational Girl
  • Coco & Kelley
  • Cotton & Curls
  • Crafterhours
  • Craftiness is not Optional
  • Effortless Style Blog
  • Happy Together
  • Hi Sugarplum
  • Homemade By Jill
  • Honey We're Home
  • How Sweet It Is
  • Hyperbole & a Half
  • iHeart Organizing
  • Kristen F. Davis Designs
  • Lil Blue Boo
  • Little Green Notebook
  • Momastery
  • One Pretty Thing
  • Piccoli Piselli
  • PS- I made this
  • Skirt as Top
  • Smitten Kitchen
  • That's So Michelle
  • The Baking Robot
  • The Daybook
  • The Makerista
  • Victoria Elizabeth Barnes
  • Vintage Revivals
  • Young House Love

WordPress Admin