Little Pink Monsters

  • tutorials
  • Recipes
  • Contact
  • About Me
  • facebook
  • twitter
  • pinterest
  • instagram
  • rss

Bathroom Remodel-Part One

by Natasha on June 9, 2010 in Uncategorized

I’ve got the “nesting/tear everything up/remodel the entire house itch” before this baby comes, & I’ve got it BAD. Now that the playroom’s done I’m on to our master bathroom. It’s not done yet but I just had to give you a little visual update!

Here’s the before:It’s not bad per say but it definitely needed some help…the tiles were literally falling off the walls, the grout is cracked & that vanity is about 10″ too short for my 6’4″ husband.

Here’s a pic of the tile I’ve chosen. This is the display in the tile shop, I loved it so much I decided to copy it exactly.And after the demo today I walked in to find this…And behind the curtain? Ready?Do you know what that big black spot is on the ground??? MOLD! AAAGGHH!!!! I was just telling P that now I feel like every breath I take has invasive mold spores in it. I can’t stand it. We’re having some mold clean up guy come out tomorrow to investigate how far below it goes. I lived in a mold infested apartment before when I was in college, both Parker & I ended up with respiratory issues & didn’t figure out why until I bought a home test mold kit from Home Depot. I am NOT going down that road again, I want guys in big white haz-mat suits to come in & eradicate the stuff. I’m thinking that scene in ET where there all the guys are running in the bubble hallway & breathing through plastic tubes…yep, that’s what I want.

Is it just me or does it scare the crap out of anyone else to think of what might behind the walls?!? Ew!

Inspired? Share the Love...
Share on Facebook
Facebook
Tweet about this on Twitter
Twitter
Pin on Pinterest
Pinterest
Google+
Google+

{ }

DIY Tank Top Bra

by Natasha on June 7, 2010 in tutorials

I couldn’t really think of an appropriate name for this project, “tank top bra” isn’t quite it. I guess it’s more like a layering tank that only covers your boobs? Kind of? Ok, you know when you want to wear a summer dress but you need a little coverage underneath so you layer it over a tank top? But when you do that does it ever drive you crazy that the tank top rides up under your dress? Or it leaves a big fat line under your dress where you tank cuts across your muffin top? *Not that you HAVE a a muffin top but if you DID than maybe it would be a an unflattering place for a tank to cut across…

I’ve always had this problem but with a big ol’ preggers belly it’s worse times 10. I’m constantly tugging at the tank under my dress…that’s where I came up with this little idea…

(I’m not about to model what’s basically a glorified sports bra for ya so my duct tape dress form will have to do…with a tutu of course, just because.)

And under what would otherwise be a “welcome to the boob show dress”….Here’s how I did it. You’re gonna die when you see how easy it is.

You’ll need: 1 tank top, 1 piece of elastic long enough to fit around your rib cage. (mine was 1/2″ wide)First, cut the tank top 13 & 1/2″ from the top. (you can adjust this if your tata’s are particularly large or small…try on the tank if you’d like & just mark where it stops under your bust)Next stitch the two edges of your elastic together, being careful not to twist, so you have one big loop. (stitch several times back & forth to make sure it’s a good hold)

Last step, working from the inside of your tank fold the unfinished edge of your tank up & over the elastic loop & stitch into place. You’re basically creating a casing for the elastic as you go…covering it up & stitching the casing shut. (I used a zig-zag stitch because it’s good for stretch fabric since it has a bit of stretch itself, also be careful not to stretch the tank as you sew otherwise it’ll come out wonky)

THAT’S IT! Seriously, you’re done. I know, right? Pretty darn great.

Inspired? Share the Love...
Share on Facebook
Facebook
Tweet about this on Twitter
Twitter
Pin on Pinterest
Pinterest
Google+
Google+

{ }

Warm Bacon Spinach Salad

by Natasha on June 3, 2010 in dinner 101

Mmmm, this is one of those recipes that every time I make it I always ask myself why the heck I don’t make it more often. Sooo yummy! Last night we had it with grilled chicken breast strips on top, it was heavenly.

This is a Martha Stewart Everyday Food recipe & since I forgot to take a picture of my own I’m snatching hers.Ingredients (serves 4)

  • 1/2 cup pecan halves (I always forget this ingredient, I’m sure it’d be much better with it but if roasting nuts sounds too complicated it’s yummy without it too)
  • 6 slices bacon, cut into 1-inch pieces
  • 1 red onion, halved and thinly sliced (I substitute a chopped yellow onion)
  • 1 pint (2 cups) grape tomatoes
  • 1/3 cup white-wine vinegar
  • 1 tablespoon sugar
  • 2 to 3 bunches (1 1/2 pounds total) flat-leaf spinach, trimmed, cleaned, and dried
  • Coarse salt and ground pepper
  • (Sometimes I like to add thinly sliced mushrooms, just toss them in with the tomato)

Directions

  1. Preheat oven to 350 degrees. Spread pecans on a rimmed baking sheet, and toast in oven until golden and fragrant, 10 to 15 minutes. Set aside.
  2. Meanwhile, in a large skillet over medium heat, cook bacon, stirring occasionally, until browned and crisp, 6 to 8 minutes. Transfer to a paper-towel-lined plate. Pour off all but 3 tablespoons fat from skillet.
  3. Add onion to skillet; cook, stirring occasionally, until crisp-tender, 5 to 7 minutes. Add tomatoes, vinegar, and sugar; simmer until liquid thickens slightly and tomatoes are heated through, 1 to 2 minutes.
  4. Place spinach in a large bowl, and pour hot tomato-onion mixture over; toss quickly to coat and wilt spinach. Season with salt and pepper. Sprinkle with reserved pecans and bacon

Inspired? Share the Love...
Share on Facebook
Facebook
Tweet about this on Twitter
Twitter
Pin on Pinterest
Pinterest
Google+
Google+

{ }

Japanese Taped Walls

by Natasha on June 2, 2010 in tutorials

I absolutely fell in lovvve with this look when Jen did it to her entryway over on Little Green Notebook. (You can see her transformation/instructions here) I’ve had it bookmarked forever so when it came to making over the playroom & I needed to do something below the chairrail this immediately came to mind, a different paint color would’ve been too much going on. It took me two naptimes & besides the tape all I needed was a level & exacto knife. (my kind of project!)

(Sam’s grocery cart worked as a great portable table for holding the tape mid-marking)

So much easier than wallpaper too, I wish I would’ve known about this when I was renter, what a great way to add some color when you can’t paint, huh?

The tape is called Japanese masking tape, it comes in the most beautiful colors, is slightly translucent & won’t leave a sticky residue on your walls. I bought mine from Happy Tape, The color is “water” and I ordered 4 rolls of the 15mm width. That was just enough.Overall I’m very happy with the look but I do have to warn you of a couple things…one, I might be (am definitely) mathematically challenged so I had a hard time figuring out how to measure out the lines to make equal diamonds. In the end it was easiest for me to make small pencil marks that were evenly (& level-y) spaced & then connect the dots with the tape. Although if you look closely some diamonds are a bit off. The wonky ones drive me nuts so I’m sure I’ll eventually redo them but for now they can stay, no one seems to notice but me. Or they’re too nice to say anything. Hmm, that’s actually a good possibility. Also for the first couple of days some of the strips of tape would start to peel off the walls, that was infuriating. But after using a credit card to really smooth them onto the wall they ended up staying put. Overall, thumbs up for masking taped walls. (:

Inspired? Share the Love...
Share on Facebook
Facebook
Tweet about this on Twitter
Twitter
Pin on Pinterest
Pinterest
Google+
Google+

{ }

Painted Frames

by Natasha on June 1, 2010 in tutorials


This is SO my go-to design trick for adding some color to a room.

I bought these plain IKEA frames for $1.99 each, slapped on about 3 coats of basic acrylic paint (also don’t give in if you don’t see the exact color you want, I bought red, orange & white and mixed them until it was the reddish-orange I had in mind), & then a coat of polyurethane spray sealant. That’s it! The pics are what I’m calling “pet portraits”. I wanted to do something fun & Samster is obsessed with our dogs. (P & I kind of are too)A few other places I’ve used colored frames, the spray painted teal frames in my livingroom…And this mod-podged frame in Sam’s room. (I like using fabric on frames as a way to tie a room together, the bookshelf fabric is the same as the valance & the frame is the same as the floating bookshelf)
*They’re all Amy Butler Midwest Modern prints from last season. Here’s the Fresh Poppies Fuchsia Fabric By The Yard
Hmmm, looking at these pics of Samster’s room has made me realize I better get crack-a-lackin on Chum-Chum’s nursery. I’m thinking polka dot walls…hmmm….

Inspired? Share the Love...
Share on Facebook
Facebook
Tweet about this on Twitter
Twitter
Pin on Pinterest
Pinterest
Google+
Google+

{ }

Washing Machine Dyed Curtains

by Natasha on May 31, 2010 in tutorials

I didn’t want to spend any money on new window treatments for the playroom (full makeover pics here) so I decided to be crazy & throw the ivory ones I already had in the washing machine with a pack of teal RIT dye. I followed the directions exactly…But this was about when I started to panic, watching that teal dye start swishing around my washing machine…what have I done?!!But then, beautiful!The only downside is I didn’t really look into what my panels were made of & the lining behind the linen (? at least it looks like linen, they’re cheapo JcPenney panels so who knows, could be polyester blend) panel shrunk more than the front. I think the lining was cotton. But you really can’t tell unless you tried to lay them out, they’d lay a bit wonky. Overall I say thumbs up to washing machine dyeing. Don’t be scurred. Just follow the directions exactly, take a deep breath and go for it. Your machine will not be dyed teal, it all washes out. At least for me it did. (THANK GOODNESS! P would’ve KILLED me!)

Inspired? Share the Love...
Share on Facebook
Facebook
Tweet about this on Twitter
Twitter
Pin on Pinterest
Pinterest
Google+
Google+

{ }

Dining Room to Playroom Makeover!

by Natasha on May 27, 2010 in tutorials

Here’s the before…ready for this? Brace yourself, it’s UGLY.And now…Before, ugly RED dining/junk room…After! Welcome to Samster’s new playroom! I love the aqua & orange combo…soothing but fun.One wall has a bookshelf (I’ll show you the makeover of it later in the week, it was just an old basic honey colored bookshelf from P’s college days before) Now it’s the same watered down ‘Aviary Blue’ as the ceiling. (Sherwin-Williams paint) The walls below the chairrail are done with a japanese masking tape tutorial from LGN, I’ll also tell you about that in another post this week…And on the other side of the old “dining” room was what I guess you’re supposed to use as a formal livingroom? We’re not very formal people so it was more of a holding space for extra random furniture…
And now it’s a dining room! One you can actually EAT in, what a concept huh? Only took me almost 4 years to do…Someone asked me for a close up of what I have on the table…just some random knick-knacks on a wicker tray…I’ll tell you more about the details of the room like the picture frames on the wall I painted, dyed curtain panels, taped walls & painted furniture but right now I have to go pack. Samster & I are off to the Florida with my family for the holiday weekend. It’ll be my last chance to get out of town before the 3rd trimester officially begins!

Inspired? Share the Love...
Share on Facebook
Facebook
Tweet about this on Twitter
Twitter
Pin on Pinterest
Pinterest
Google+
Google+

{ }

Goldfish Portrait

by Natasha on May 26, 2010 in tutorials

Remember the goldfish painting I was working on a few days (ugh, a week and a half) ago?

Here’s the picture I was working from…And the finished product (I think)I might have to tweak it a bit more but for now it’s hung & that means my playroom IS DONE! Tomorrow I’ll take some pics & finally show you my before & after big reveal. I’ve only been teasing you about it for what, 3 weeks?

Also sorry the blog is a bit slow this week (I feel like I’m saying that a lot lately…) I have my family in town from Florida so we’re doing the D.C. stuff every day & not a lot of time for crafting. Next week though, next week, that’ll be the week I get back on track! (fist shaking in air!)

Inspired? Share the Love...
Share on Facebook
Facebook
Tweet about this on Twitter
Twitter
Pin on Pinterest
Pinterest
Google+
Google+

{ }

Knockoff Pottery Barn

by Natasha on May 20, 2010 in Uncategorized

We’ve been married for 3 years. For the entire length of our marriage we’ve had a dining room with a table & no chairs.

It’s because awhile back I found an awesome deal on our huge table but didn’t quite think it through that such a big table would require a future purchase of 8 chairs. I also didn’t realize that chairs is how they getcha, they’re expensive! Although anything times 8 is going to be expensive…besides tampons I suppose.

Anyways, that’s why I’ve had the table but no chairs for so long.

Until now…

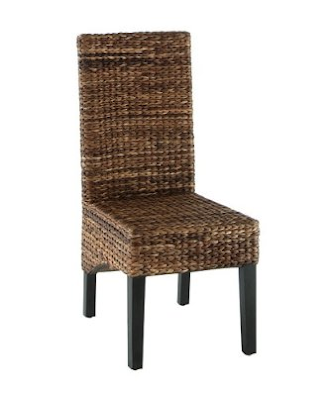
I really loved these Seagrass ones from Pottery Barn but at that price it just wasn’t gonna happen.So you can imagine my excitement when I found THESE from Target for less than $100 each!!!They look the EXACT same! Although in reality the Target one is even better because it’ll be a nice blending piece between my honey colored wood floors & our dark stained table. HOORAY!!!
They also shipped in only 2 days which is totally awesome considering my entire family is coming to visit this weekend.

So here’s my new DINING ROOM, I can say that now because we can actually DINE in it!

(sorry for the crappy picture, can you tell I still haven’t found a replacement charger for my camera? ugh.)

Also take a look at this other dramatic makeover of the day…

BEFORE

And then a visit from the mobile dog groomer, which by the way is the BEST INVENTION EVER when you’re a big ‘ol pregnant lady with a 2 yr old.

AFTER

Yes, Parker may look like some sort of mutant squirrel & Lucy’s belly jowels are completely exposed but they are SO much happier when they get their summer shavedown! And so is my house, bye bye dog hair tumbleweeds…

It was a good day.

Inspired? Share the Love...
Share on Facebook
Facebook
Tweet about this on Twitter
Twitter
Pin on Pinterest
Pinterest
Google+
Google+

{ }

Lite Ranch Dressing Recipe

by Natasha on May 18, 2010 in dinner 101

You are SO gonna love me for this one…We love ranch dressing in our house, it’s by far both P’s & my favorite. Problem is it’s so bad for you, I mean it’s like 90% mayo & buttermilk…not exactly figure flattering. And I don’t know about you but every “lite” ranch I buy taste like watered down crap. I’ve tried making it from scratch too but there’s so many herbs & seasonings…not quite practical for my life lately. That’s why I was so excited to figure out this recipe, and my favorite part? You only need three ingredients. Yep, 3!

-Hidden Valley Ranch seasoning packet or jar
-2% greek yogurt
-lowfat milk

Mix about 1 cu of yogurt to 1 tbs of seasoning mix, (add more seasoning to your desired ranchiness) thin with milk to get desired texture…I thinned it out for salad dressing & left it thick for a veggie dip. It’ll keep in the fridge up until the yogurt’s expiration date.

You could also use lowfat sour cream instead of yogurt if you like but the yogurt is so much better for you…greek yogurt pretty much taste like nothing too. And one serving is packed full of protein.

So there’s my tip just for you…hope you like it as much as I do! Is it sad that I get this excited about salad dressing?

Inspired? Share the Love...
Share on Facebook
Facebook
Tweet about this on Twitter
Twitter
Pin on Pinterest
Pinterest
Google+
Google+

{ }

Next Entries →
← Previous Entries

greeting

phone pic

LTL button

before after 

buttonbirthday buttonfamily dinner buttonmommy thoughts button

marthabadge1
Photobucket
Photobucket

Tags

beauty before/after birthday party cheater's cooking Christmas costume decorating dinner 101 DIY dress-up easy dinner fashion craft furniture gift ideas hair halloween health chats holiday home home decor instagram jewelry making kid's craft kid fashion lyme mommy blog mommy thoughts naptime crafting party pinbusters pinterest princess recipe review recipes sewing shopping sunday love thrift store finds tips & tricks toddler sewing tutorials valentines video vlog where am I?

Blogroll

  • A Beautiful Mess
  • Cancer Alliance Blog
  • Centsational Girl
  • Coco & Kelley
  • Cotton & Curls
  • Crafterhours
  • Craftiness is not Optional
  • Effortless Style Blog
  • Happy Together
  • Hi Sugarplum
  • Homemade By Jill
  • Honey We're Home
  • How Sweet It Is
  • Hyperbole & a Half
  • iHeart Organizing
  • Kristen F. Davis Designs
  • Lil Blue Boo
  • Little Green Notebook
  • Momastery
  • One Pretty Thing
  • Piccoli Piselli
  • PS- I made this
  • Skirt as Top
  • Smitten Kitchen
  • That's So Michelle
  • The Baking Robot
  • The Daybook
  • The Makerista
  • Victoria Elizabeth Barnes
  • Vintage Revivals
  • Young House Love

WordPress Admin