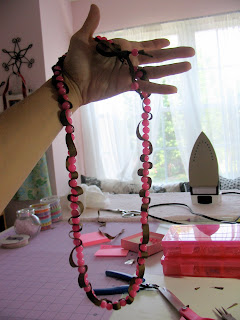
I saw a necklace in Jcrew the other day that looked like it had ribbon woven in & out of the strand of beads, it must only be available in certain stores because I can’t find a picture online, regardless, my “oh I can make that” syndrome kicked in & I came home with a mission to make a DIY knock-off…here it is!
You’ll need:
-Beads of your choice, just make sure they have a decent size opening for threading the ribbon through
-Stringing line (fishing line)
-3/8″ ribbon (I used 89″ of both ribbon and line, it’s a lot to work with but you won’t run out)
-clasp (2 pieces)
–crimp bead
Start off by taking your line and stringing a crimp bead and then one of your clasp ends, fold string over and then thread back through crimp bead. Crimp bead to secure.
*If you’ve never used crimps before they’re a really basic, easy way to secure the beginning and end of strung jewelry pieces. Here are some good directions for using crimps. You could also knot the line but I think that’s a big pain and this way will hold up better longterm.
Next take your piece of line and thread a needle onto the other end, pull the thread through and double it over a couple of inches, you’re not going to knot this, you’ll just hold it as you work so it doesn’t slip back through the needle. Like this:Start by threading the needle through your ribbon around 6″ in, then string a few beads on the line, next you’ll put your needle back through the ribbon but place your needle a little further distance than the width of the beads you just threaded. Basically you’re making the ribbon pucker around the beads, it’s hard to describe but try and you’ll see what I mean.
Continue in this manner, alternating between string beads and threading your needle through the ribbon until you get the desired length. Also for my design I randomly switched between groups of one, two and three beads between the ribbon, I think it gives it a really natural flowing feel.
 End with the needle through the ribbon and then take the string through the other end of your clasp. Pull back through ribbon and a few of your beads like this:
(Sorry the pics aren’t great, jewelry crafts are really hard to photograph!) Secure string by tying it through bead, this is called making a “stop bead”. Here are some more detailed directions for that technique.
Finally take each 6″ tail of ribbon and string a bead on the ribbon, my technique for doing this is to trim the ribbon into a point, heal seal the edges with a lighter and then it’s easy to pull the bead through. Knot ribbon on outside of each bead to secure. Ta-da!


I love this one! I'm so going to make this… I'll send pic's when I do!
p.s. Sorry about your poop catastrophe, that sounds horrific! Poor Sam, hope she feels better.
So crafty! I need to get my DYI projects going I feel like I just start them and don't finish but very nice!
This is soo cute. I would love to a good pic of the end with the clasp.
I have featured this in my blog:
http://diyjenellstyle.blogspot.com/
I'm all about a J.Crew knock off! Sweet.
LOVE IT!!!!! I am going to try to make this before Monday! I will send pictures if I do!
LOVE IT!!!!! I am going to try to make this before Monday! I will send pictures if I do!
I made mine today. I am going to email you pictures.
I made mine today. I am going to email you pictures.
SO wonderful. Great tutorial!
viagra online
generic viagra