
I know I usually set my crafting cross hairs on Crewcuts when I want to do a knock-off project but today I’m going for American Apparel. I just love their designs & soft knits for kids but hate putting money in their d-bag CEO‘s pocket. This was originally a post I did for Crafterhours Skirt Week but it was the same week as the new site launch so I’m just now getting it up on Pink Monster. Boo on me, I know, I know.
 First step is to write up a quick pattern. The only thing about this project that could be construed as even slightly difficult is figuring out the measurements. It involves a bit of math but don’t worry, I’m allergic to math so I promise to keep it super slowww & simple.
(Also note that I did not add any seam allowance in my measurements, since the knit has such stretch I wanted it a smidge snug)
The idea is to draw a pattern that is a perfect 1/4 of a circle with the inner circle being 1/4 of your child’s waist measurement. (eh? keep reading, it’ll make sense) To find that magic number you need to figure out what the radius is of a __ circle (blank being your waist measurement, mine was 20″) That involves Pi which is already making my nose tickle so I just google it. Seriously. I typed in “what is the radius of circle who’s circumference (total measurement around the circle) is 20 & guess what, some math website tells me it’s 3.18!
On my pattern paper I drew two 3.18″ lines (see step 1 below), then continued to draw more 3.18″ lines so that I could easily connect the lines & have a nice curved edge. (step 2) This little arc is going to be the inner curve of our pattern. Next decide what you want the length of the skirt to be, I chose 9”. Stemming out from your little arc draw several 9″ lines. Connect these edges, cut out your inner arc & congratulations, you’ve got yourself a pattern.
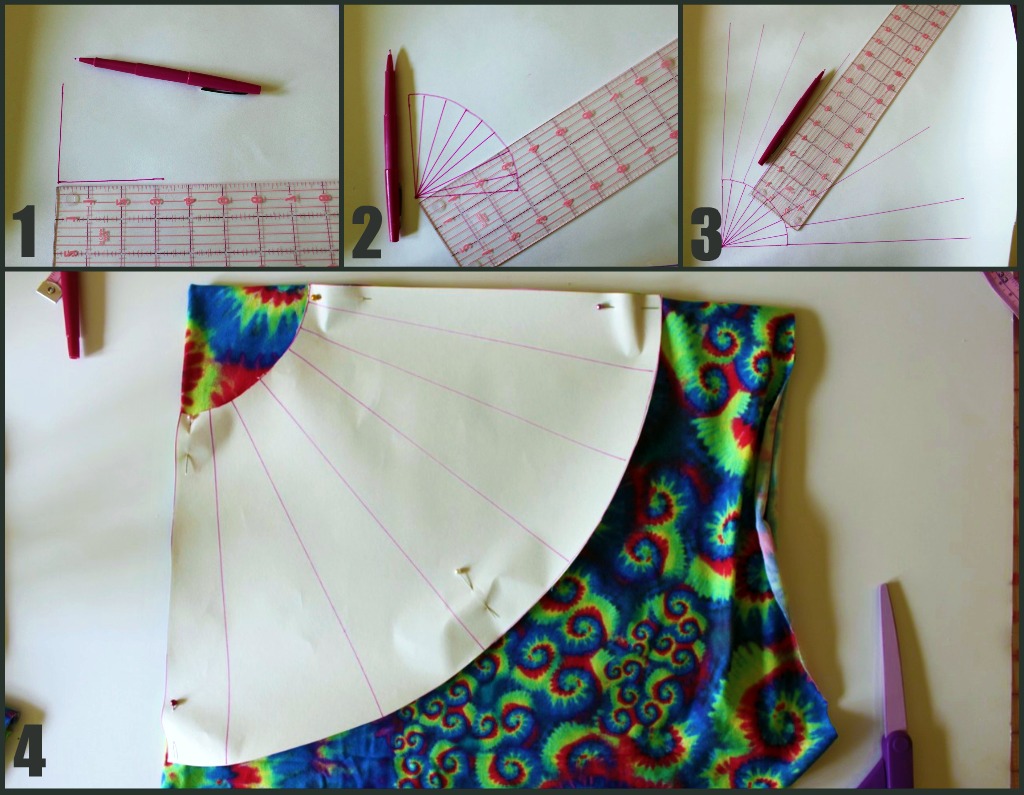 For Step 4 I took a large square of fabric (32″ square in my case) & folded it into equal quarters. I pinned my pattern on top & cut along the curved edged of my pattern. (ONLY the curved edges! You need the folds of the straight edges for this to open up to one large circle)
Now for the waistband. I usually use a foldover waistband for making baby yoga pants but lately I’m really loving it for skirts. And it’s SO SO simple.
Start with a rectangle of fabric folded in half, cut to your waist size (20″) by 4″. Unfold & sew the short ends together. Fold this tube in half & you’ve got your waistband.
 Fold down the waistband again (now it’s a 2″ waistband) & you’re set!
You could finish off the hemline but knit doesn’t fray & I kind of feel like a hem would weigh down the twirl & therefore utter awesomeness of this skirt.
Next post I have to confess something to you. I’ve been lying to you & the jig is up…


I just finished one. They are so cute, twirly, super easy, and didn’t take a lot of time at all! My daughter will be getting quite a bit of these for school. Love it! 🙂
I love making these simple circle skirts. My daughter has been living in them this summer.
LOVE these. Thank you so much. My girls are going to be twirling in these the rest of the year.
Excuse me, but I’m all new to this wanting to be domestic since you have inspired me to do so, but what do you mean when you say “pattern”. I’m confused bec when I read that, the tie die pattern is what I am thinking. Sorry for such a noob question. Im dying to make a skirt for my little one!
Hey you gotta learn somewhere right?! By pattern I’m referring to the piece of paper cutout that you follow to cut out your fabric. It’s the basic shape(s) you’ll need to assemble your piece, kind of like a blueprint. Does that help?
Ohhh!!! VERY MUCH SO! After reading your definition and going back to reading the steps, its much easier to understand!! Thank you so much!! I am also totally digging foldover anythings for little girls!!
Thanks again!
Thank you! I LOVE that this skirt has no extra elastic for me to buy and sew – I can make it with just the things I have here! This is on the top of my list for tomorrow.
I have the same serger :). I love it!
LOVE LOVE LOVE. I made two of these in 20 min. My daughter LOVES them too! Thank you so much for this!
This skirt is so awesome! I finished one right now and I’m really happy with it. I didn’t understand the bit with the waistband all through, but I improvised a little bit and it became gorgeous! Tomorrow I’ll wear it for school. Thanks a lot! Loulou
Thanks so much for the easy tutorial! I made one for my neice and its so cute. I made a bow with the scrap fabric and added it to the waist band for a little flair. It is so cute and easy. Even better, i made it out of an old dress i don’t wear anymore. To get the fabric right i made it a bit shorter than yours but still just as cute!
I don’t get the waist band, for it to be three layers to sew through you need to sew the waisteband in half to sew it onto the skirt. If you start with 4″ then you get 2″ once attached. If you then fold it over you get 1″. If you sew it on without folding it first don’t you have a raw edge. I don’t get it. I think I would cut the pattern piece 8″ wide and then folded over twice it is a 2″ waistband. Am I missing something?